Creating a project
Creating an Apartment Layout
How to switch to Room Layout
To render an interior design, you first need to create a room layout.
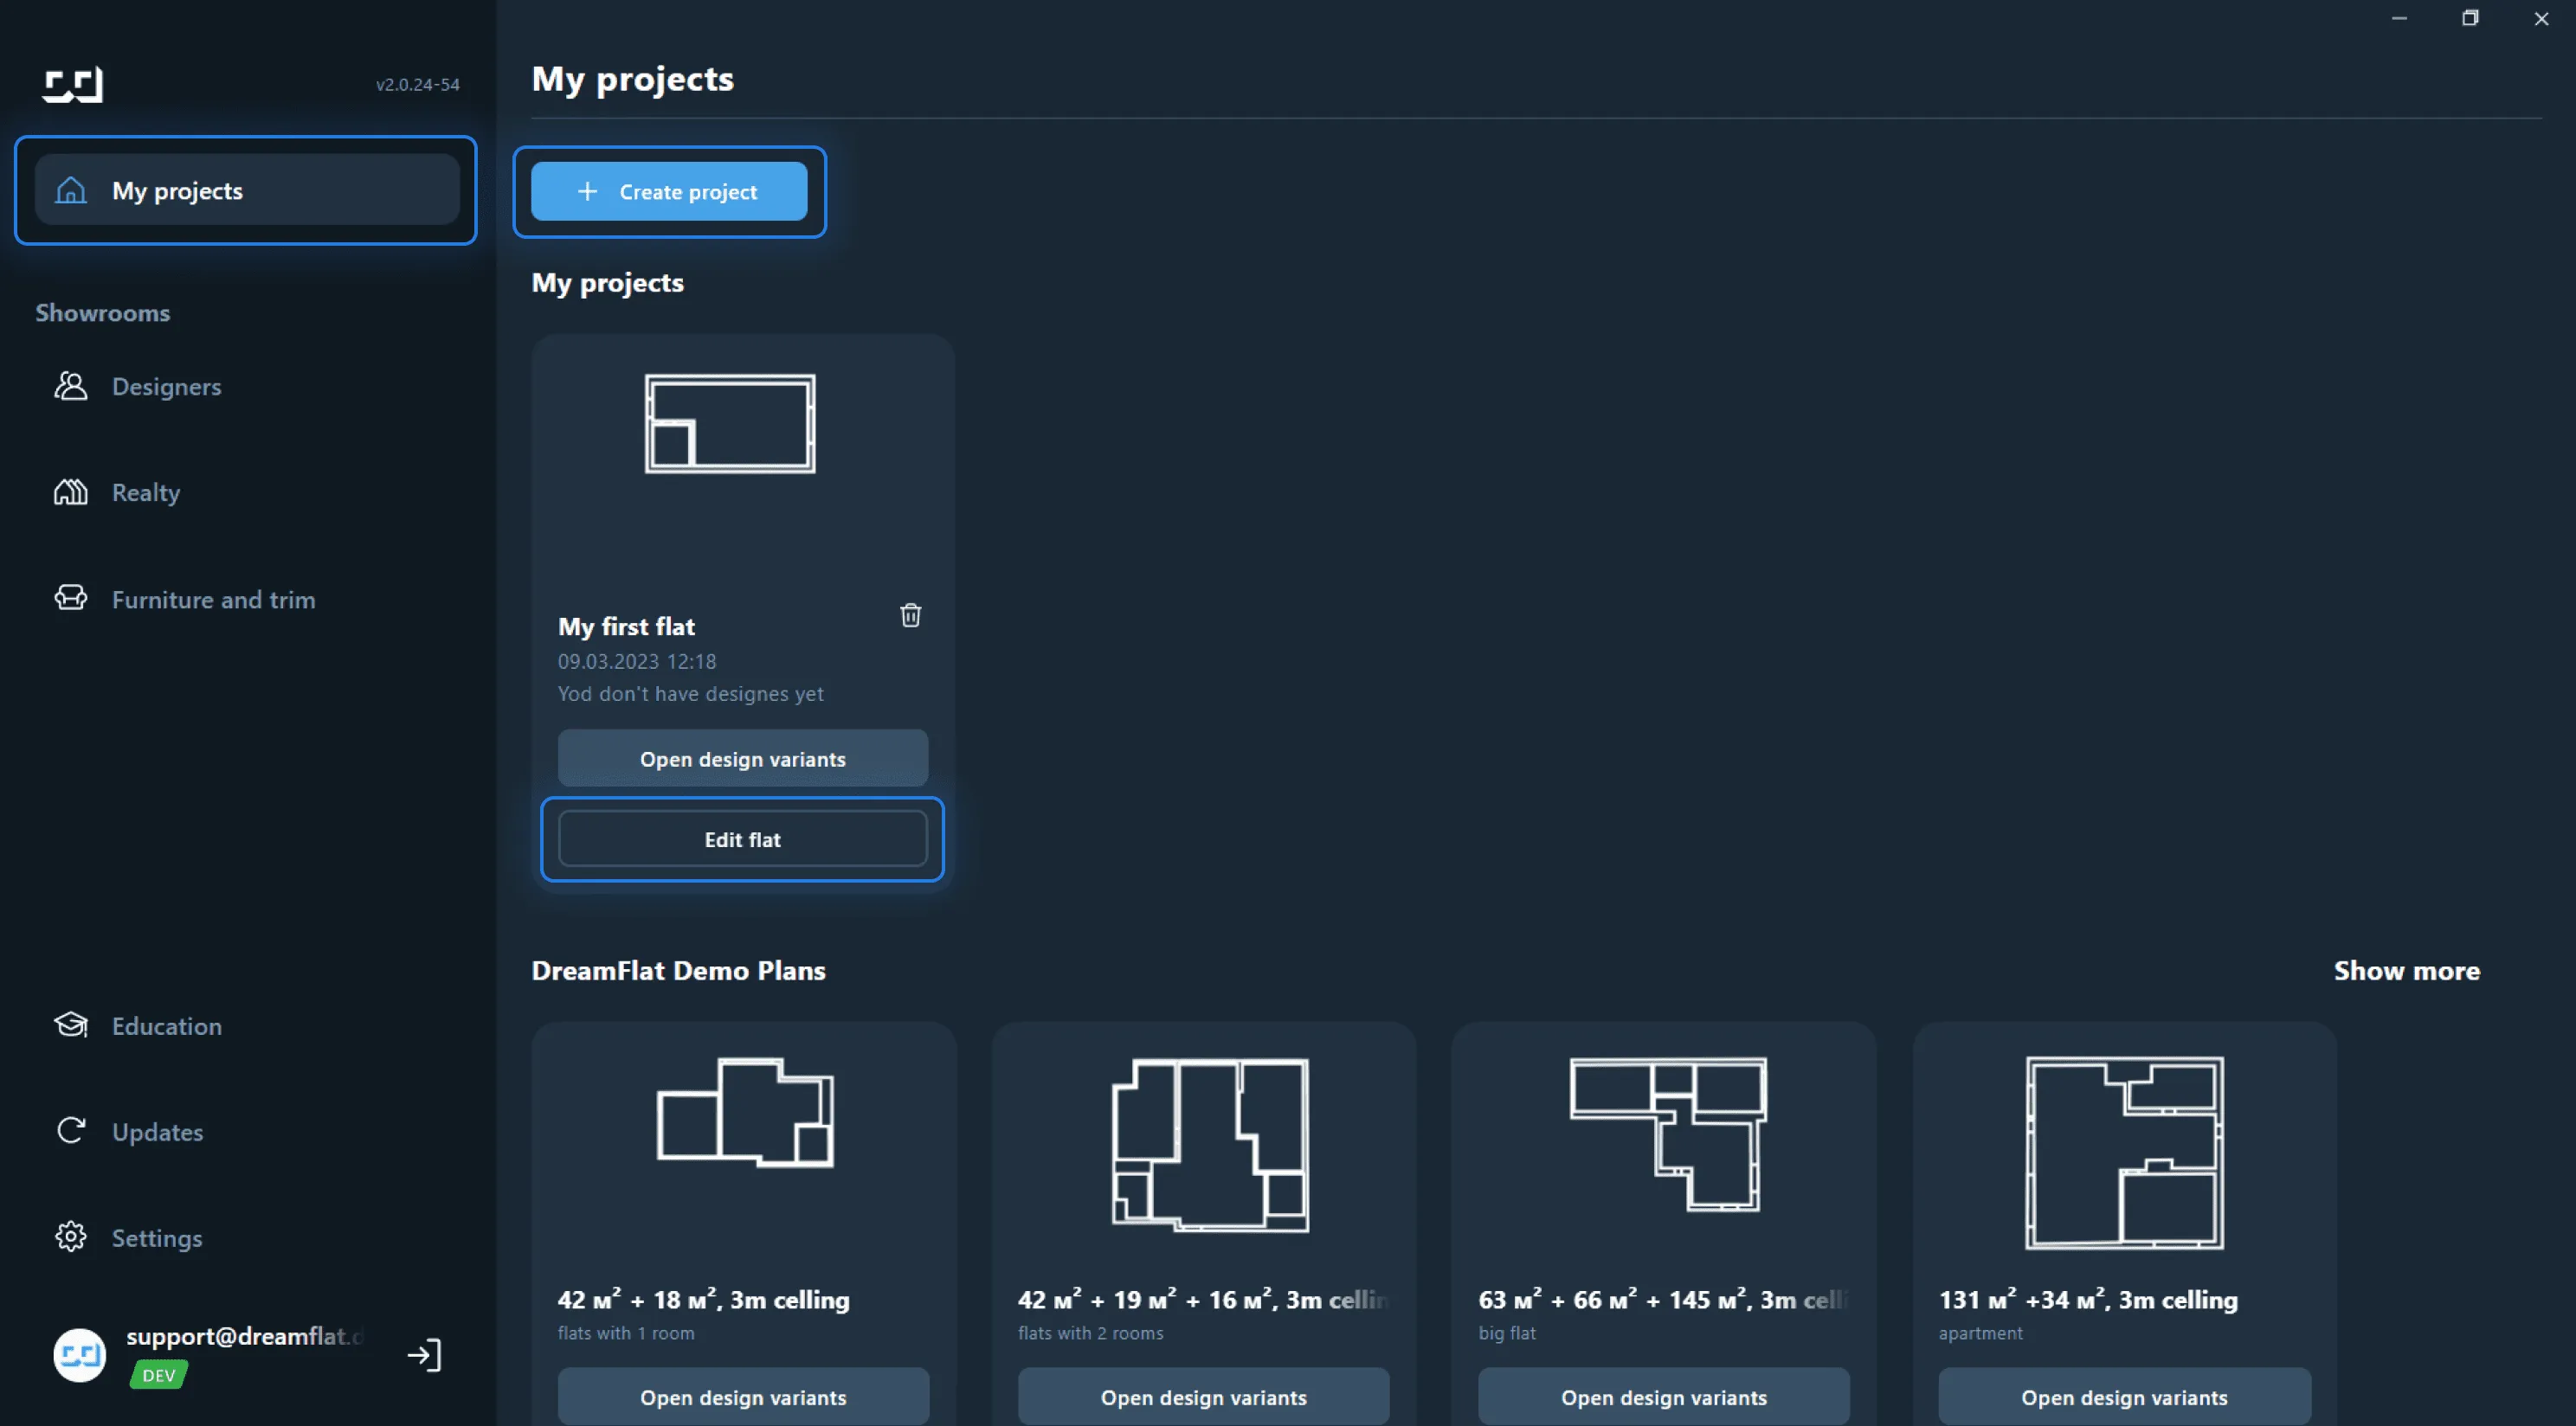
To do this, go to the "My Projects" section on the main screen → Click "Create a project".
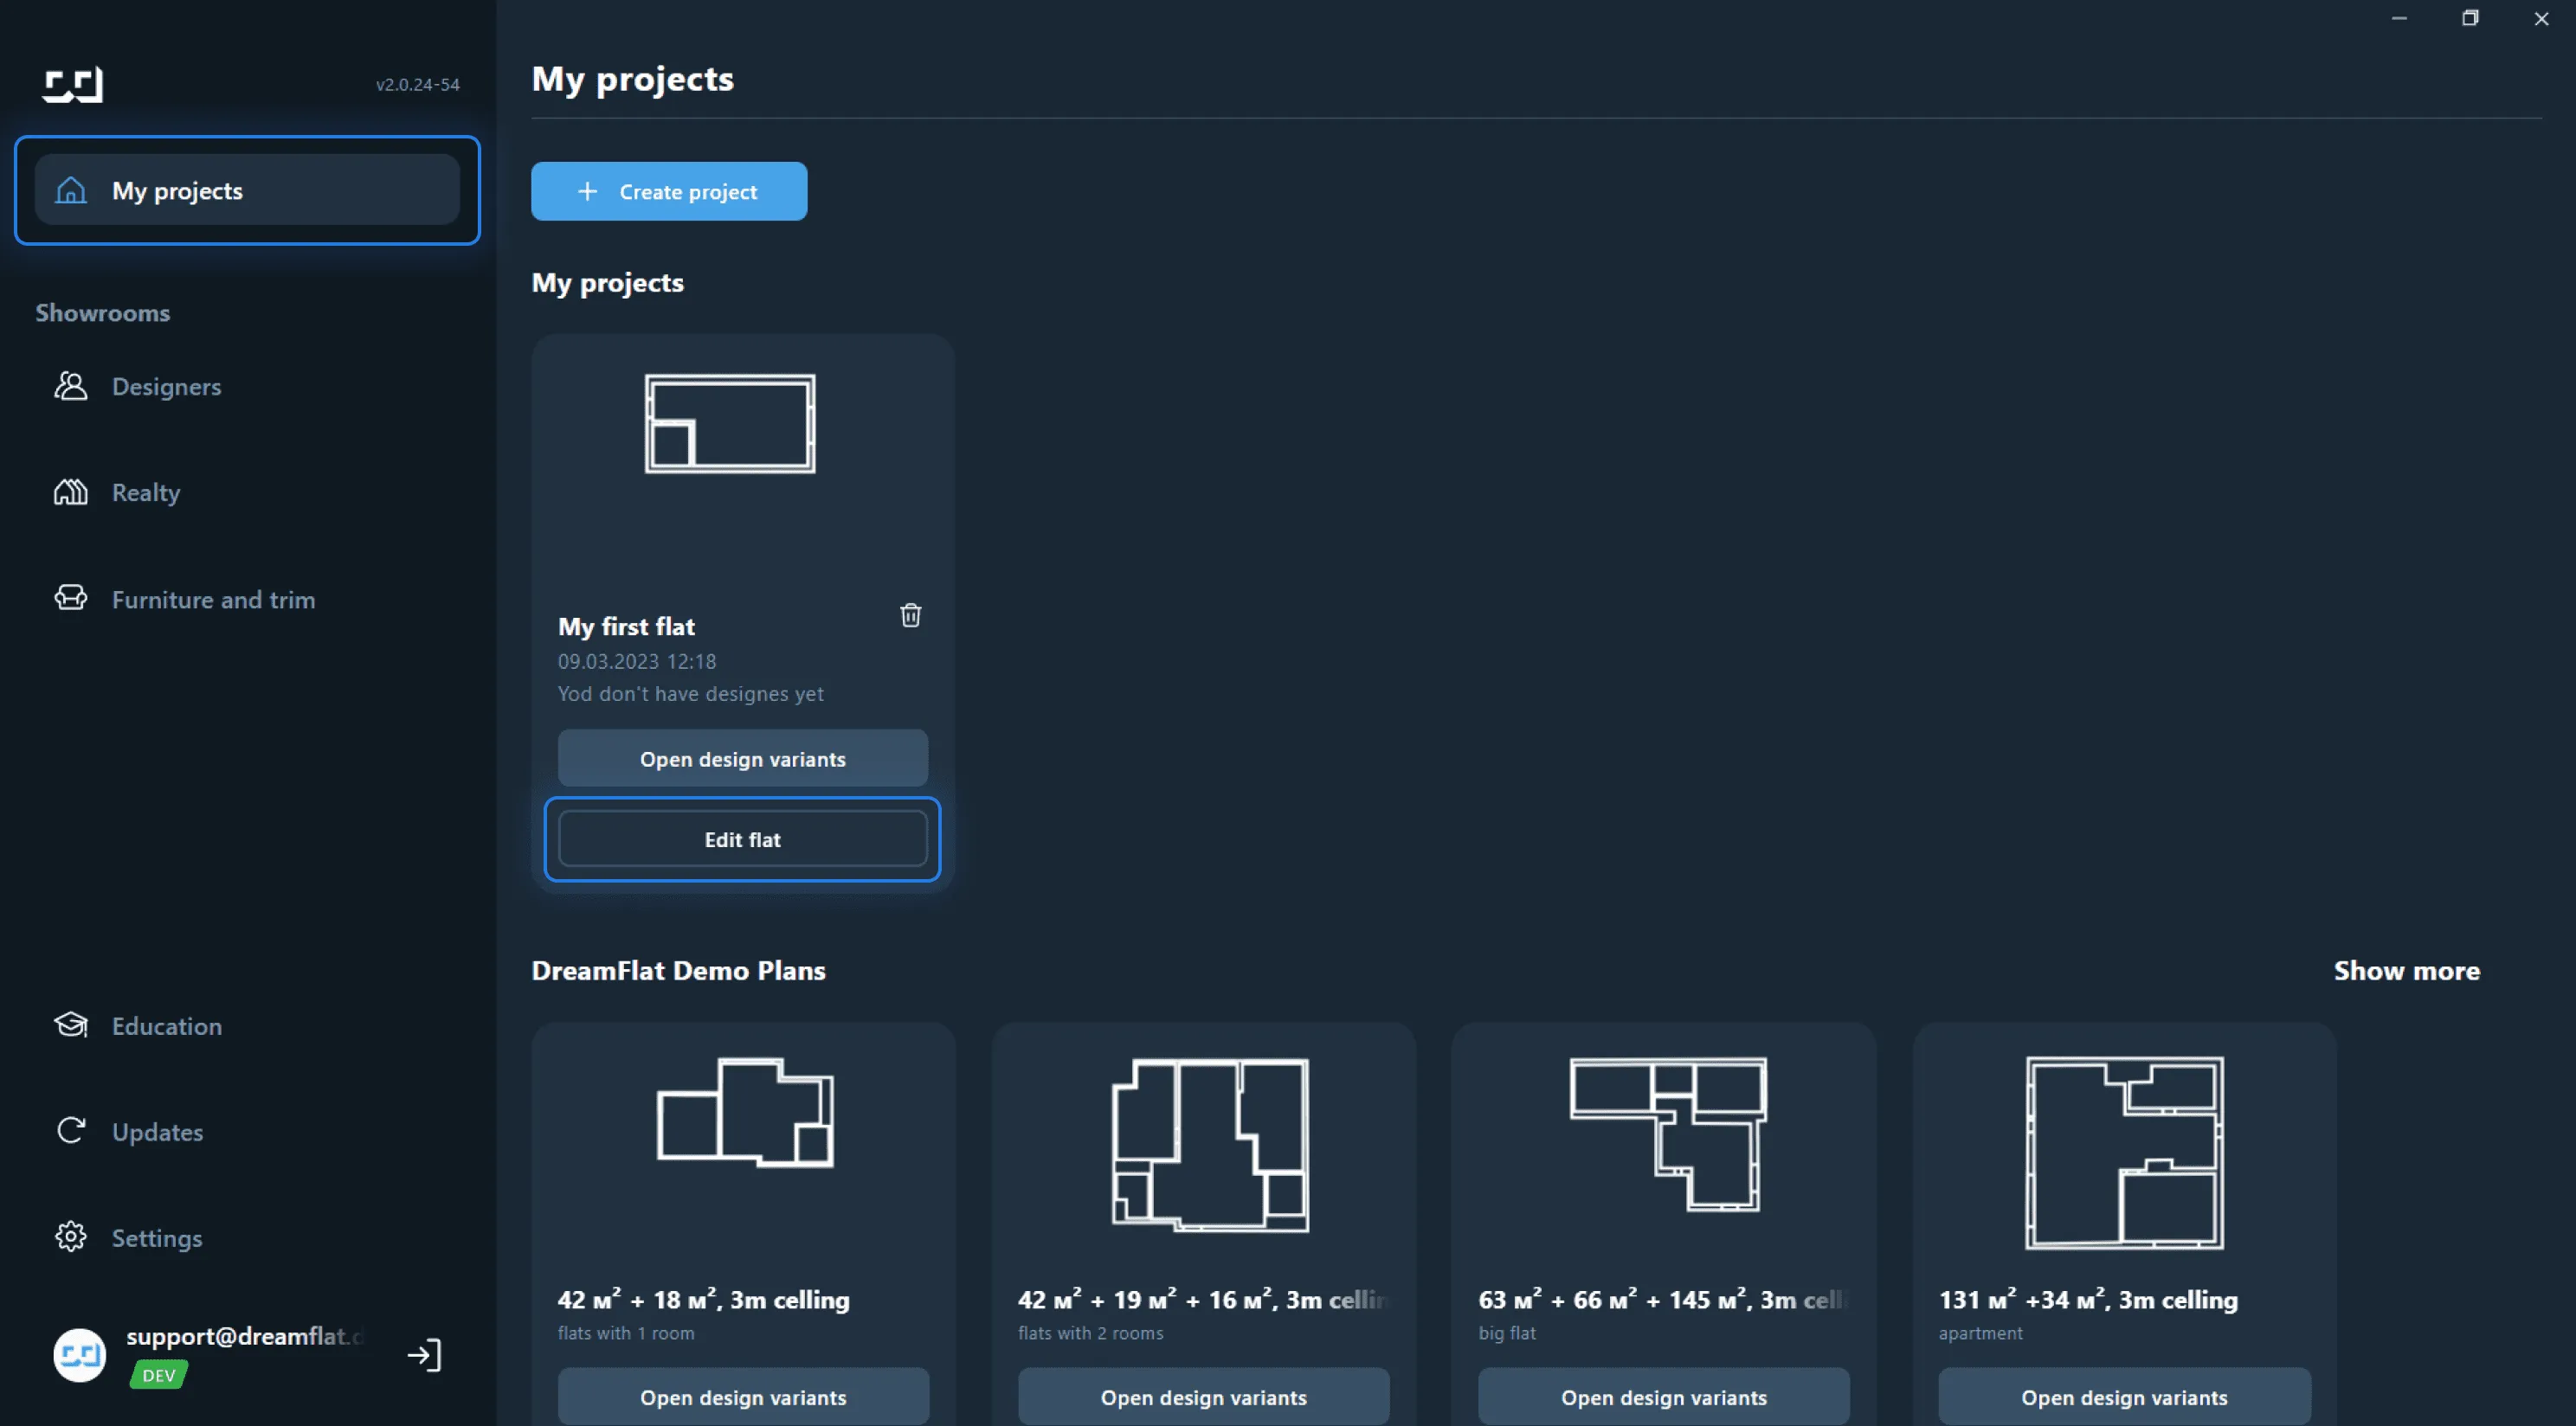
If you have previously created a project that you want to work with, go to the "My Projects" section → Click "Edit layout".
Menu
Creating a Room Layout
You can start working on a room layout from a blank sheet or you can load your own drawing as a background reference for a more accurate and convenient layout.
Uploading Your Background Reference
To add your drawing to the workspace click the Upload the Background Reference icon in the top menu → Upload .jpg or .png.
Scaling the Background Reference
To scale the layout background reference, first, click on the background reference → In the right menu select Edit Anchor Position → Match the edge points of a segment of a specific length to any object the size of which is specified → Click on Rescale → Click and hold the edge point of the segment and pull it until it fits the desired scale or set your value in Resize in the right dialogue box.
Creating a Layout and Precise Drawing
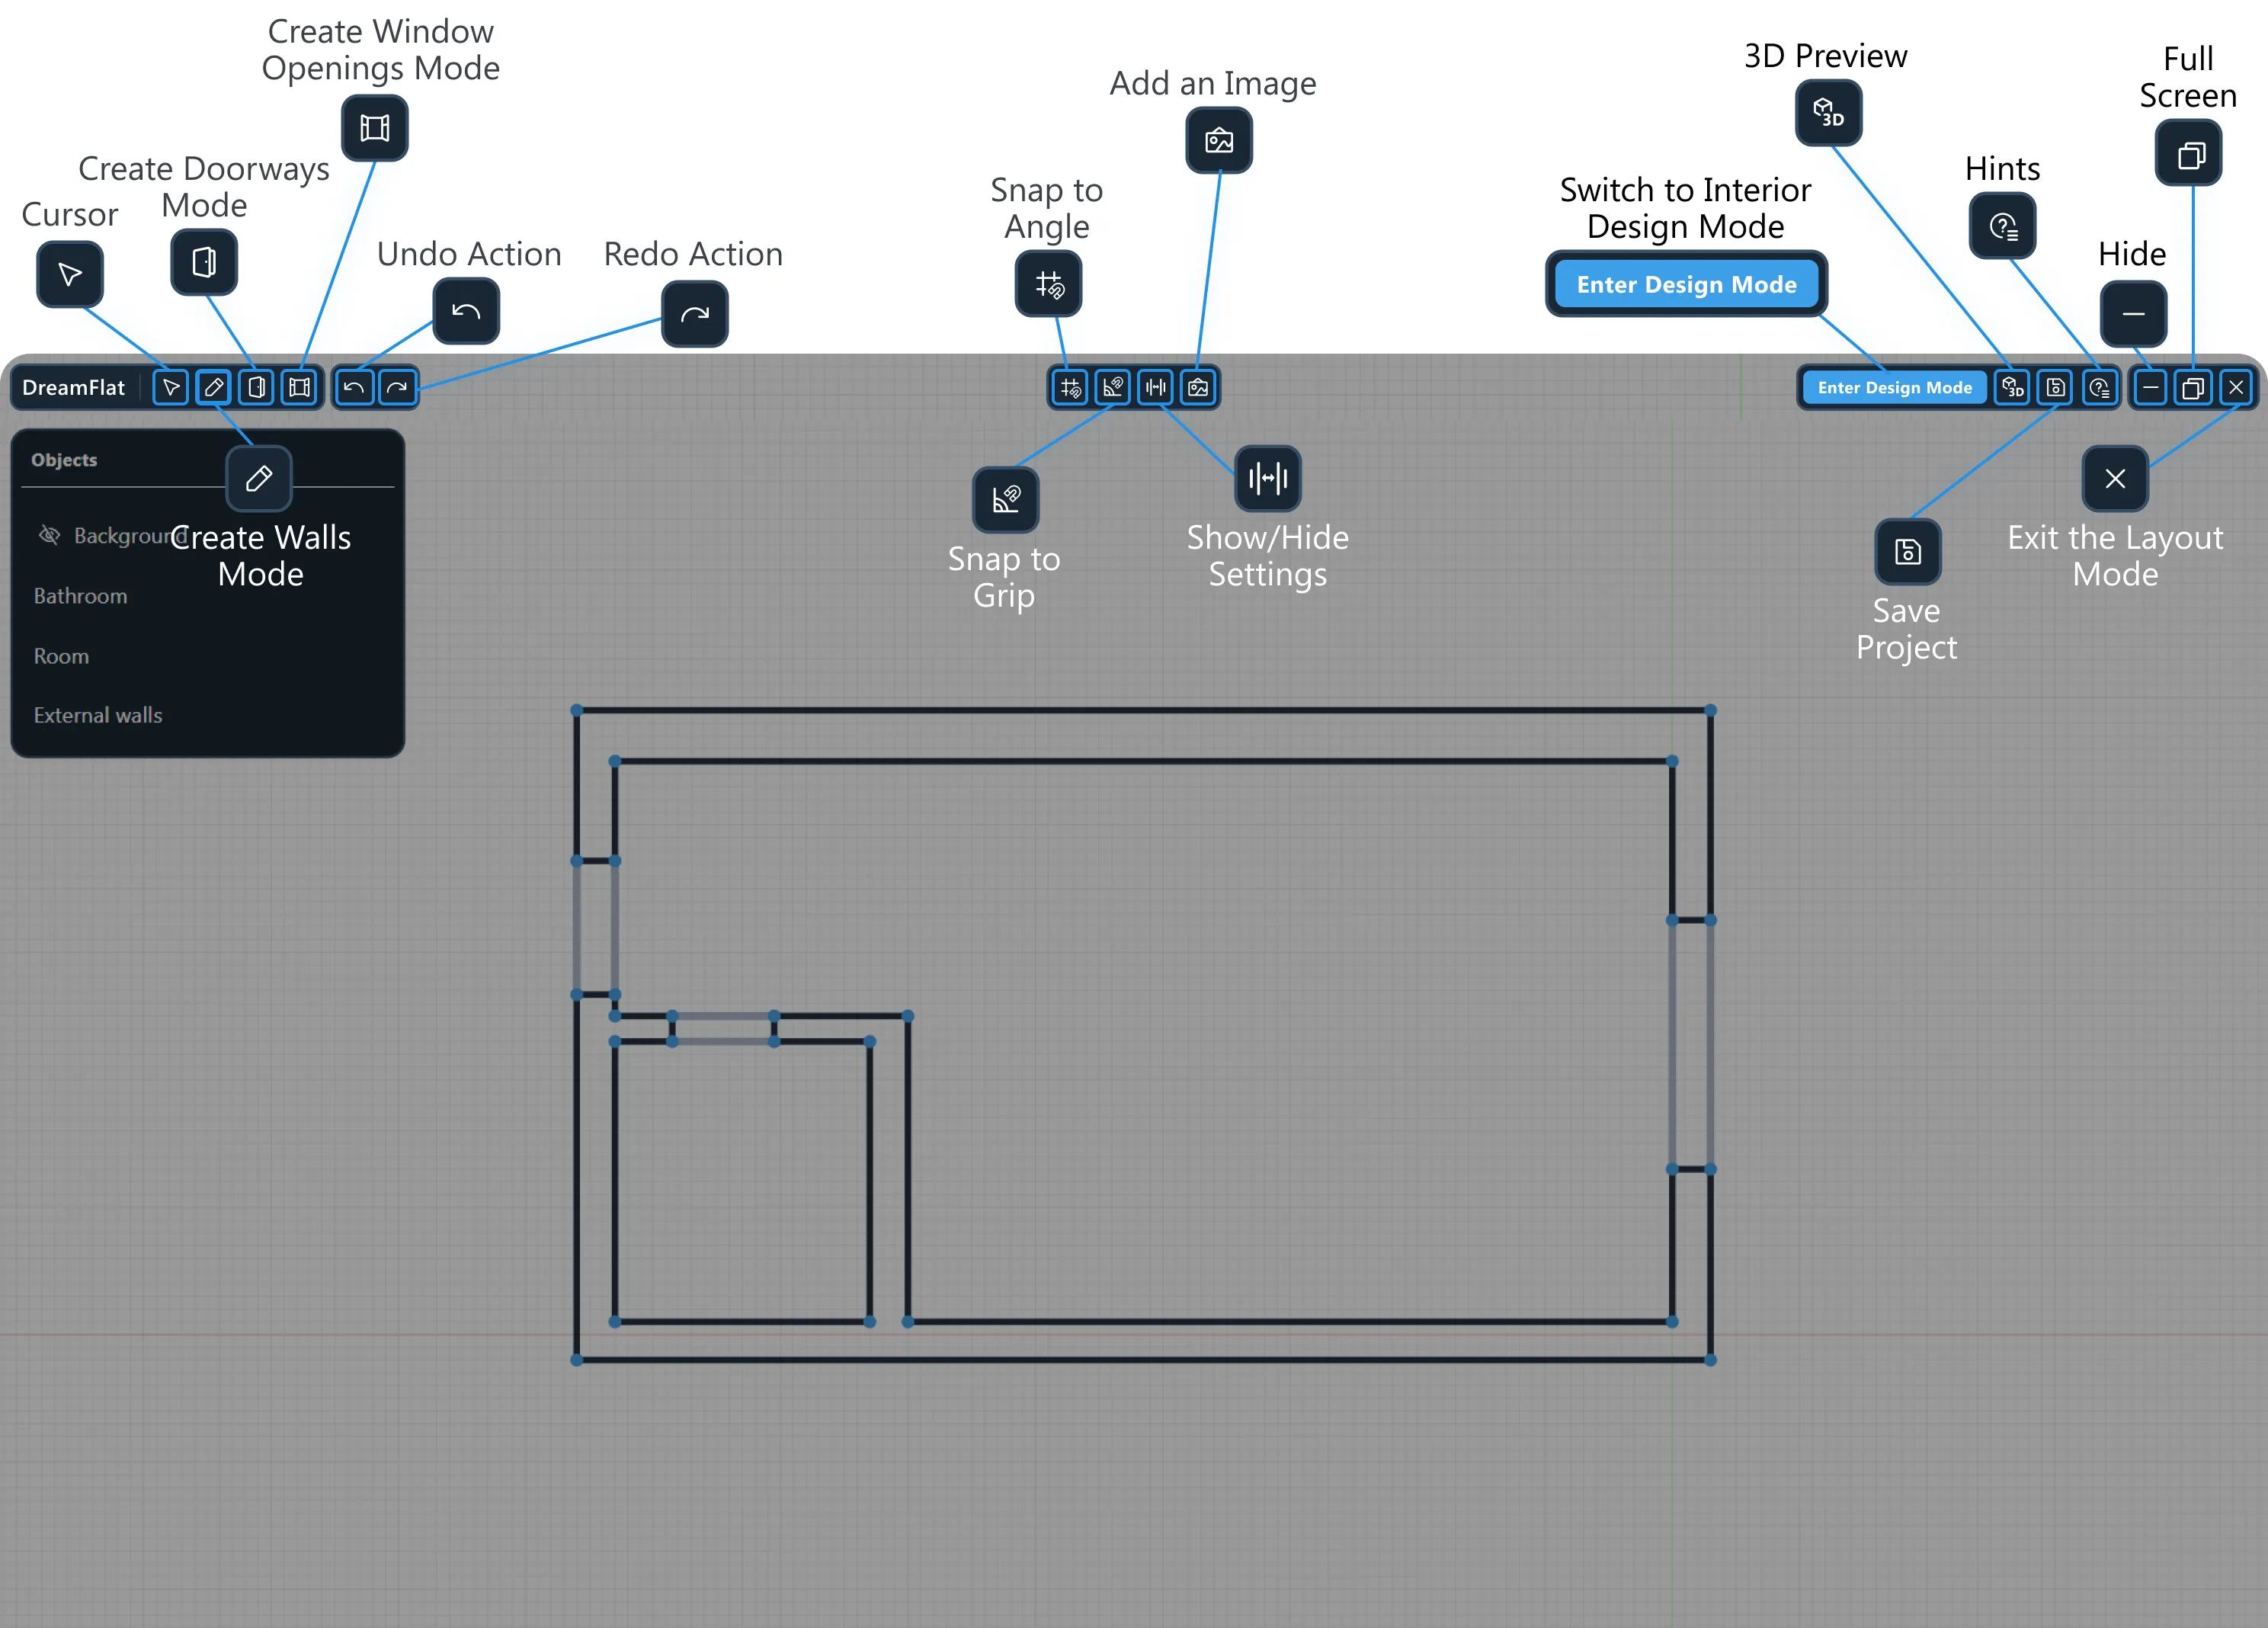
To create a room layout, select Create a Room from the top menu.
You can use Ruler Guides, Snap to Angle, and Show Options menu for precise and easy drawing. By using Ruler Guides, you can create a layout with a geometrical precision. Snap to Angle allows you to draw a room plan with 90° and 45° angles. The Show Options function will show the object width, length, and height.
Create the apartment layout step by step:
1. Draw the inner outline of each room.
2. Draw the general outer outlines of the room.
To delete the necessary outlines of the room, select the outline and press Delete or click on the trash icon in the left menu. To delete a point, right-click on it and press Delete.,
3. Set the ceiling height. To do this, select a room in the object menu on the left → Set the required wall height in Room Settings on the right. The wall height will be set for all rooms at once.
Create Doorways Mode
To create doorways, select the Create Doorways mode from the top menu → Click on the outer or inner outline in the area where you want to place the door.
The door will be created automatically.
To set the width of the doorway, drag the dots on the door edges. You can also set the distance from the corner, width and height of the opening, and the door height from the floor in the Doorway Options on the right.
To delete the created doors, select the door and press Delete on your keyboard. Or select the door and click on the Recycle Bin icon in the Doorway Options menu on the right.
Create Window Openings Mode
To create window openings, first, select the Create Window Openings mode from the top menu → Click on the outer or inner outline in the area where you want to place the window.
The window will be created automatically.
To set the width of the opening, drag the dots on the window edges. You can also set the distance from the corner, width and height of the opening, and the window height from the floor in the Window Opening Options on the right.
To delete the created windows, select Undo Actionfrom the menu or click on the window and press Delete on your keyboard.
3D Preview Mode
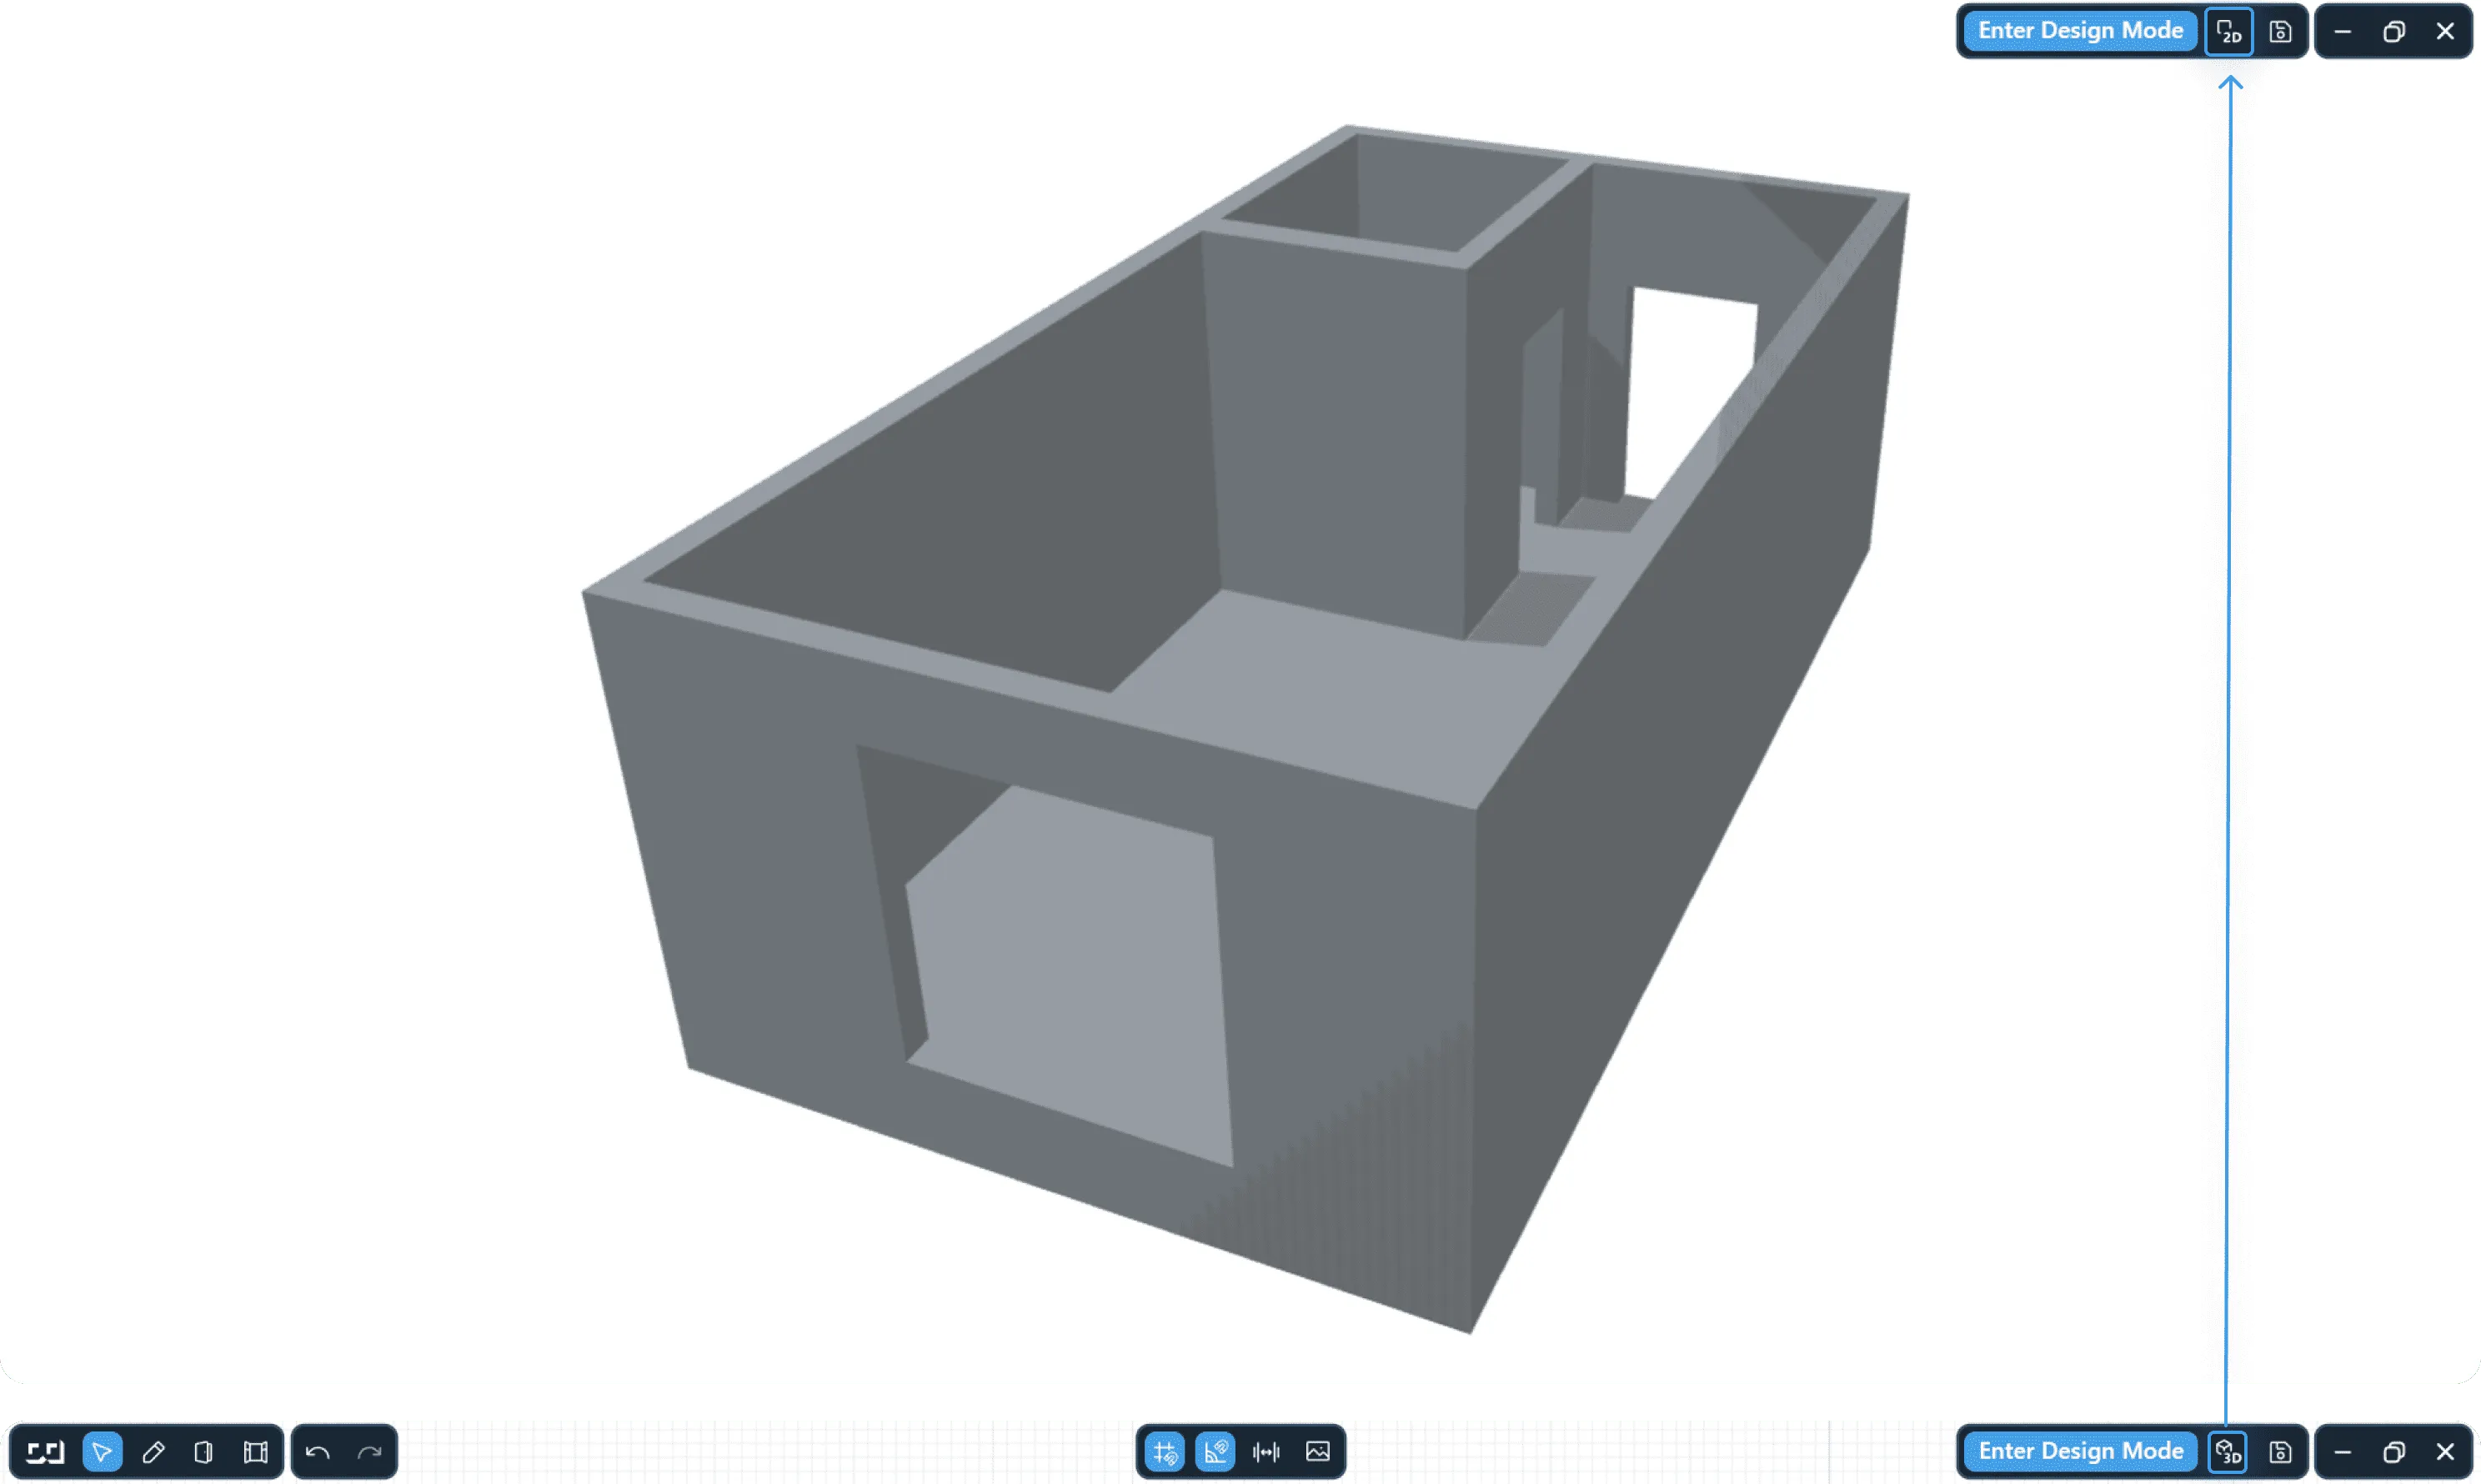
Before you start working on your interior design, you can preview the layout in 3D Preview Mode. To do this, select the 3D icon from the menu.
To return to the layout mode, click on the 2D icon.
Saving Your Room Layout
You can easily share your projects. To do this, in the “My Projects” section in the launcher you need to click on “⁝”, then “Share link”. This way you can copy it.
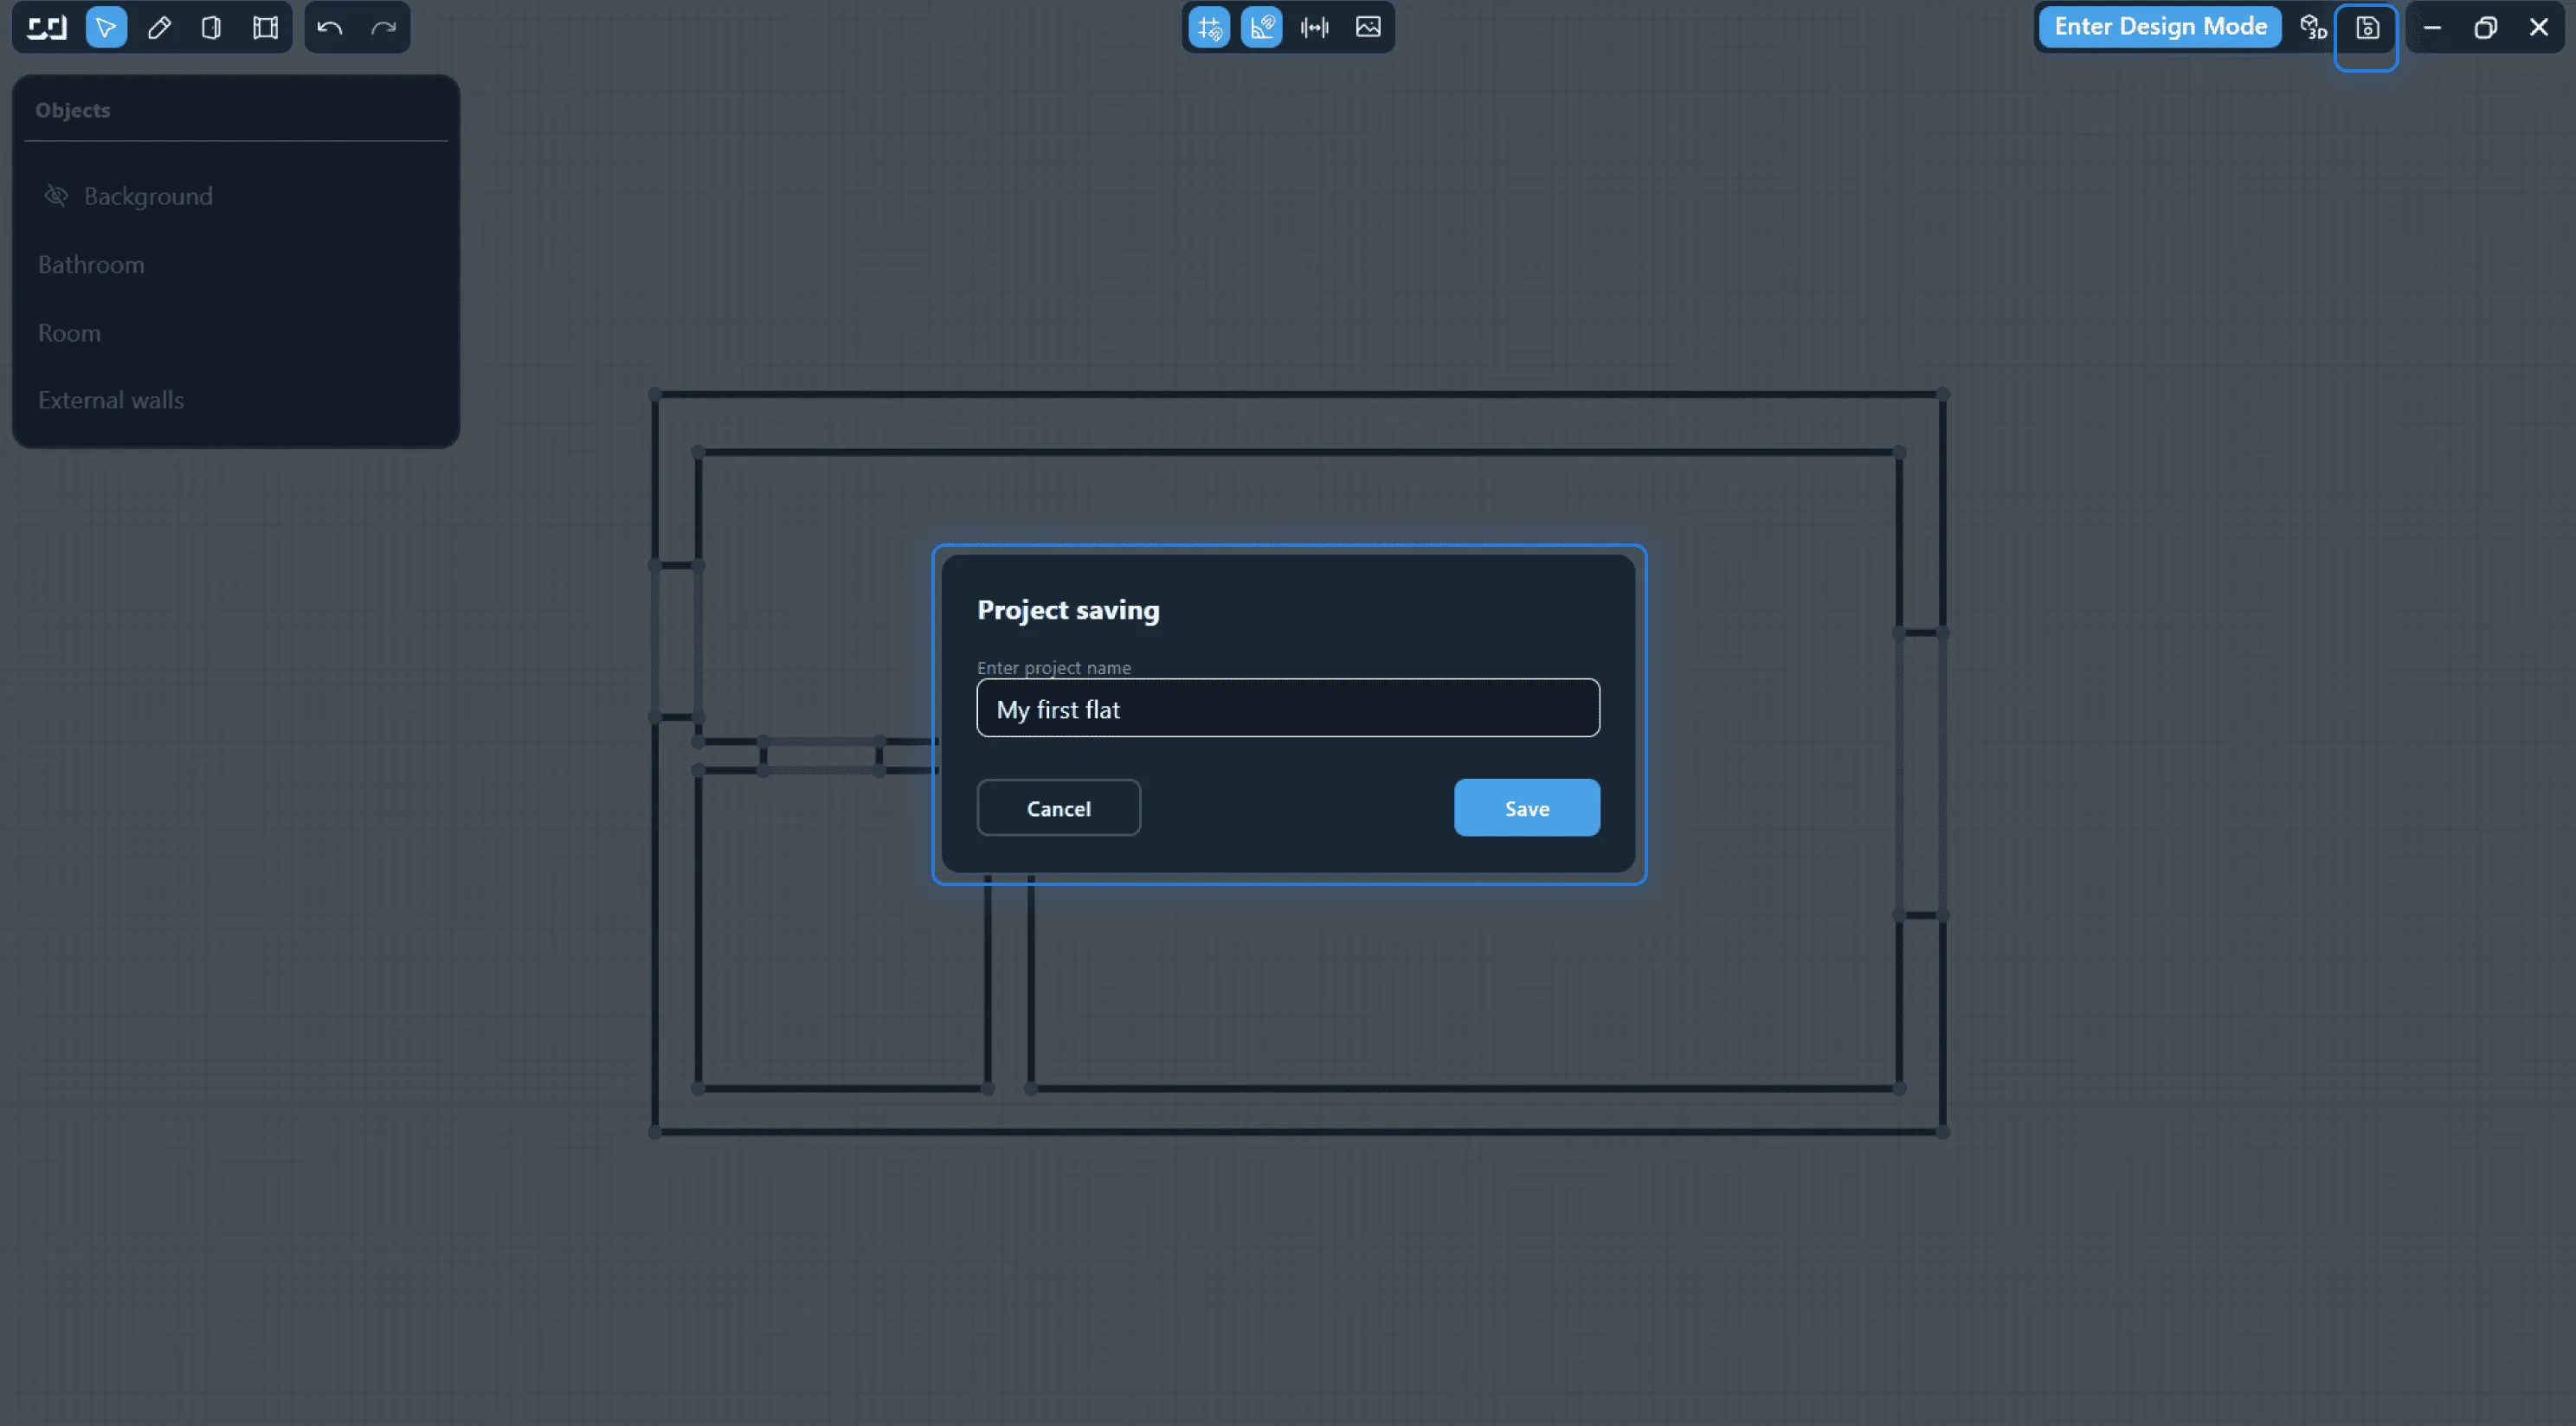
To save your room layout, select Save Project from the menu → Name your project → Click Save. Your project will appear in My Projects.
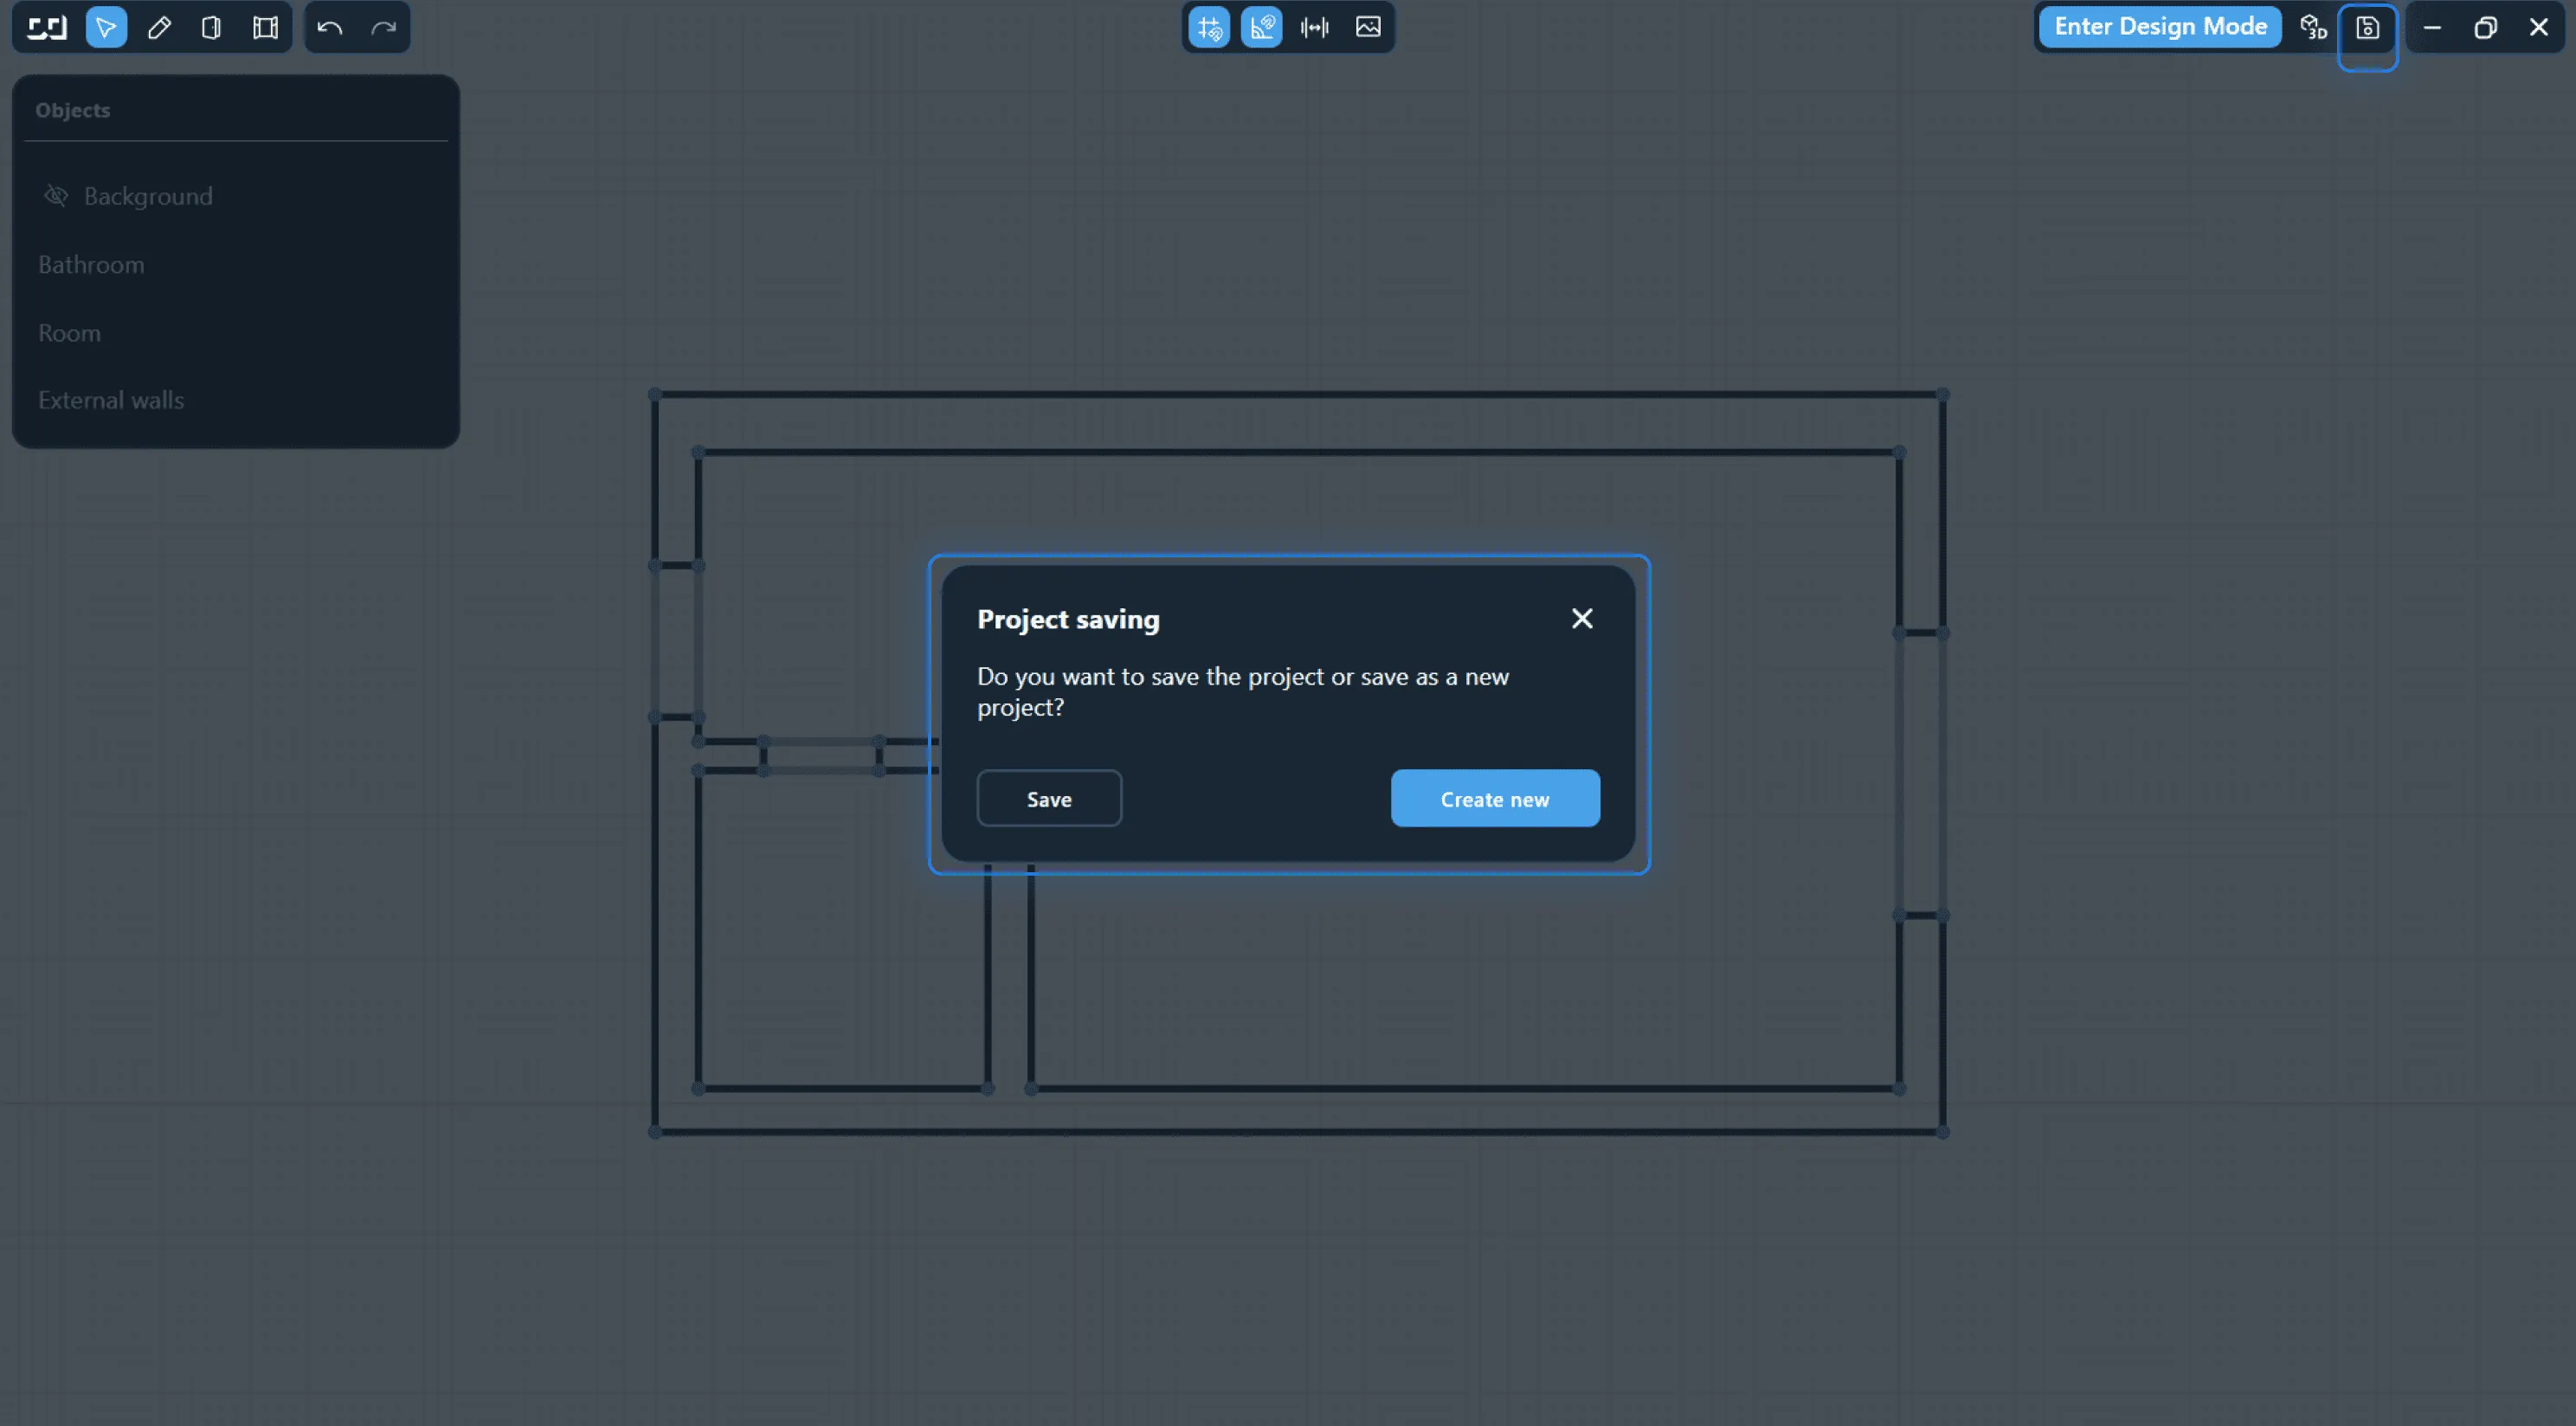
If you have edited a layout that you created earlier, there are two saving options:
1. To save the current layout and replace the previous version, click Save in the Save Project modal dialog box.
2. To save the current layout as a new project (in this case, the previous version of the layout will be kept unchanged in My Projects), click Create a New Project in the Save Project modal dialog box.
Editing the Existing Layout
To continue working on an already created layout, find the desired project in My Projectsand click Edit Layout.
You can easily share your projects. To do this, in the “My Projects” section in the launcher you need to click on “⁝”, then “Share link”. This way you can copy it.
Interior Design
How to switch to Interior Design mode
To enter the Interior Design mode, go to My Projects → Find the layout you want to use → Click Design Options → Click Create Design or, if you have already created a project and want to continue working on it, click Open Design.
Also, you can switch to Interior Design from the Layout Mode by clicking Create Design in the menu.
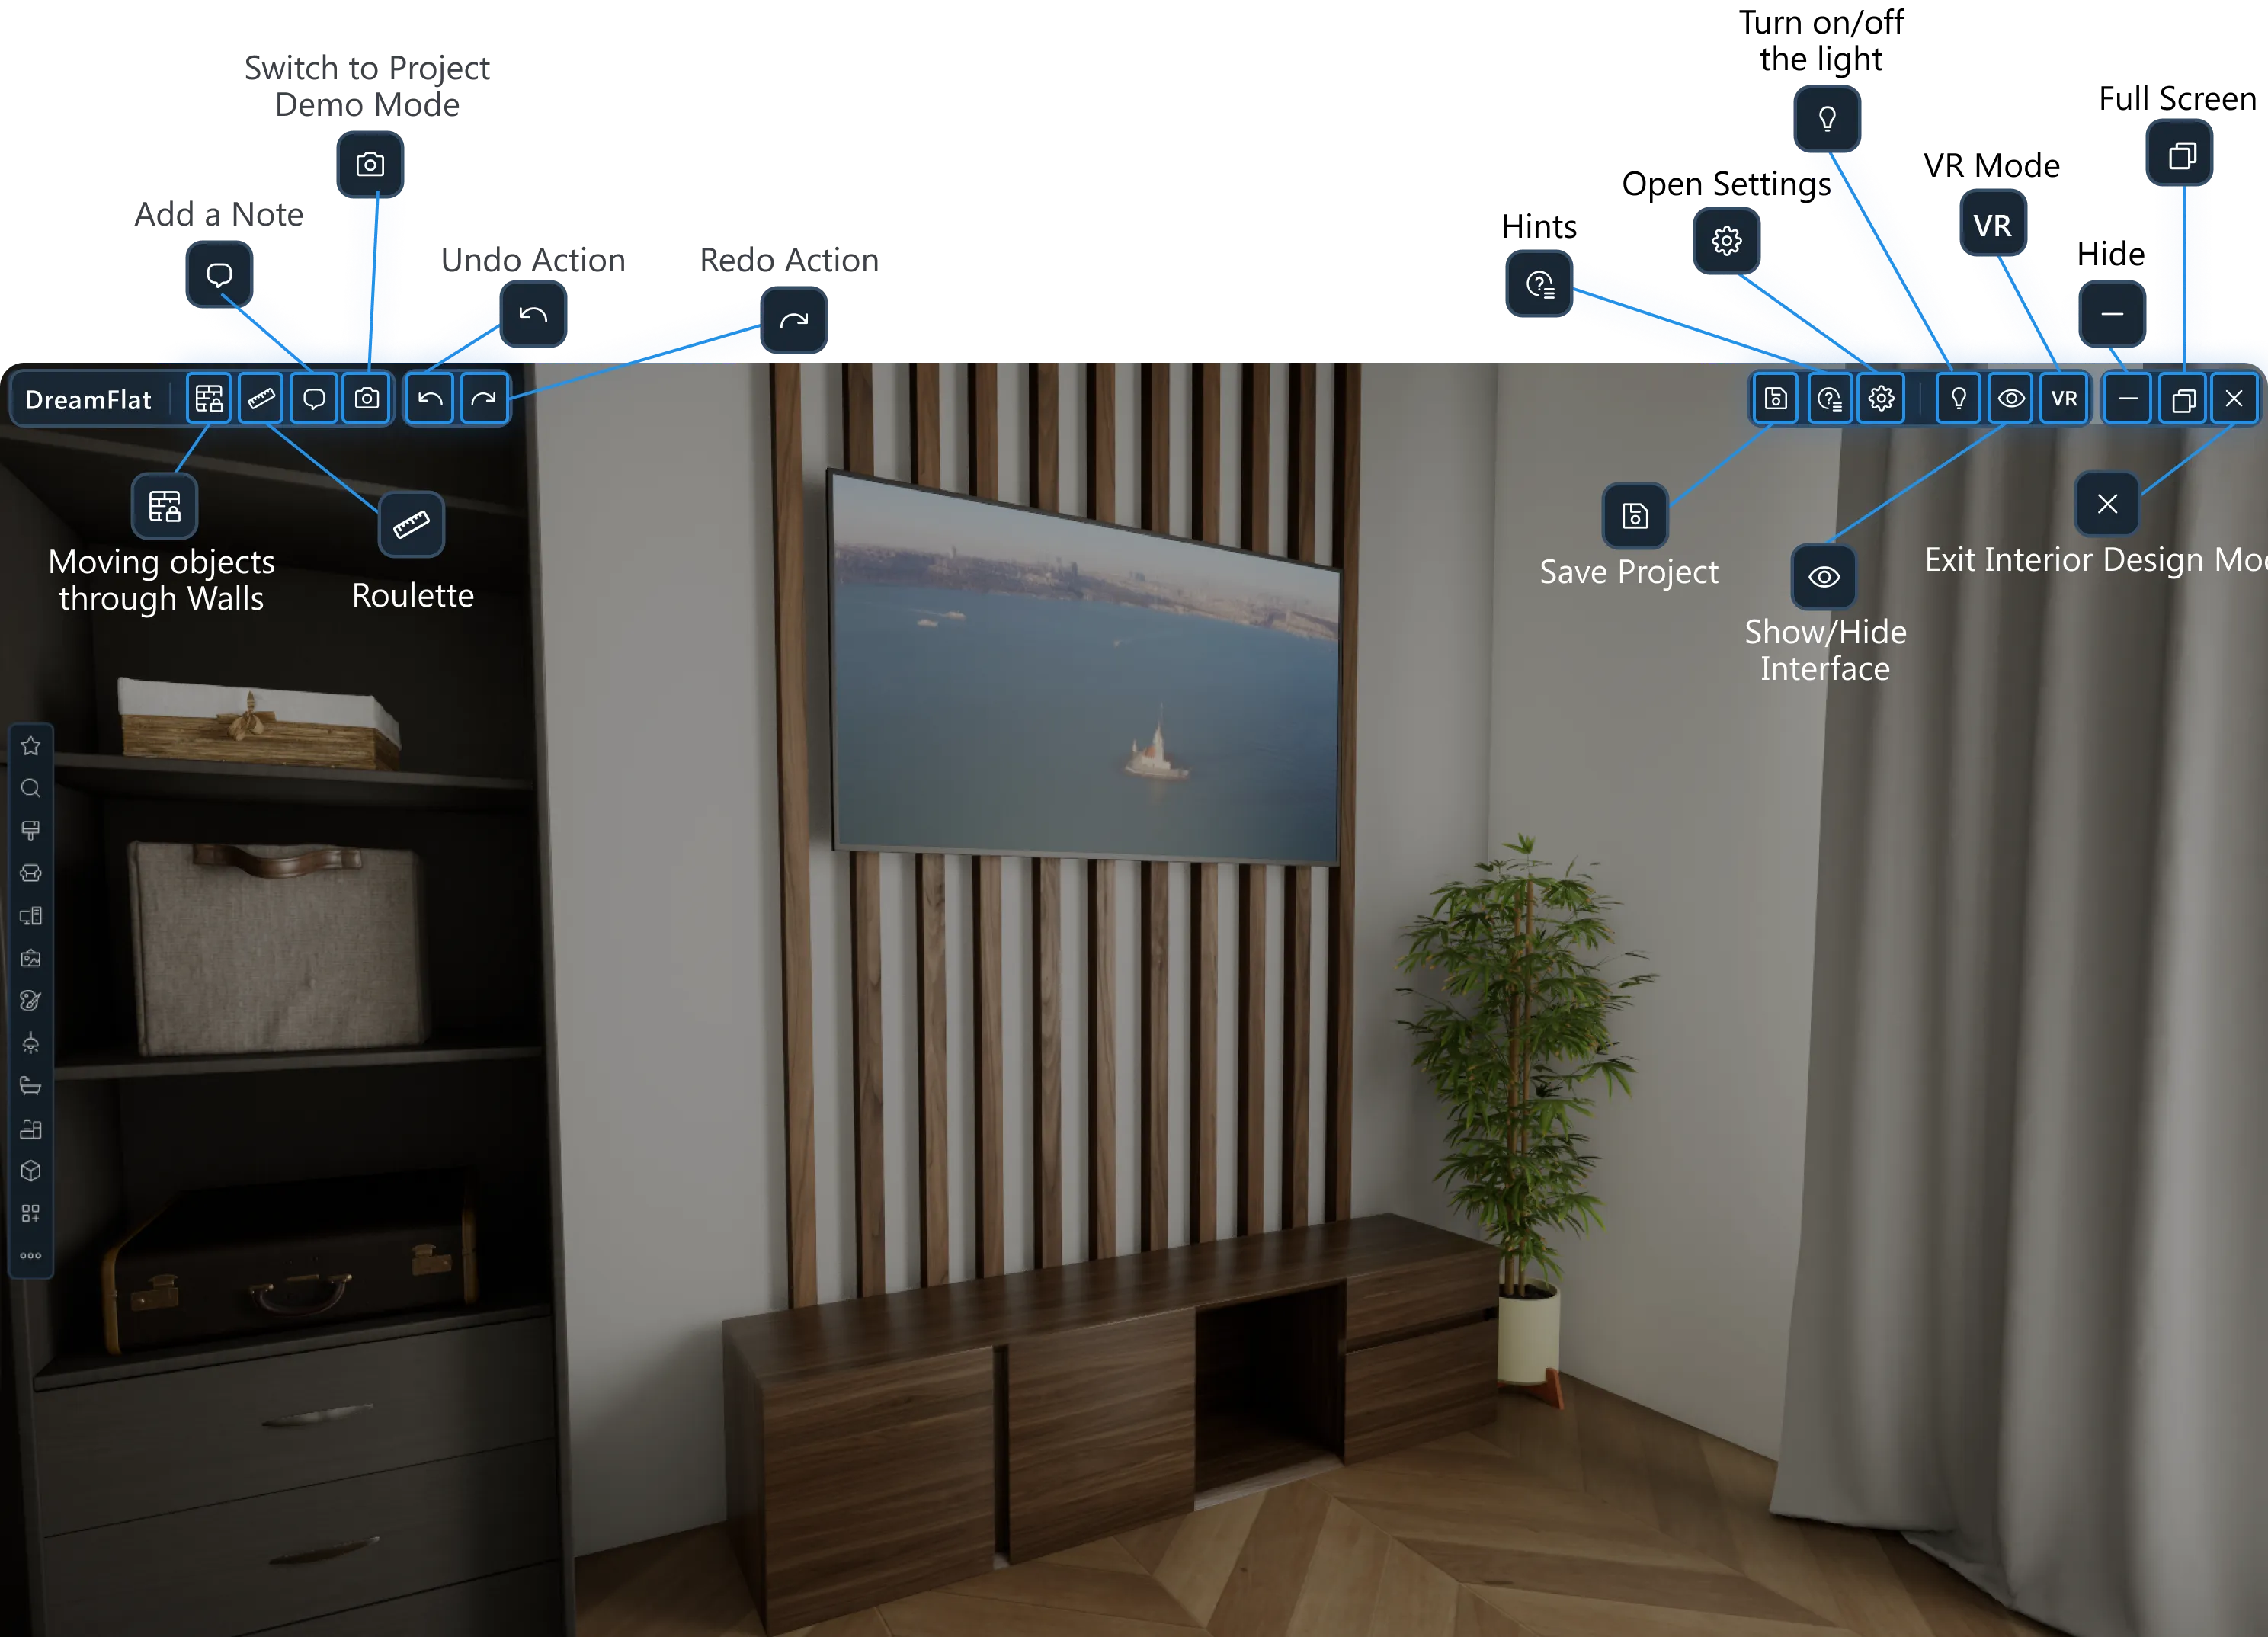
Menu
Setting the Camera Mode
How to switch to camera mode
To switch to Create Content mode click to the Camera icon at the top menu of Interior Design mode.
Setting the Camera Mode
The following camera modes are available in DreamFlat:
- free camera (provides for the possibility of the camera flying without being tied to a specific point);
- person (movement at the level of human growth);
- dog;
- cat;
- custom (adjust the movement mode yourself by setting the camera height and movement speed).
Settings: General, Graphics, Lighting, Post-processing
In the “Scene Settings” section, you can work with sunlight parameters, adjust the position of the view from the window, as well as the intensity of the panorama. In addition, in the advanced settings you can change parameters such as sunlight temperature, post-processing options, and ambient light temperature and brightness. In the same group of settings, you have access to presets - that is, ready-made settings templates that you do not need to set yourself. In addition, you can create your own presets.
You can go to Settings by clicking the settings icon in the top menu. In the Settings, you can select a language, a window view, apartment north-south orientation, lighting, graphics quality, and more.
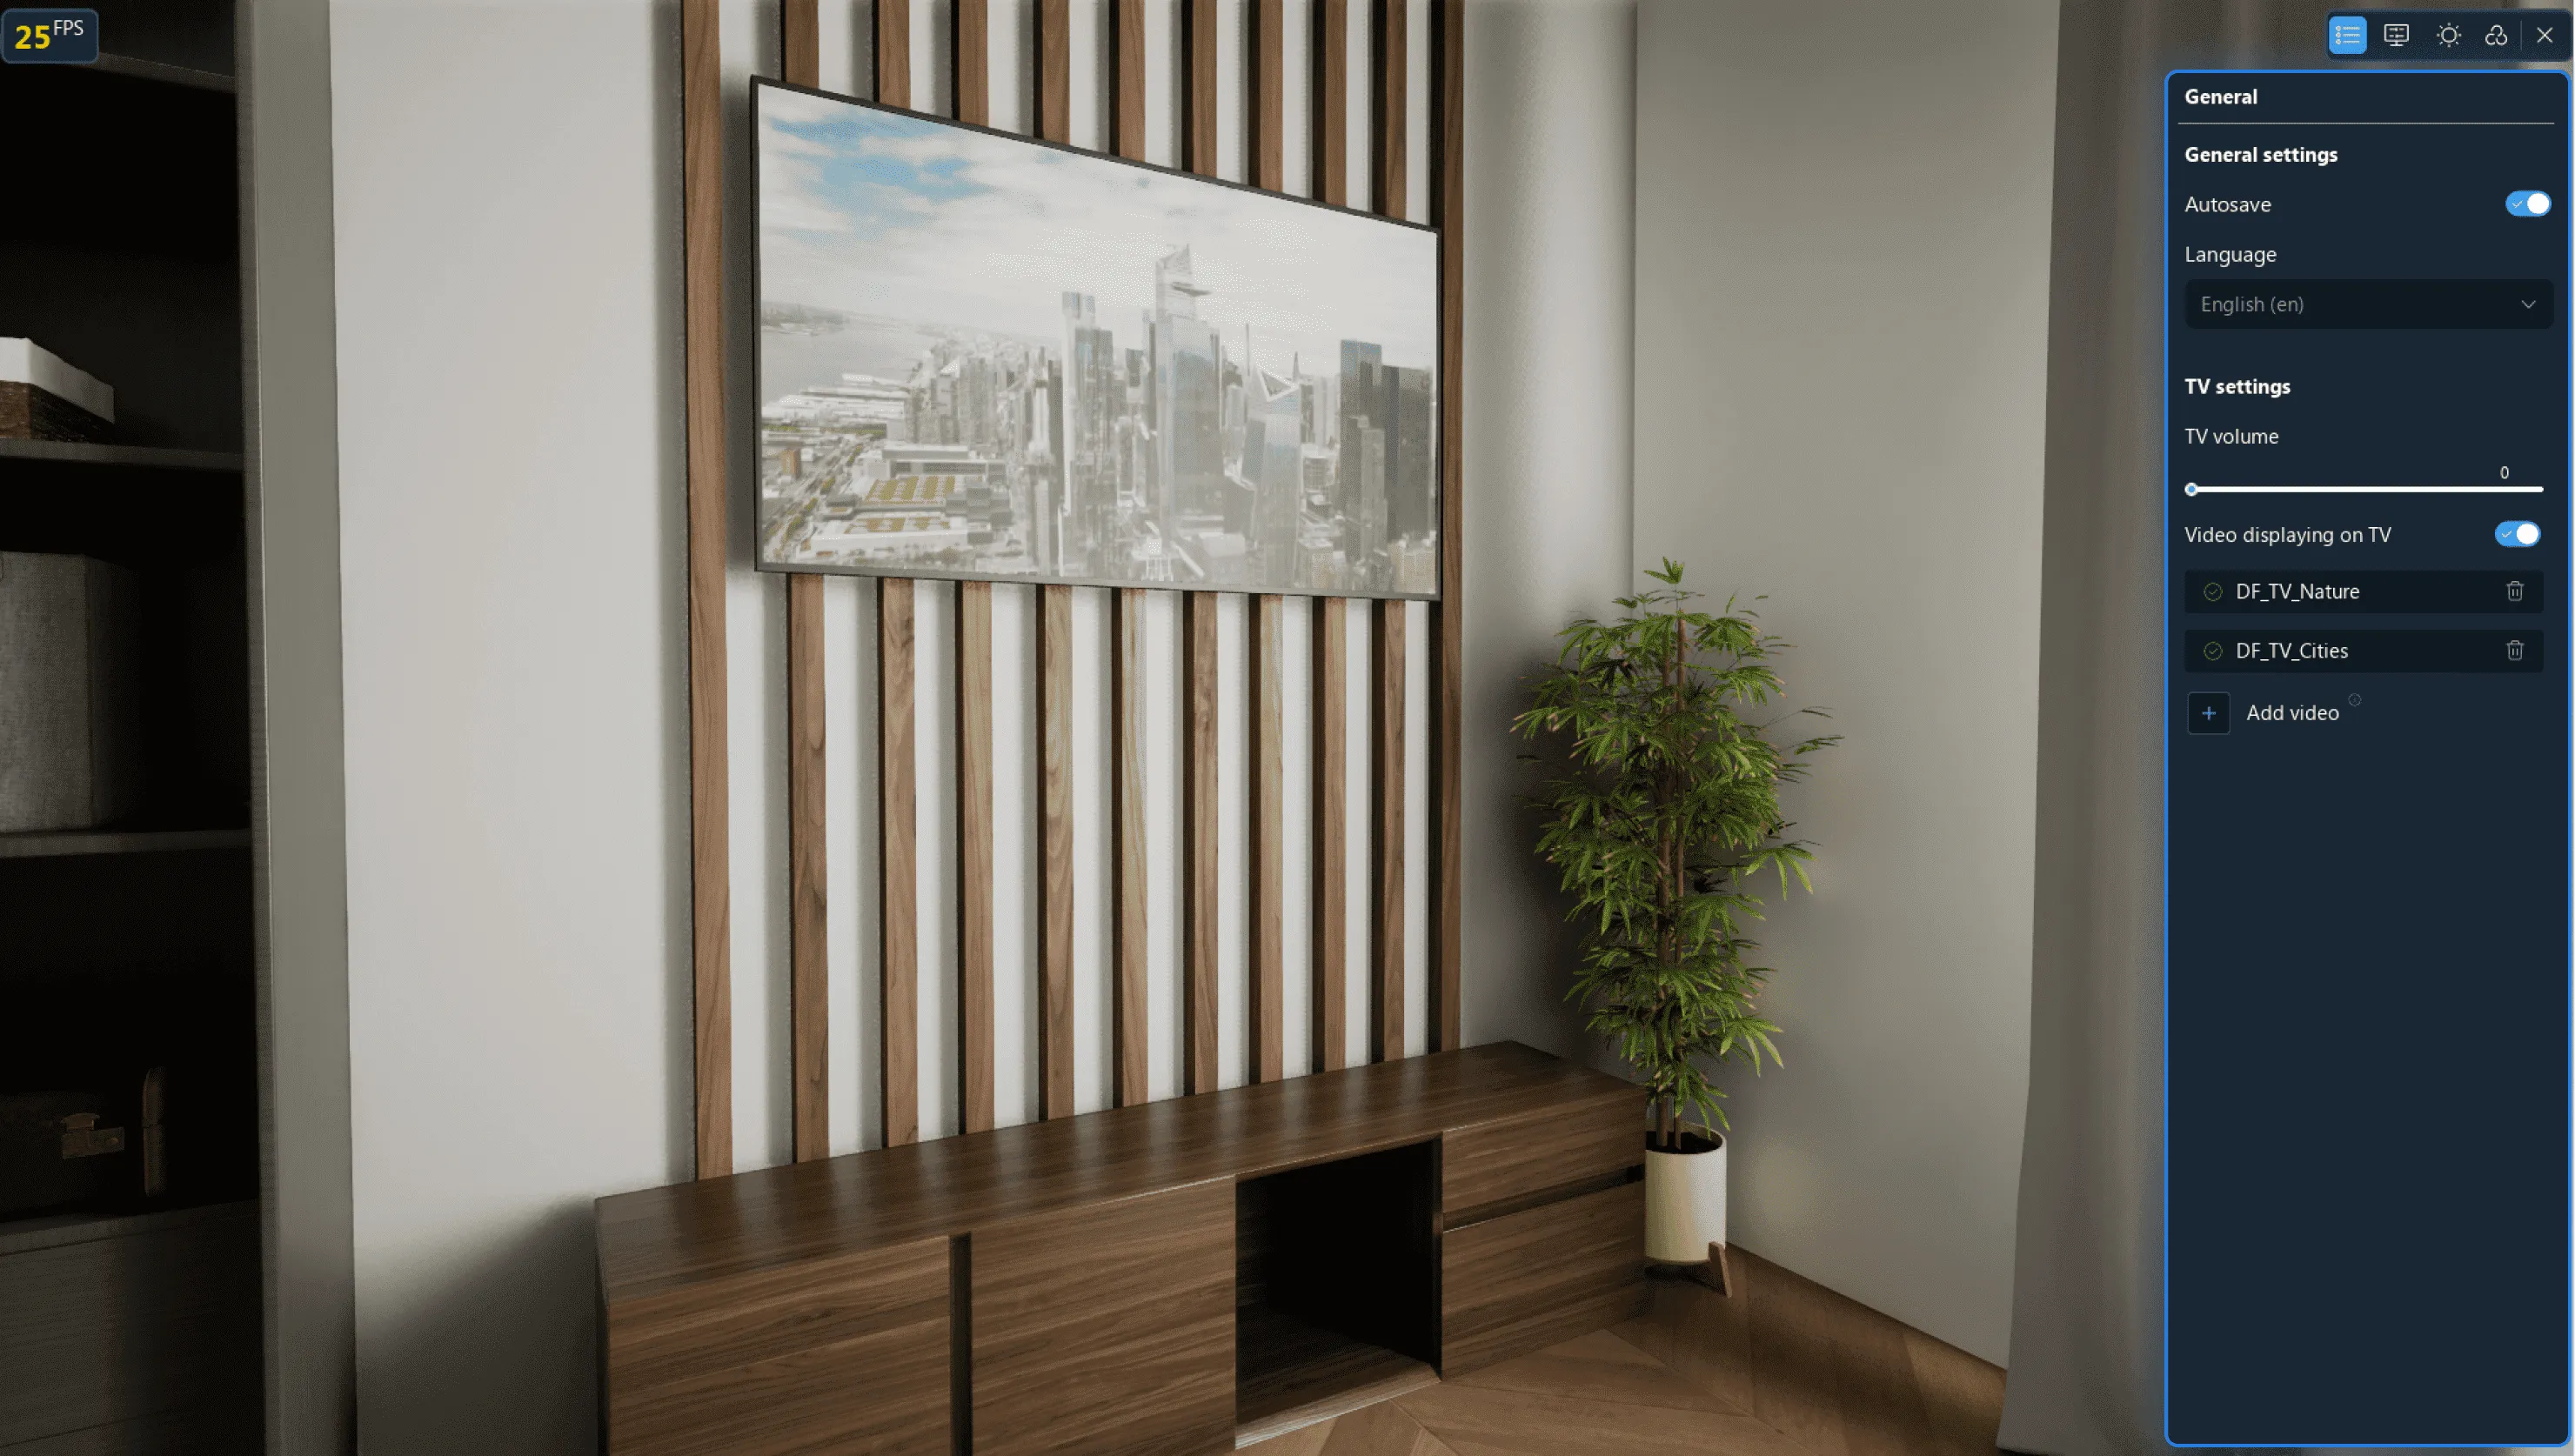
1. General Setting
The following functions are available in the general settings.
1. Autosave — save your design in real time. Autosaved versions will appear in the My Designs section of the current project.
2. Language — select the language of DreamFlat interface.
3. The Volume and Play on TV functions are for TV sets. Position the TV set in the scene and by default it will play the video with zero audio volume. To adjust the TV settings, set the Total Volume to the value you want, set Play on TV and upload your video.
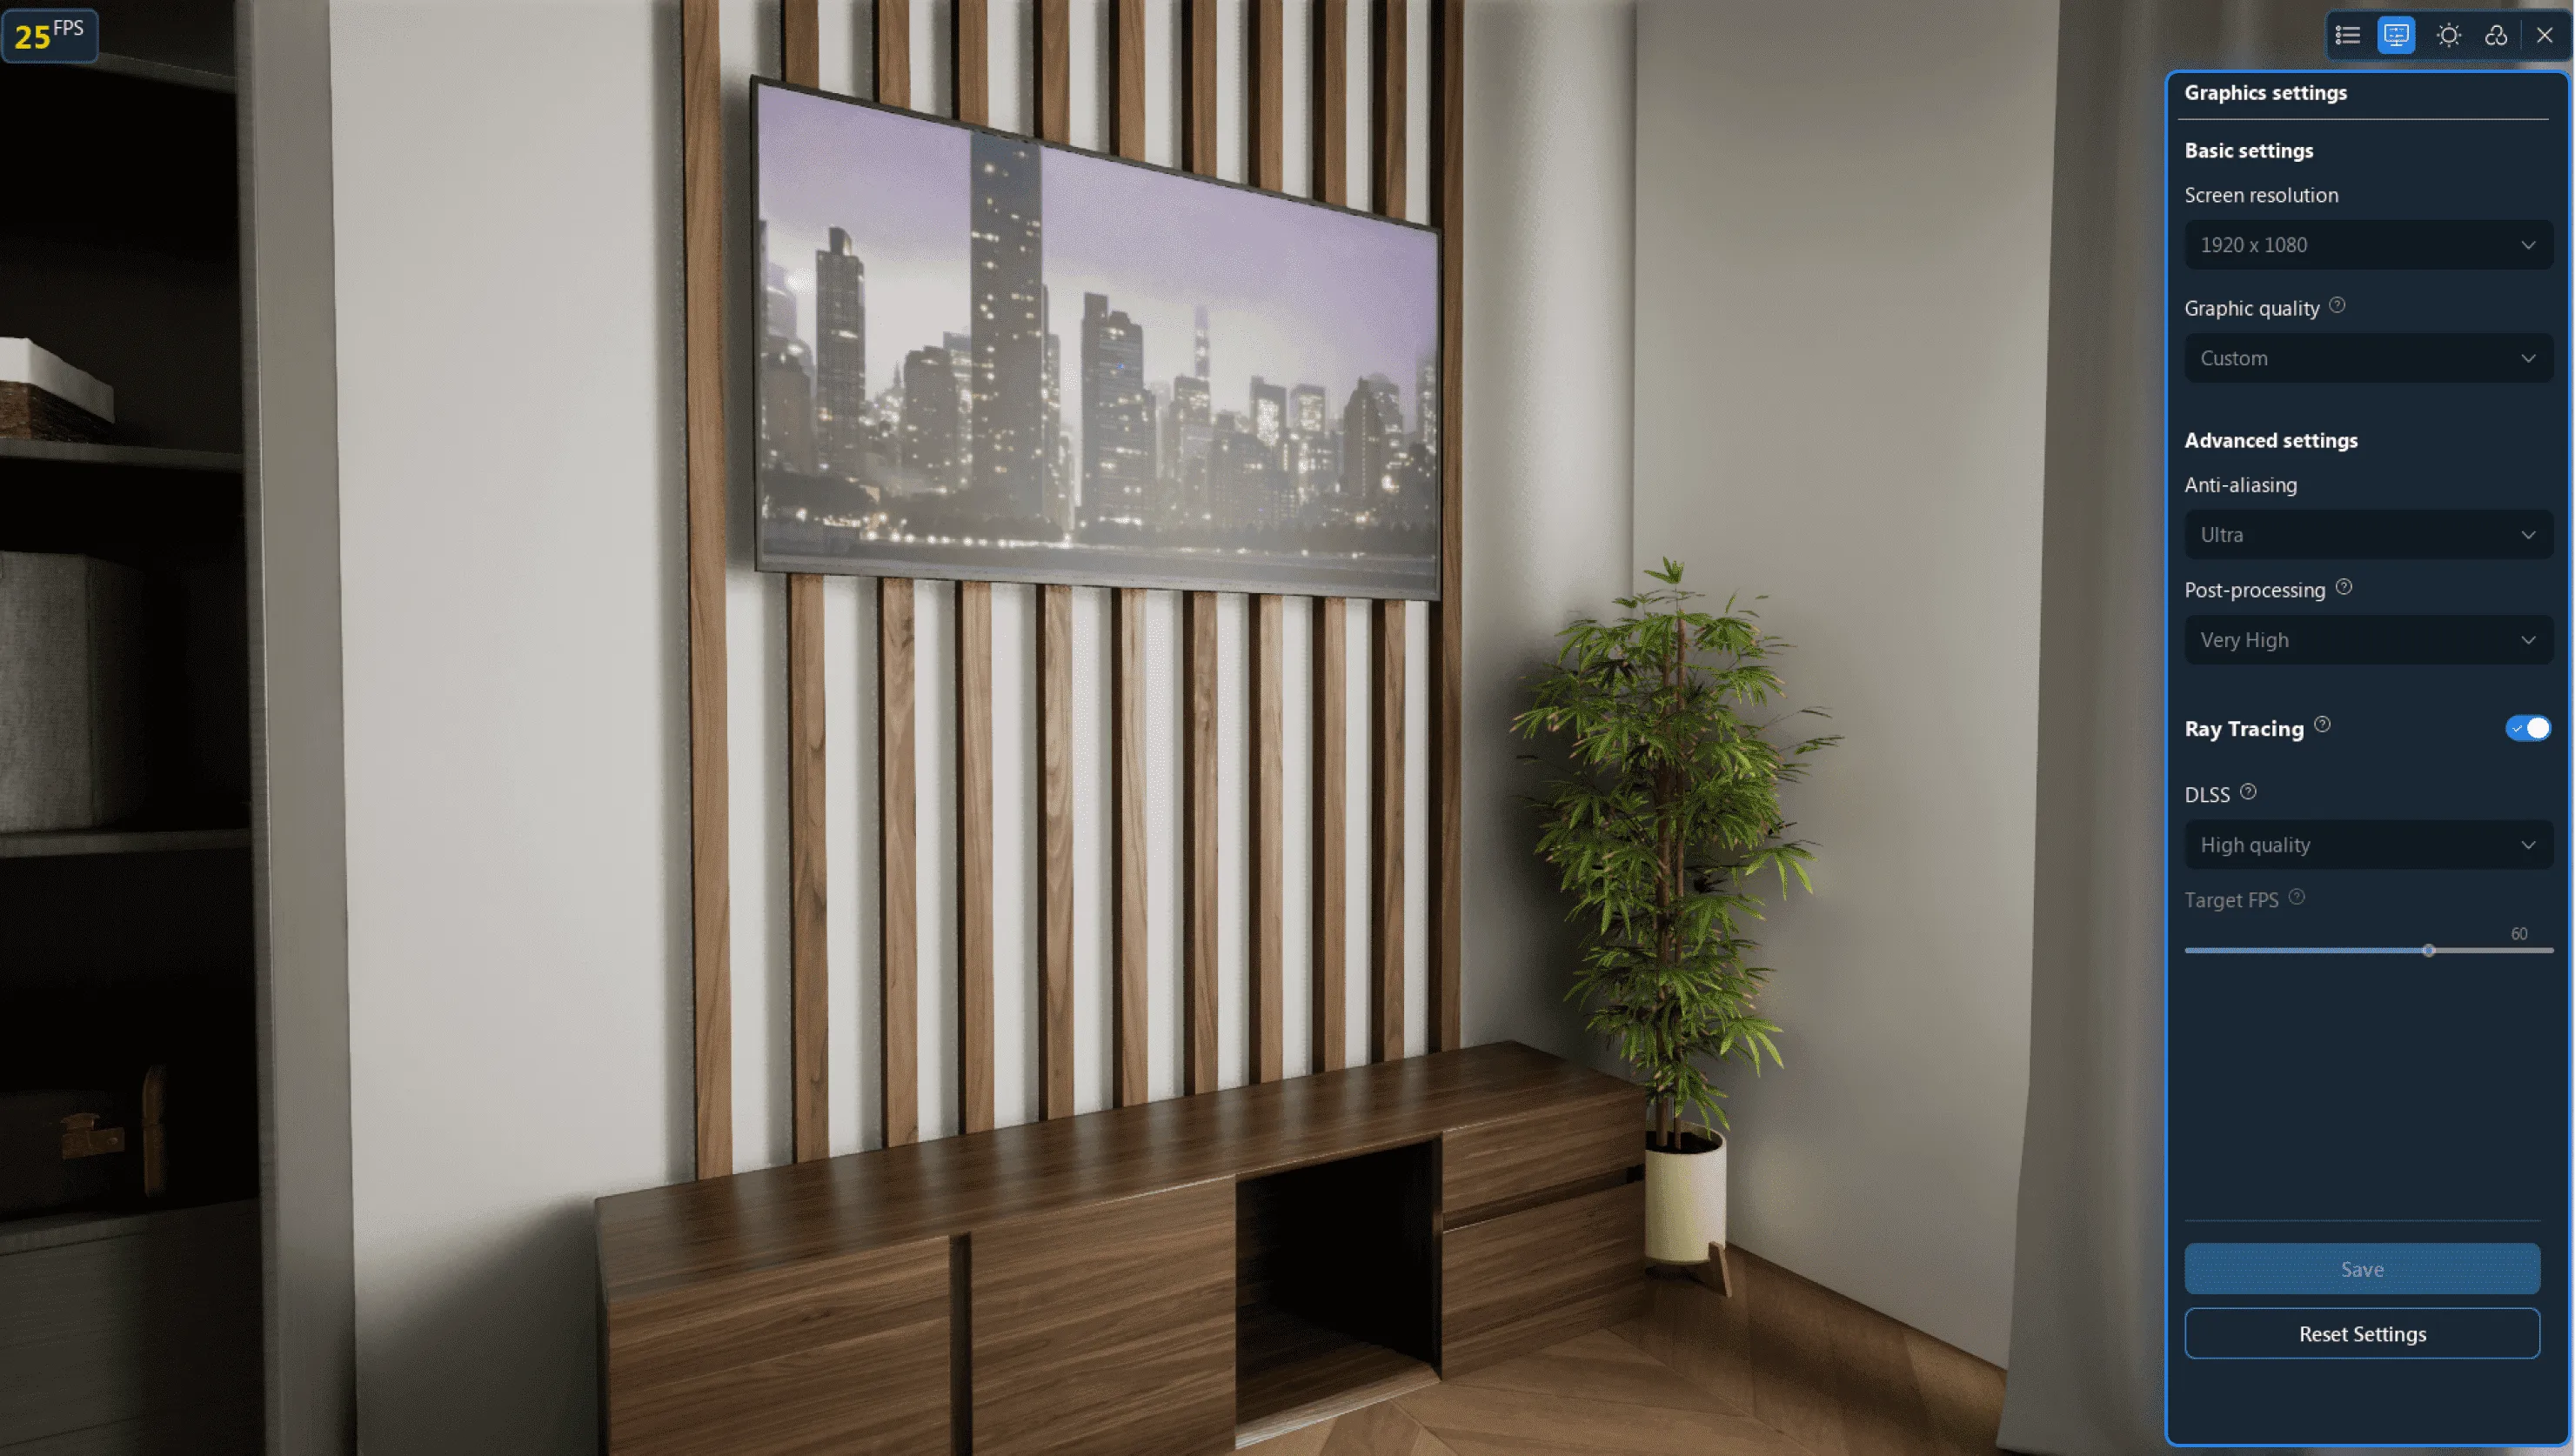
2. Graphics Settings
The following functions are available in the graphics settings.
2.1. Basic Settings
1. Default screen resolution is the same as the monitor resolution.
2. You can adjust the graphics quality from low to ultra. You can also customize the quality or apply auto settings. Apply auto settings for grapics to ensure optimised program run.
2.2. Advanced Settings
1. Smoothing will make the edges of curved lines smoother.
2. You can adjust post-processing settings for a more saturated picture and natural colours.
3. Lightning Settings
The following functions are available in the lighting settings.
3.1 General Settings
1. Time of Day — select either day or night.
2. Diffused Light Intensity, i.e. the light brightness from the sky excluding direct sunlight.
3. Diffused Light Temperature, i.e. the color in cool or warm shades from diffused light.
4. Ambient Light, i.e. extra lighting in Ray Tracing mode, which creates the illumination outside the perimeter of walls.
3.2. Panoramic view outside the window
1. Window View. You can customize the view from windows, e.g. select a misty forest, daytime or evening Dubai.
2. Panorama Light Intensity.
3. Rotation Angle of the Panoramic View.
3.3. Sunlight
1. Sunlight Intensity.
2. Sunlight Temperature.
3. Solar Angle.
4. Solar Altitude.
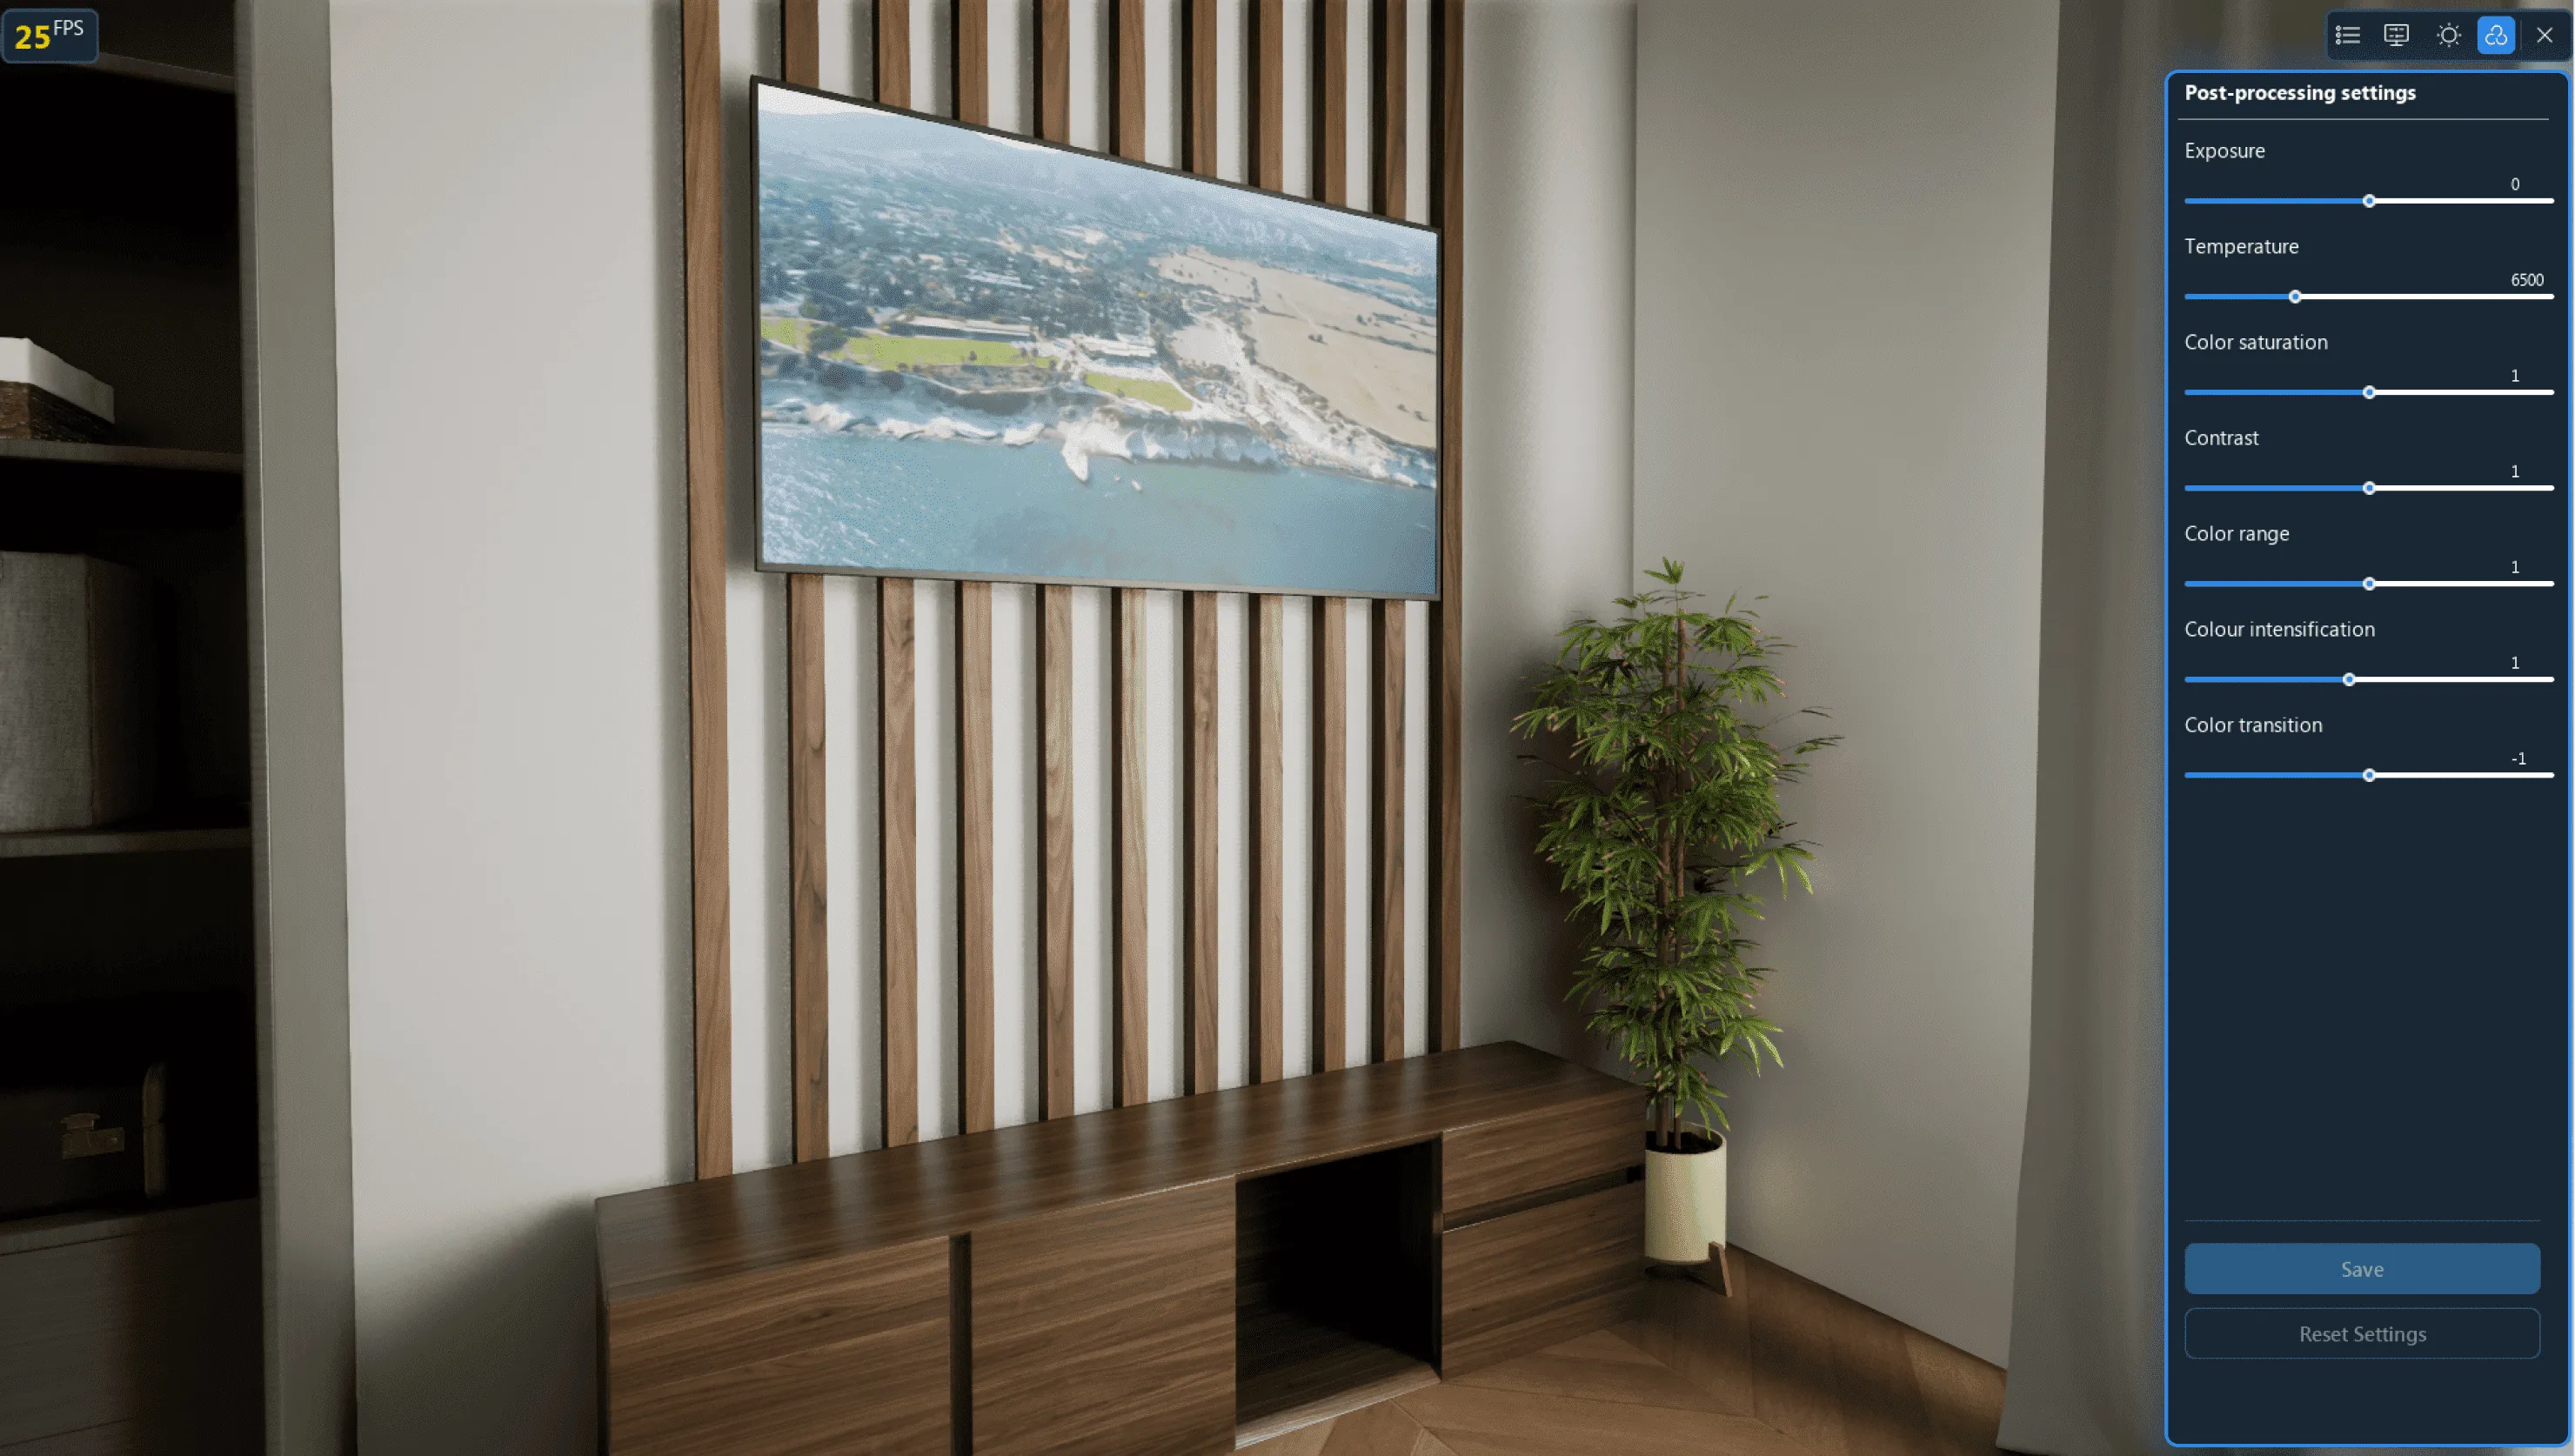
4. Post-Processing Settings
Post-processing settings allow you to customize the parameters of exposure, temperature, saturation, contrast, color range, color intensification, color transition.
Help: Controls
You can configure the Controls: DreamFlat or Cinema 4D. To do this, click on the Help icon → Controls → Select the required configuration.
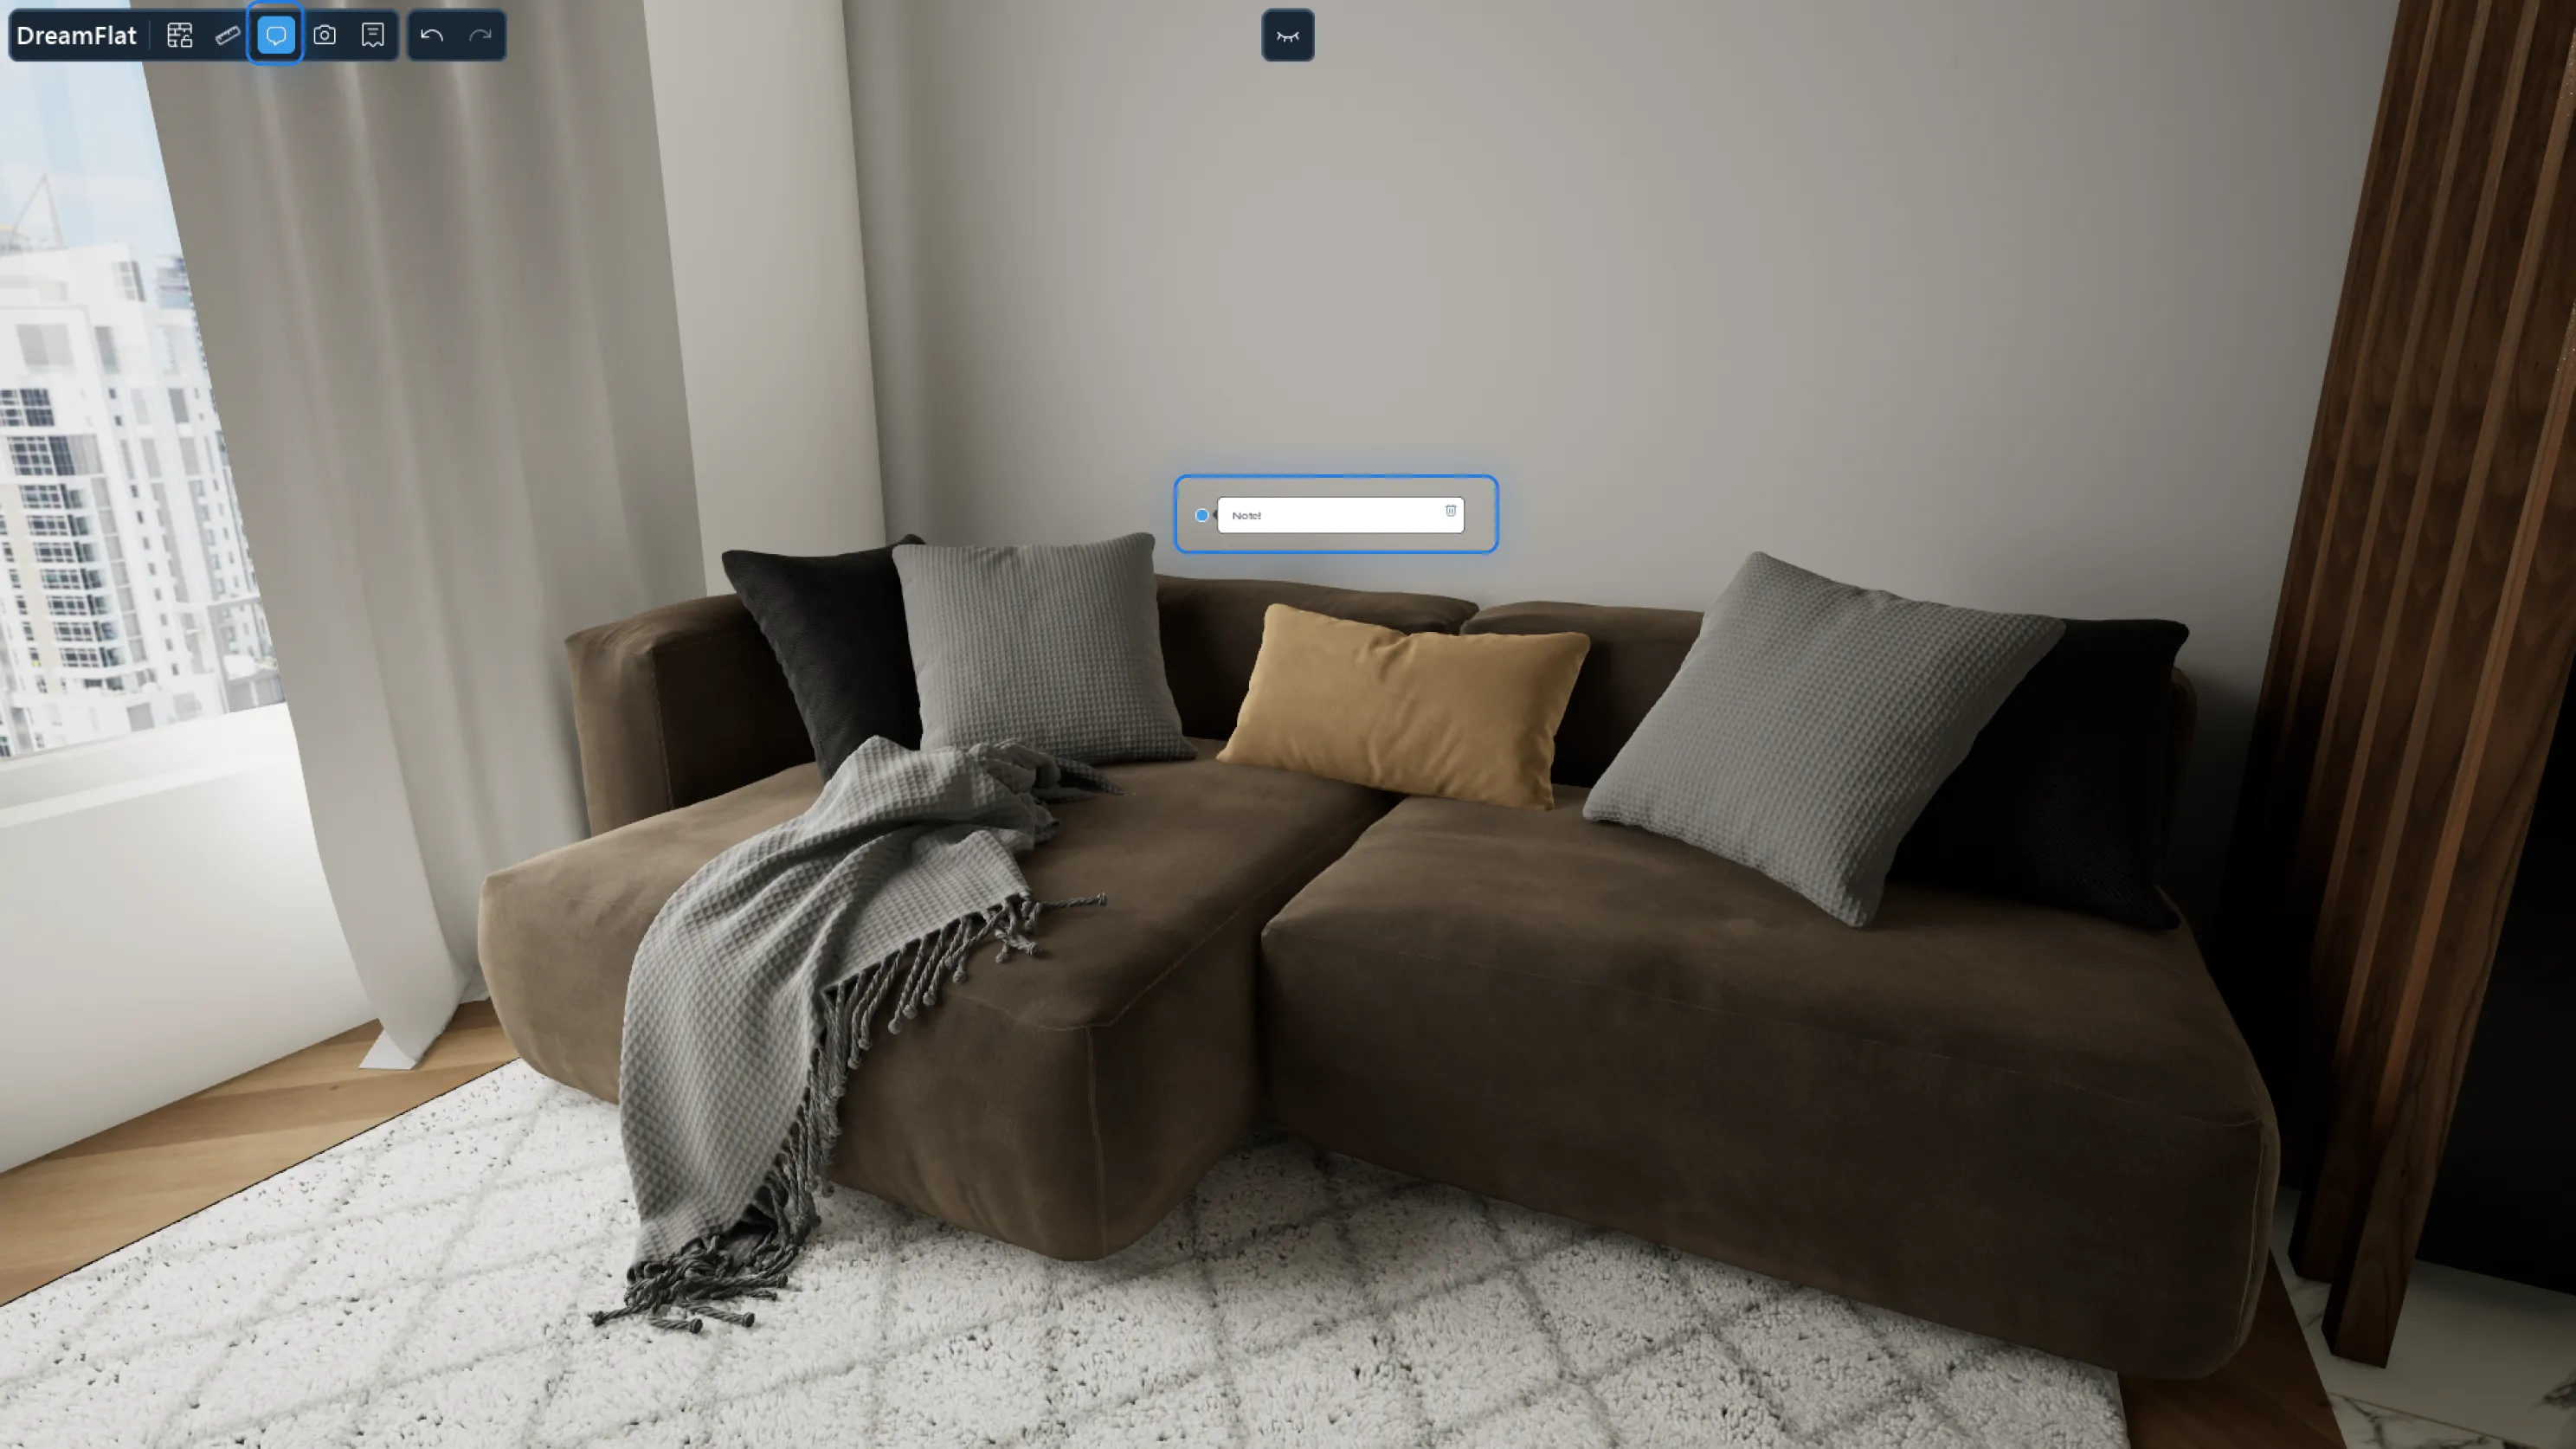
Notes
You can add a note anywhere within the scene. To do this, select Notes → Click on the scene are where you want to add a note. A text box will appear for entering the note.
Measuring tape
You can measure the length of objects on the scene using a measuring tape. To do this, select the measuring tape mode → Click the length starting point on the scene → Stretch the segment to the next point and click. You will see the length of the segment on the screen.
Moving Objects Through Walls
To prevent the model and other objects from moving through walls → Click Moving Objects Through Walls icon in the menu. To reset, click on the icon once again.
To enable/disable moving the model through walls and other objects, you can also select the model and press B on your keyboard.
Left Object Browser
Left Browser Sections
The left object browser offers DreamFlat tools that you use to create interior design. It includes:Favorites
Add to Favorites any models you want to quickly access.
1. Adding a model to a folder/without a folder
To add a model to a folder go to the library → Hover your mouse over the model → Click on the asterisk at the bottom of the model card. Add to Favorites modal dialog box will open. There are three options for adding a model to your Favourites:
1. Create a folder and add the model to the folder.
2. Select a folder you created earlier and add the model to the folder.
3. Add the model to Favorites without a folder.
2. Adding from Scene
There are two options for adding a model from the scene to your Favorites:
1. You can add all models from your current project or models from one room to your Favorites. This is done by clicking Add from Scene at the bottom of the left browser → Select the categories of the object that you want to add in the dialog box → Select or create a folder → Click Add.
2. You can add a certain model from the scene to your Favorites. This is done by selecting a certain model → Right click on it → Click Add to Favourites → Create a folder or add the model without a folder → Click Add.
3. Selections
A folder called Selections is available from your Favorites. It contains collections of models created by DreamFlat designers that you can use in your projects.
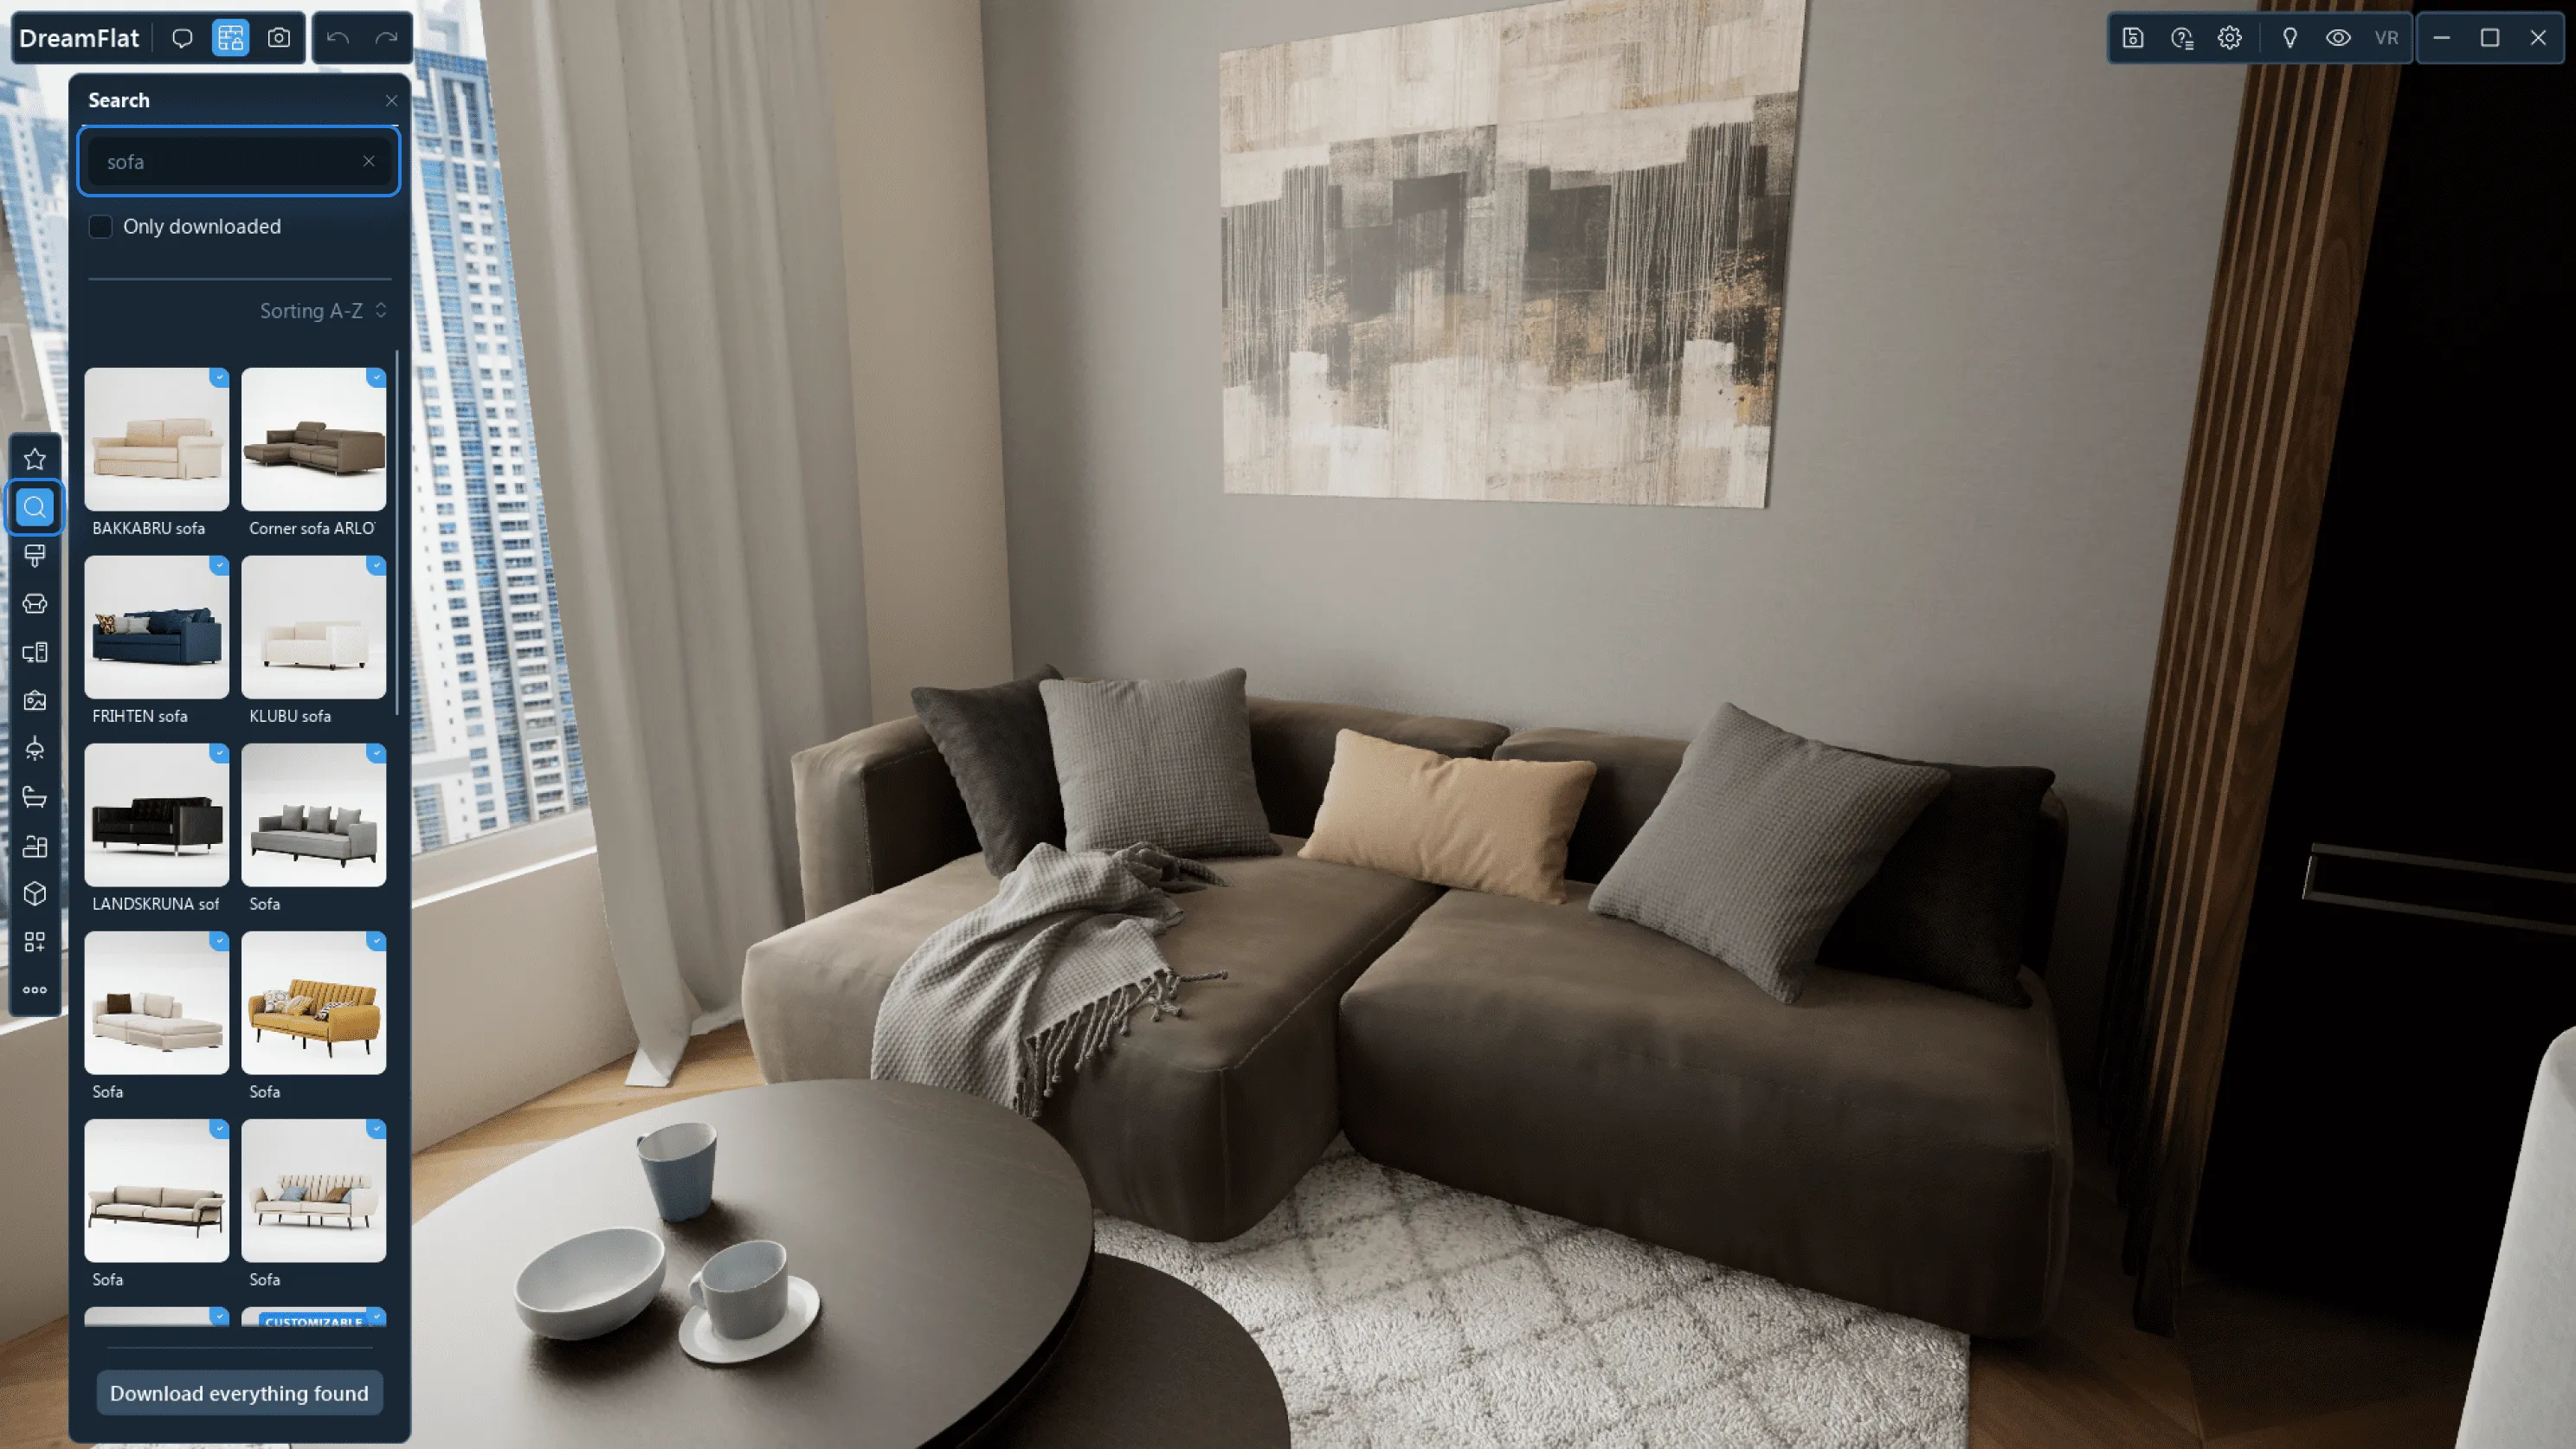
Search
To quickly find the model or material you are looking for, enter keywords in the top field under Search.
Finishing
You can use any finishing in your project. Just drag any material from the Finishing section to your walls, floors, or primitives.
Scene Material Functions
1. Material Position. To change the positioning of any material on the walls/floors/ceilings or primitives, double left click on the object → In the Options window on the right, change the position of the material using the X and Y axes and adjust the rotation angle.
2) For the even distribution of the material over the surface, select the object on which the material is located and enable the Tile function in the object parameters on the right.
You can apply and edit the material on several walls, floors ceilings and primitives at once. To do this, move the material from the Library to the selected group of objects.
Models and their functions
Preset models for filling your interior are available in Furniture, Appliances, Décor, Bathroom Equipment, Lighting, Kitchens, and Other.
1. Moving and Rotating
1. To add an interior object, drag it onto the scene from the Library.
2. To move the object around the scene, click on the object and use your mouse: the object can be moved left-right-up-down.
3. To rotate an object around its vertical axis, click on the object guides, hold down the right mouse button and rotate the object.
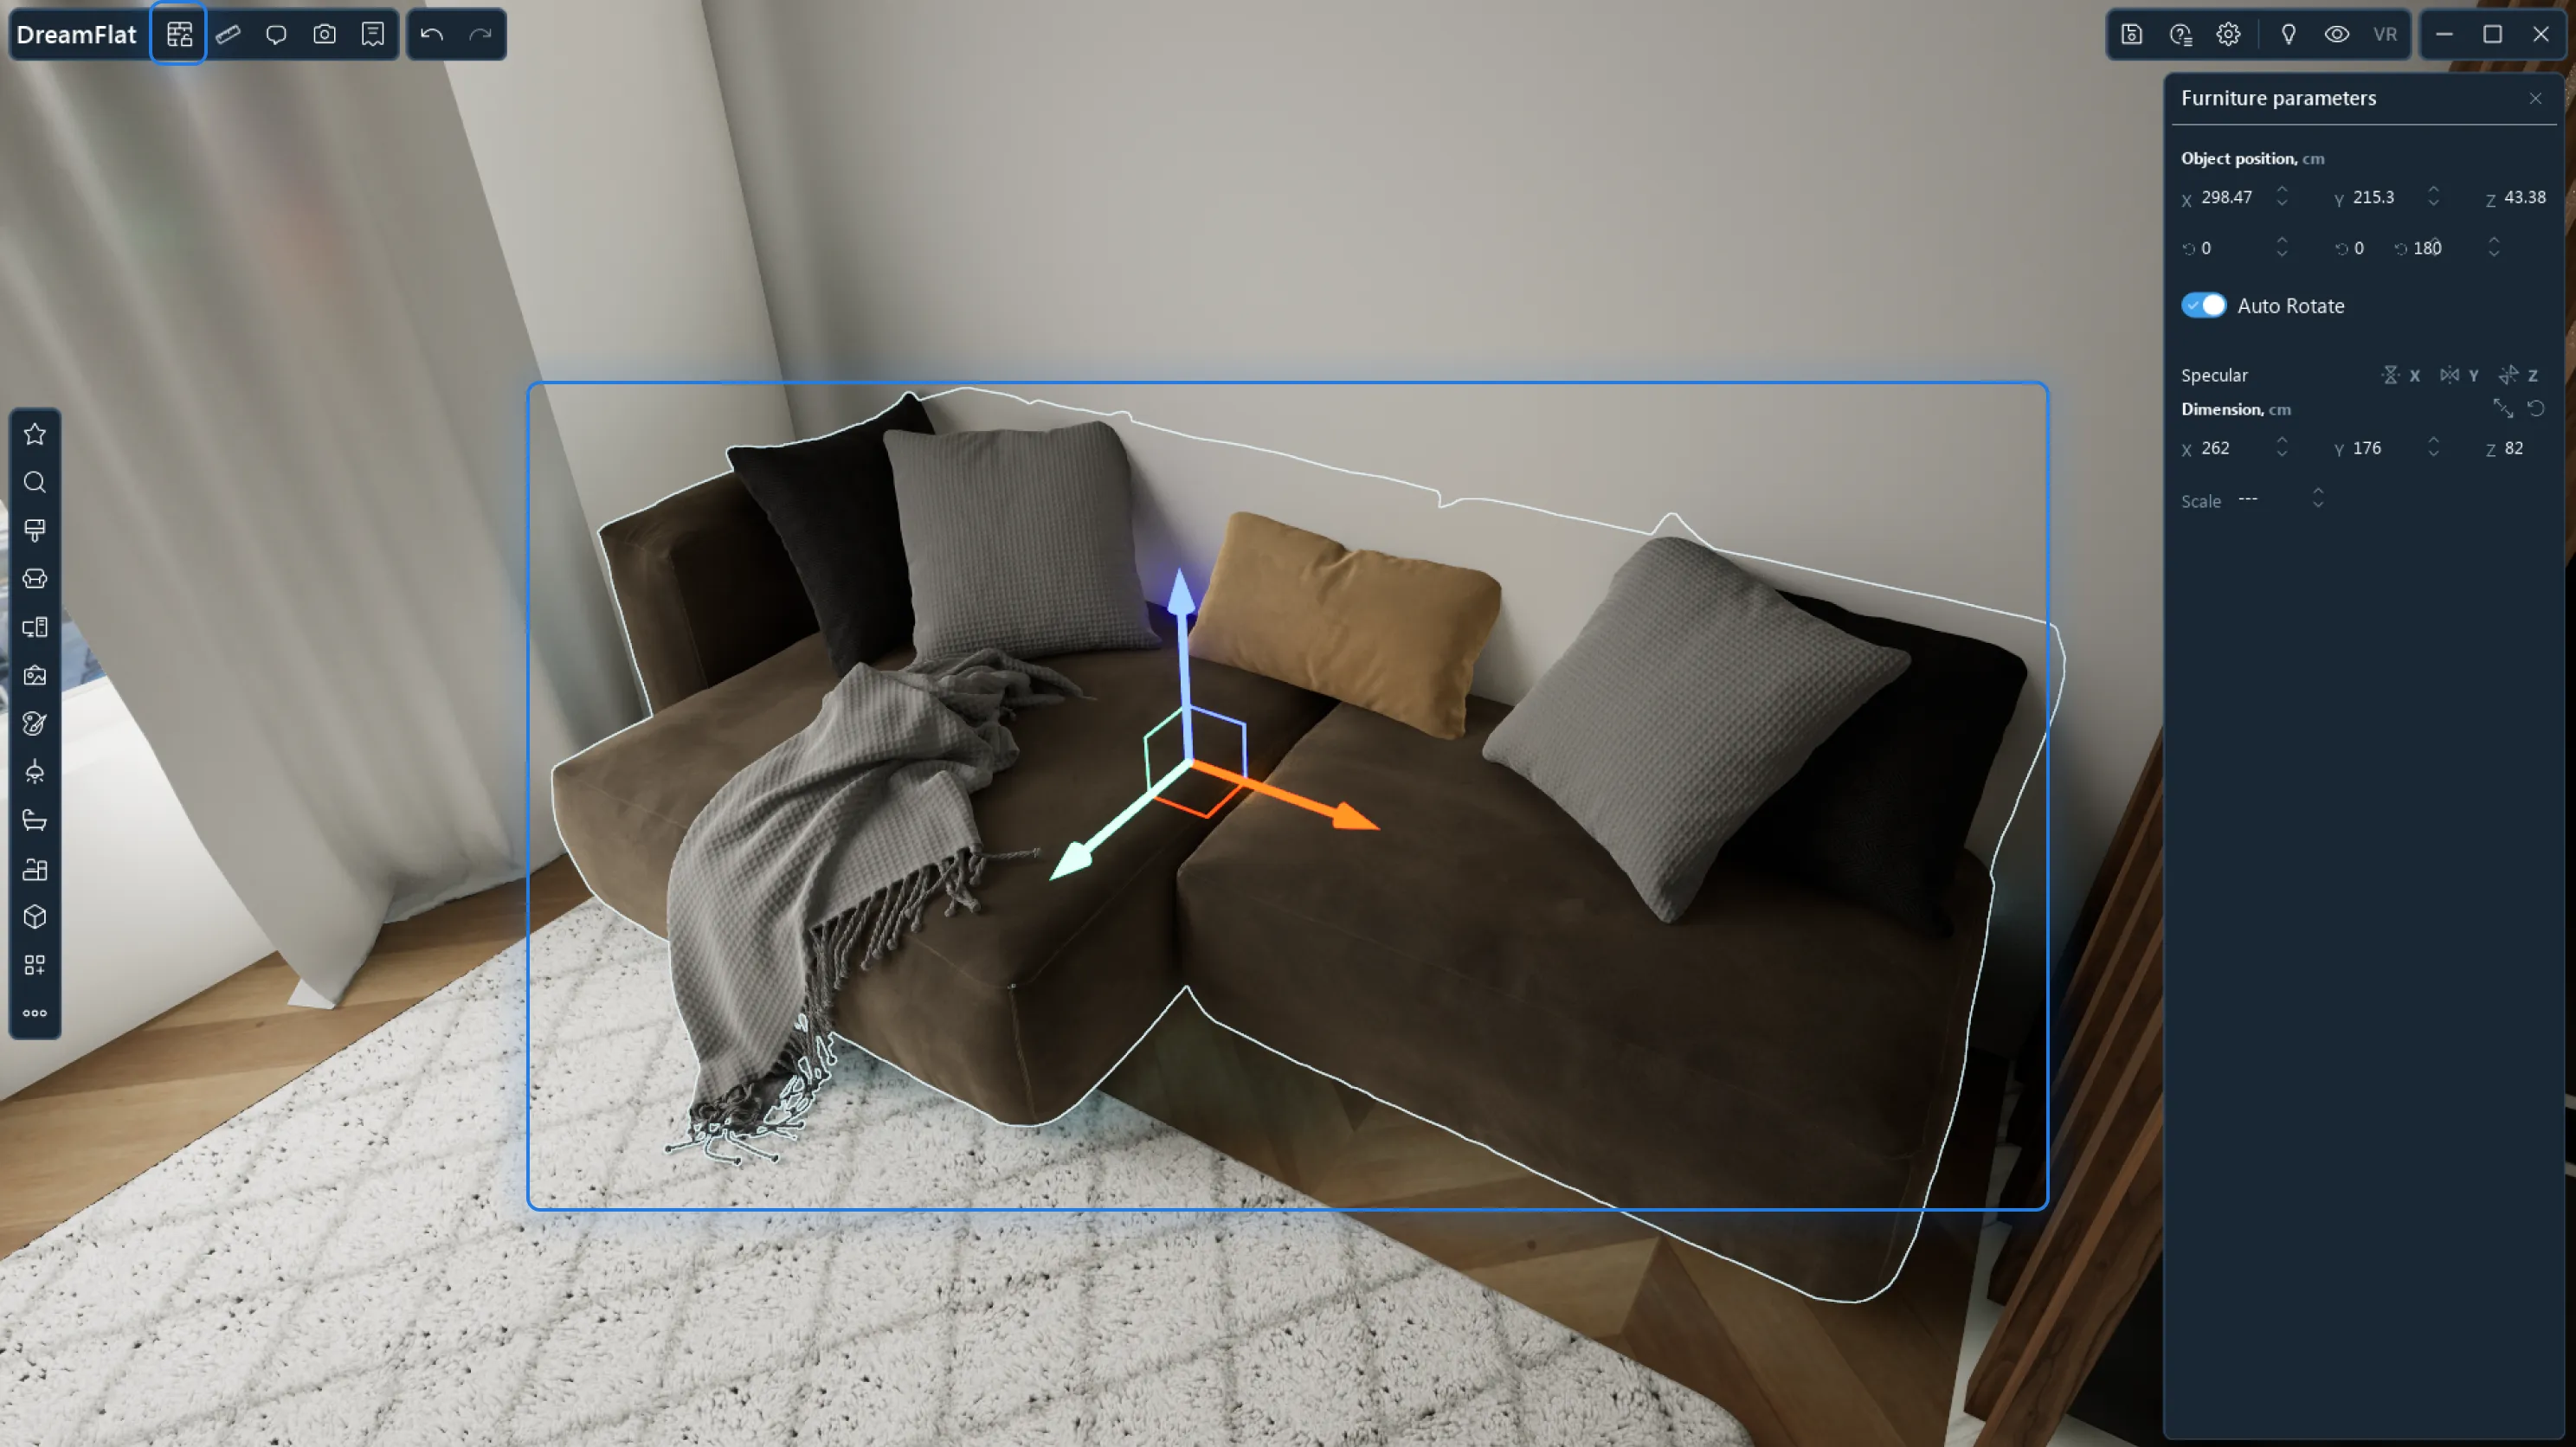
You can also set the position and rotation angle for any object in the Options. To do this, click on the object. The Options menu will appear on the right, set the required position of the object using the X, Y, and Z axes, adjust the rotation angle.
2. Copying and Pasting Objects
1) Random copying
To copy and paste an object that already exists in your interior, right-click on the object → Select Copy → Right-click on the area where you want to paste the copied object → Select Paste.
You can also use Ctrl + C for copying and Ctrl + V for pasting.
2) Copying along the object axis
To copy an object(s) along a vertical or horizontal axis, select the object(s) → Hold down the Alt key → Drag the mouse along the desired guide axis and release Alt.
3. Grouping Objects and Rotating an Object Group
You can move grouped objects around your scene. To do that, hold down Ctrl, select two or more objects, and move them.
There are two options for rotating grouped objects: rotate the whole group or rotate an individual object around its axis.
1. Right-click your mouse to rotate grouped objects circle-wise.
2. Hold down Ctrl to rotate an individual object from a group around its axis.
All the general options of scene models are also available for grouped objects.
4. Auto Rotate
This is a model function that allows you to automatically place the model along the wall. Auto rotate is enabled by default. To position the model against the wall at an arbitrary angle, turn off auto rotate in the Options of the selected model.
5. Deleting Objects
To delete an object from the scene, right-click on the object → Select Delete.
You can also use the Delete key on your keyboard for this action.
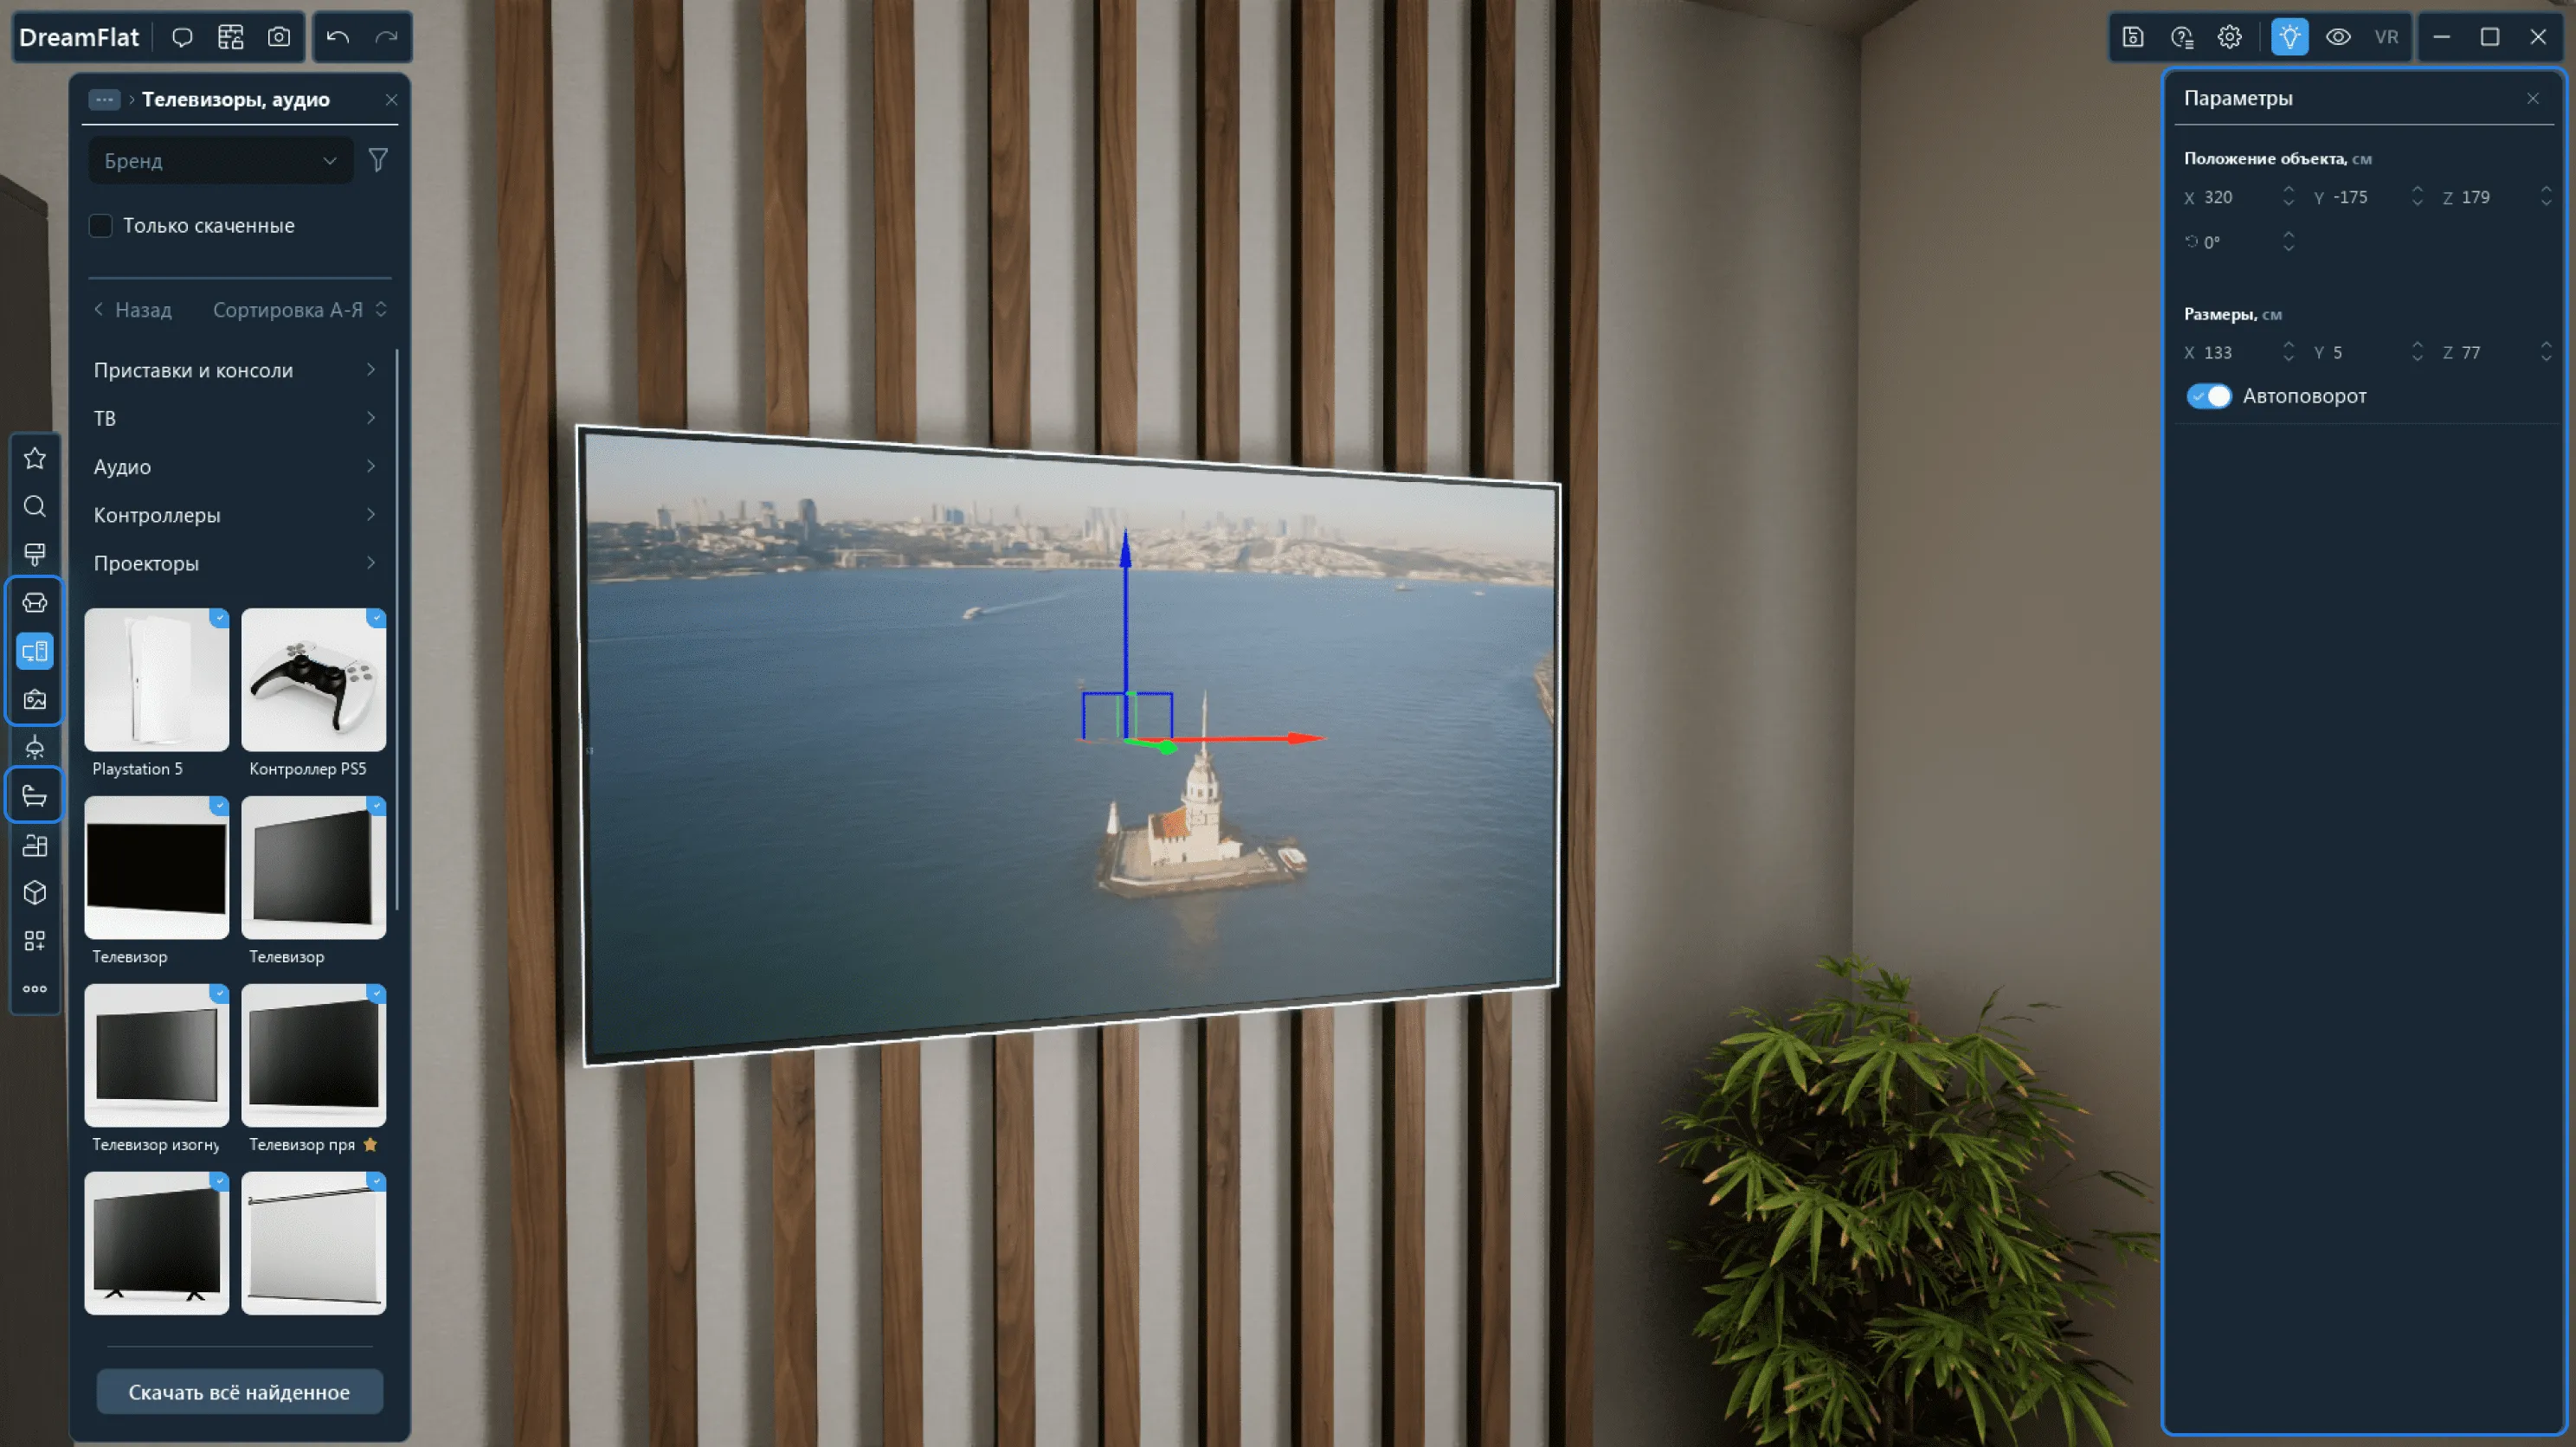
Furniture, Appliances, Décor, Bathroom Equipment, and Other
To use a model, first go to the desired section and drag it onto the scene.
All the general options of scene models are available for furniture, appliances, décor, bathroom equipment, and models from the Other section: they can be moved, rotated, copied and pasted, grouped, auto-rotated, and deleted from the scene.
Decor = Paintings = Customizable image
In the Decor – Paintings section, you can find different preloaded paintings.
To add your own painting to the scene, from the Decor – Paintings section, drag the Custom Image model → In the Parameters on the right, change the object size and position → Click Add your image → Paste a weblink to the image.
Lighting
The lighting in DreamFlat is conventionally divided into two categories: Free Light Sources and Fixtures, Lamps, and Spotlight Systems.
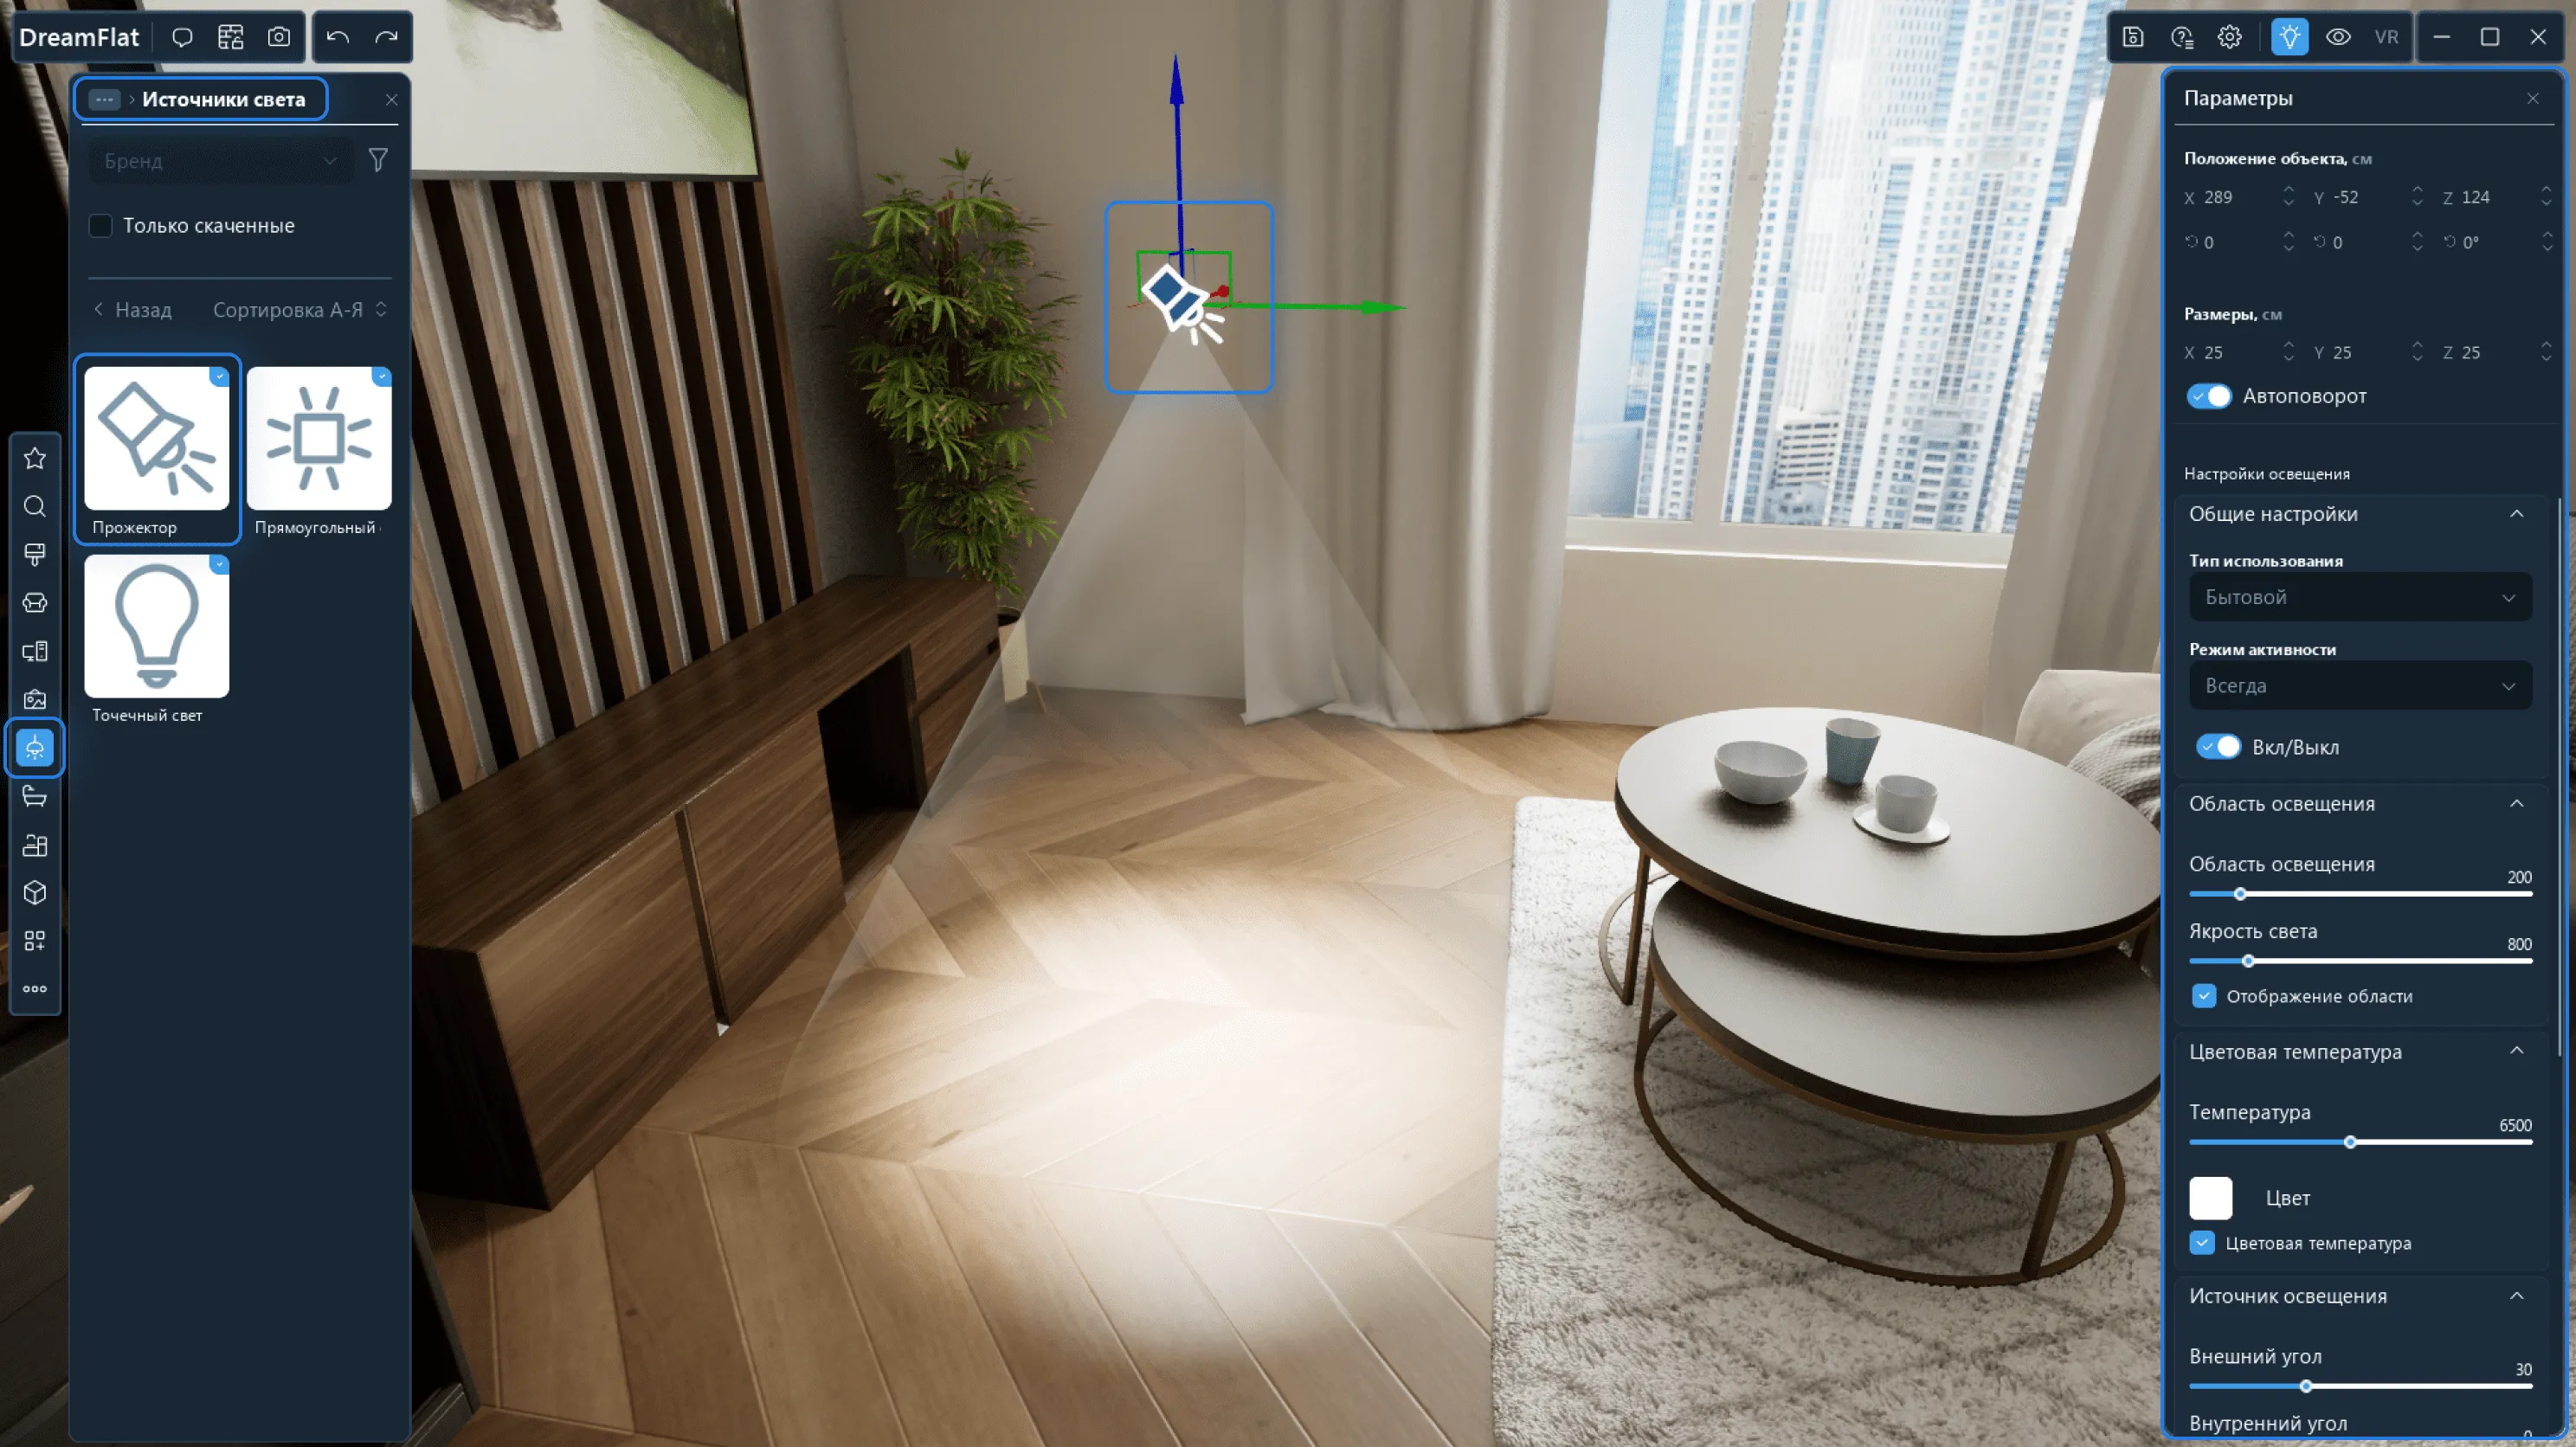
1. Free Light Sources
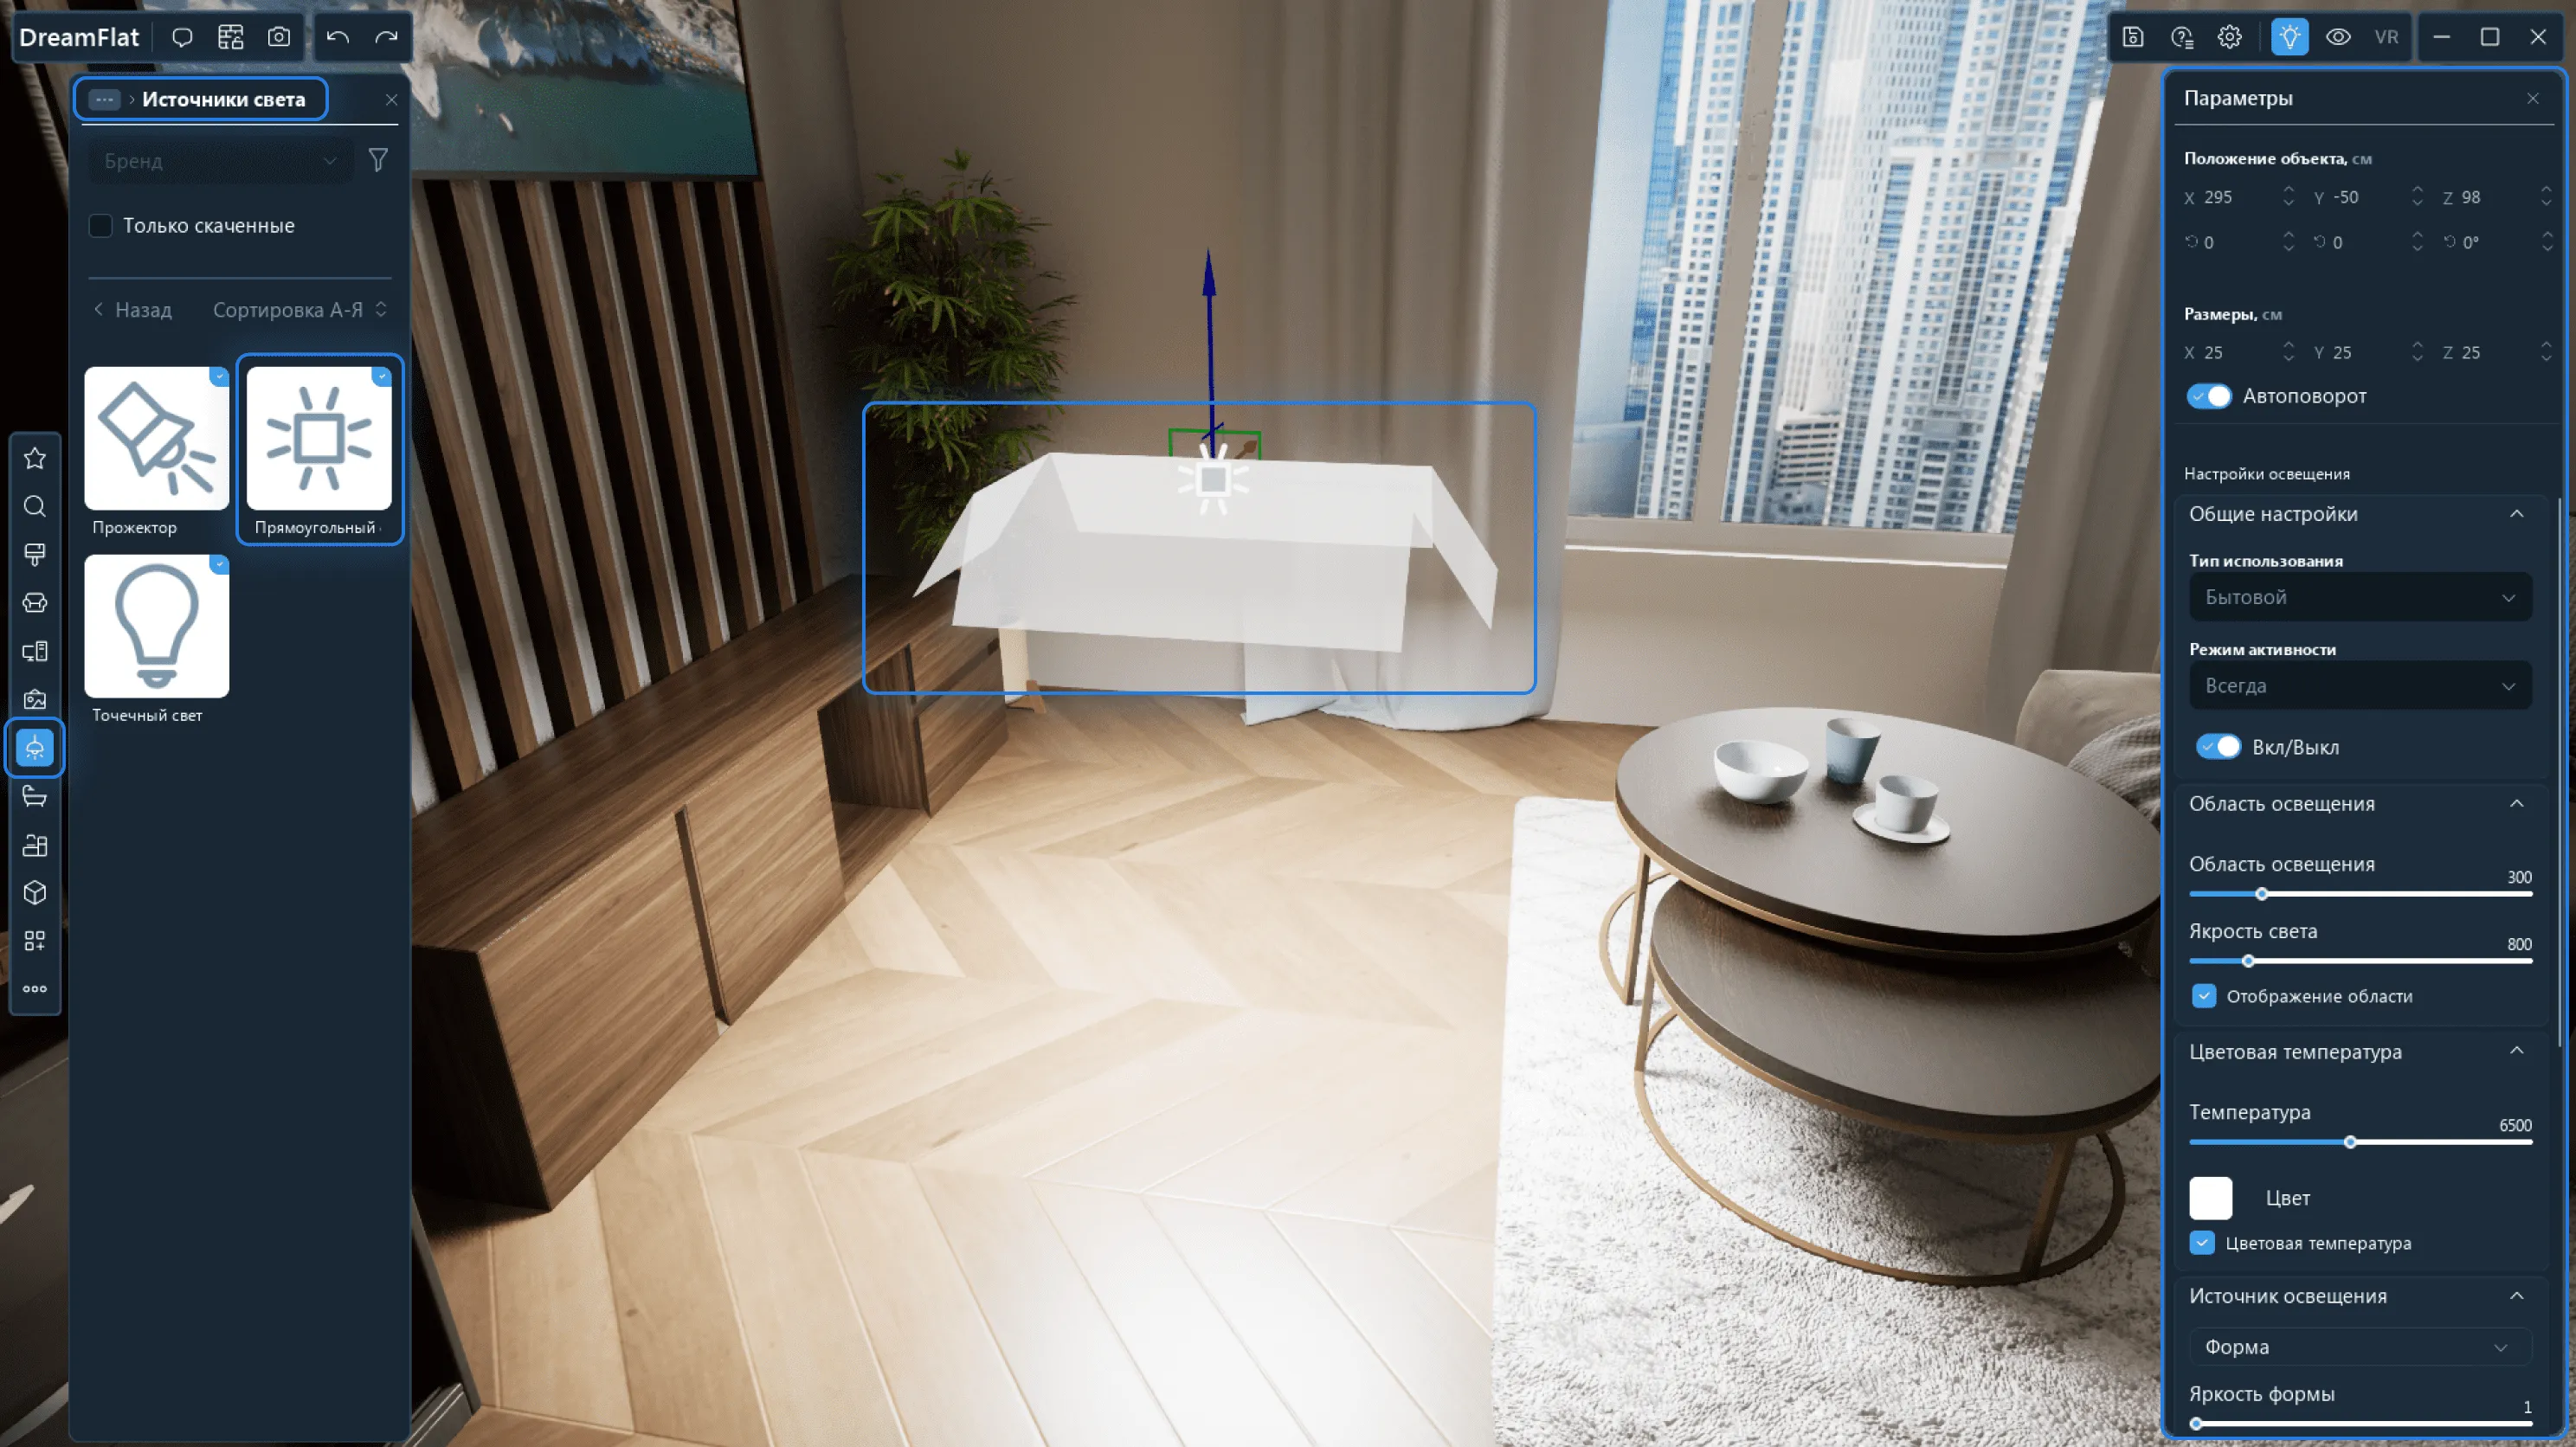
To install free light sources, first go to Lighting and select the Light Sources. This category includes the limelight, rectangular light, and spotlight.
To get started, drag any source from the Library onto the scene.
To make the icons of light sources visible within the scene, press L on your keyboard. To hide the icons, also press L.
1.1. General Object Options of Light Sources
You can use the following options for each of the three light sources.
1. The general options of scene models are also available for light sources: they can be moved, rotated, copied and pasted, grouped, and deleted from the scene.
2. General Lighting Settings. Here you can select Domestic/Other use and the Activity Mode.
● In Domestic, the light source parameters are measured in centimetres for Lit Area and in lumens for the Light Intensity. In Other, you can set a wider range of values.
● In Activity Mode you can choose when the light source will be on: during day, night, or always. For example, if you select night, then the light source will be turned off during the day, and when you switch the time of day to night, it will activate.
● To turn off the light source permanently without linking it to other settings, make the On/Off mode inactive.
3. Every light source has a lit area. To adjust this parameter, set the values in Lit Area and Light Intensity.
4. Colour Temperature. By changing this parameter, you can adjust the temperature of the light or its colour.
● Move the slider to adjust the light temperature.
● To adjust the light colour, uncheck the Colour Temperature box → Click on the colour icon → On the colour wheel, select a colour and click Accept.
● To change the light temperature, uncheck the Colour Temperature box → Move the light temperature slider.
5. Light Source. Here you can adjust IES Profile, the shape, shape intensity, light source radius, light source length, and light source angle.
● Use IES Profile to adjust light distribution from the Light Source.
● Select between a sphere, a cube, and a cylinder to assign the shape of the light source. You can also adjust the dimensions in the general object options to change the shape. For example, this way you can turn a cube into a rectangle of any size.
● Shape Intensity is the intensity of the lighting coming from the shape.
● Light Source Radius option affects the hardness of the shadows and the way the light will be distributed.
● You can adjust the Light Source Length and the rotation angles.
1.2. Limelight
A limelight is a cone-shaped light source. You can set it up using the general options. Additional options will become available in the Light Source:
You can additionally adjust the light distribution by the outer and inner angle of the Limelight.
1.3. Rectangular Light
Rectangular lights are mainly used for ceiling lighting. You can adjust this source using the general options. Additional options will become available in the Light Source:
For rectangular light, you can additionally adjust the length and width of the light source, angle and length of the shutters.
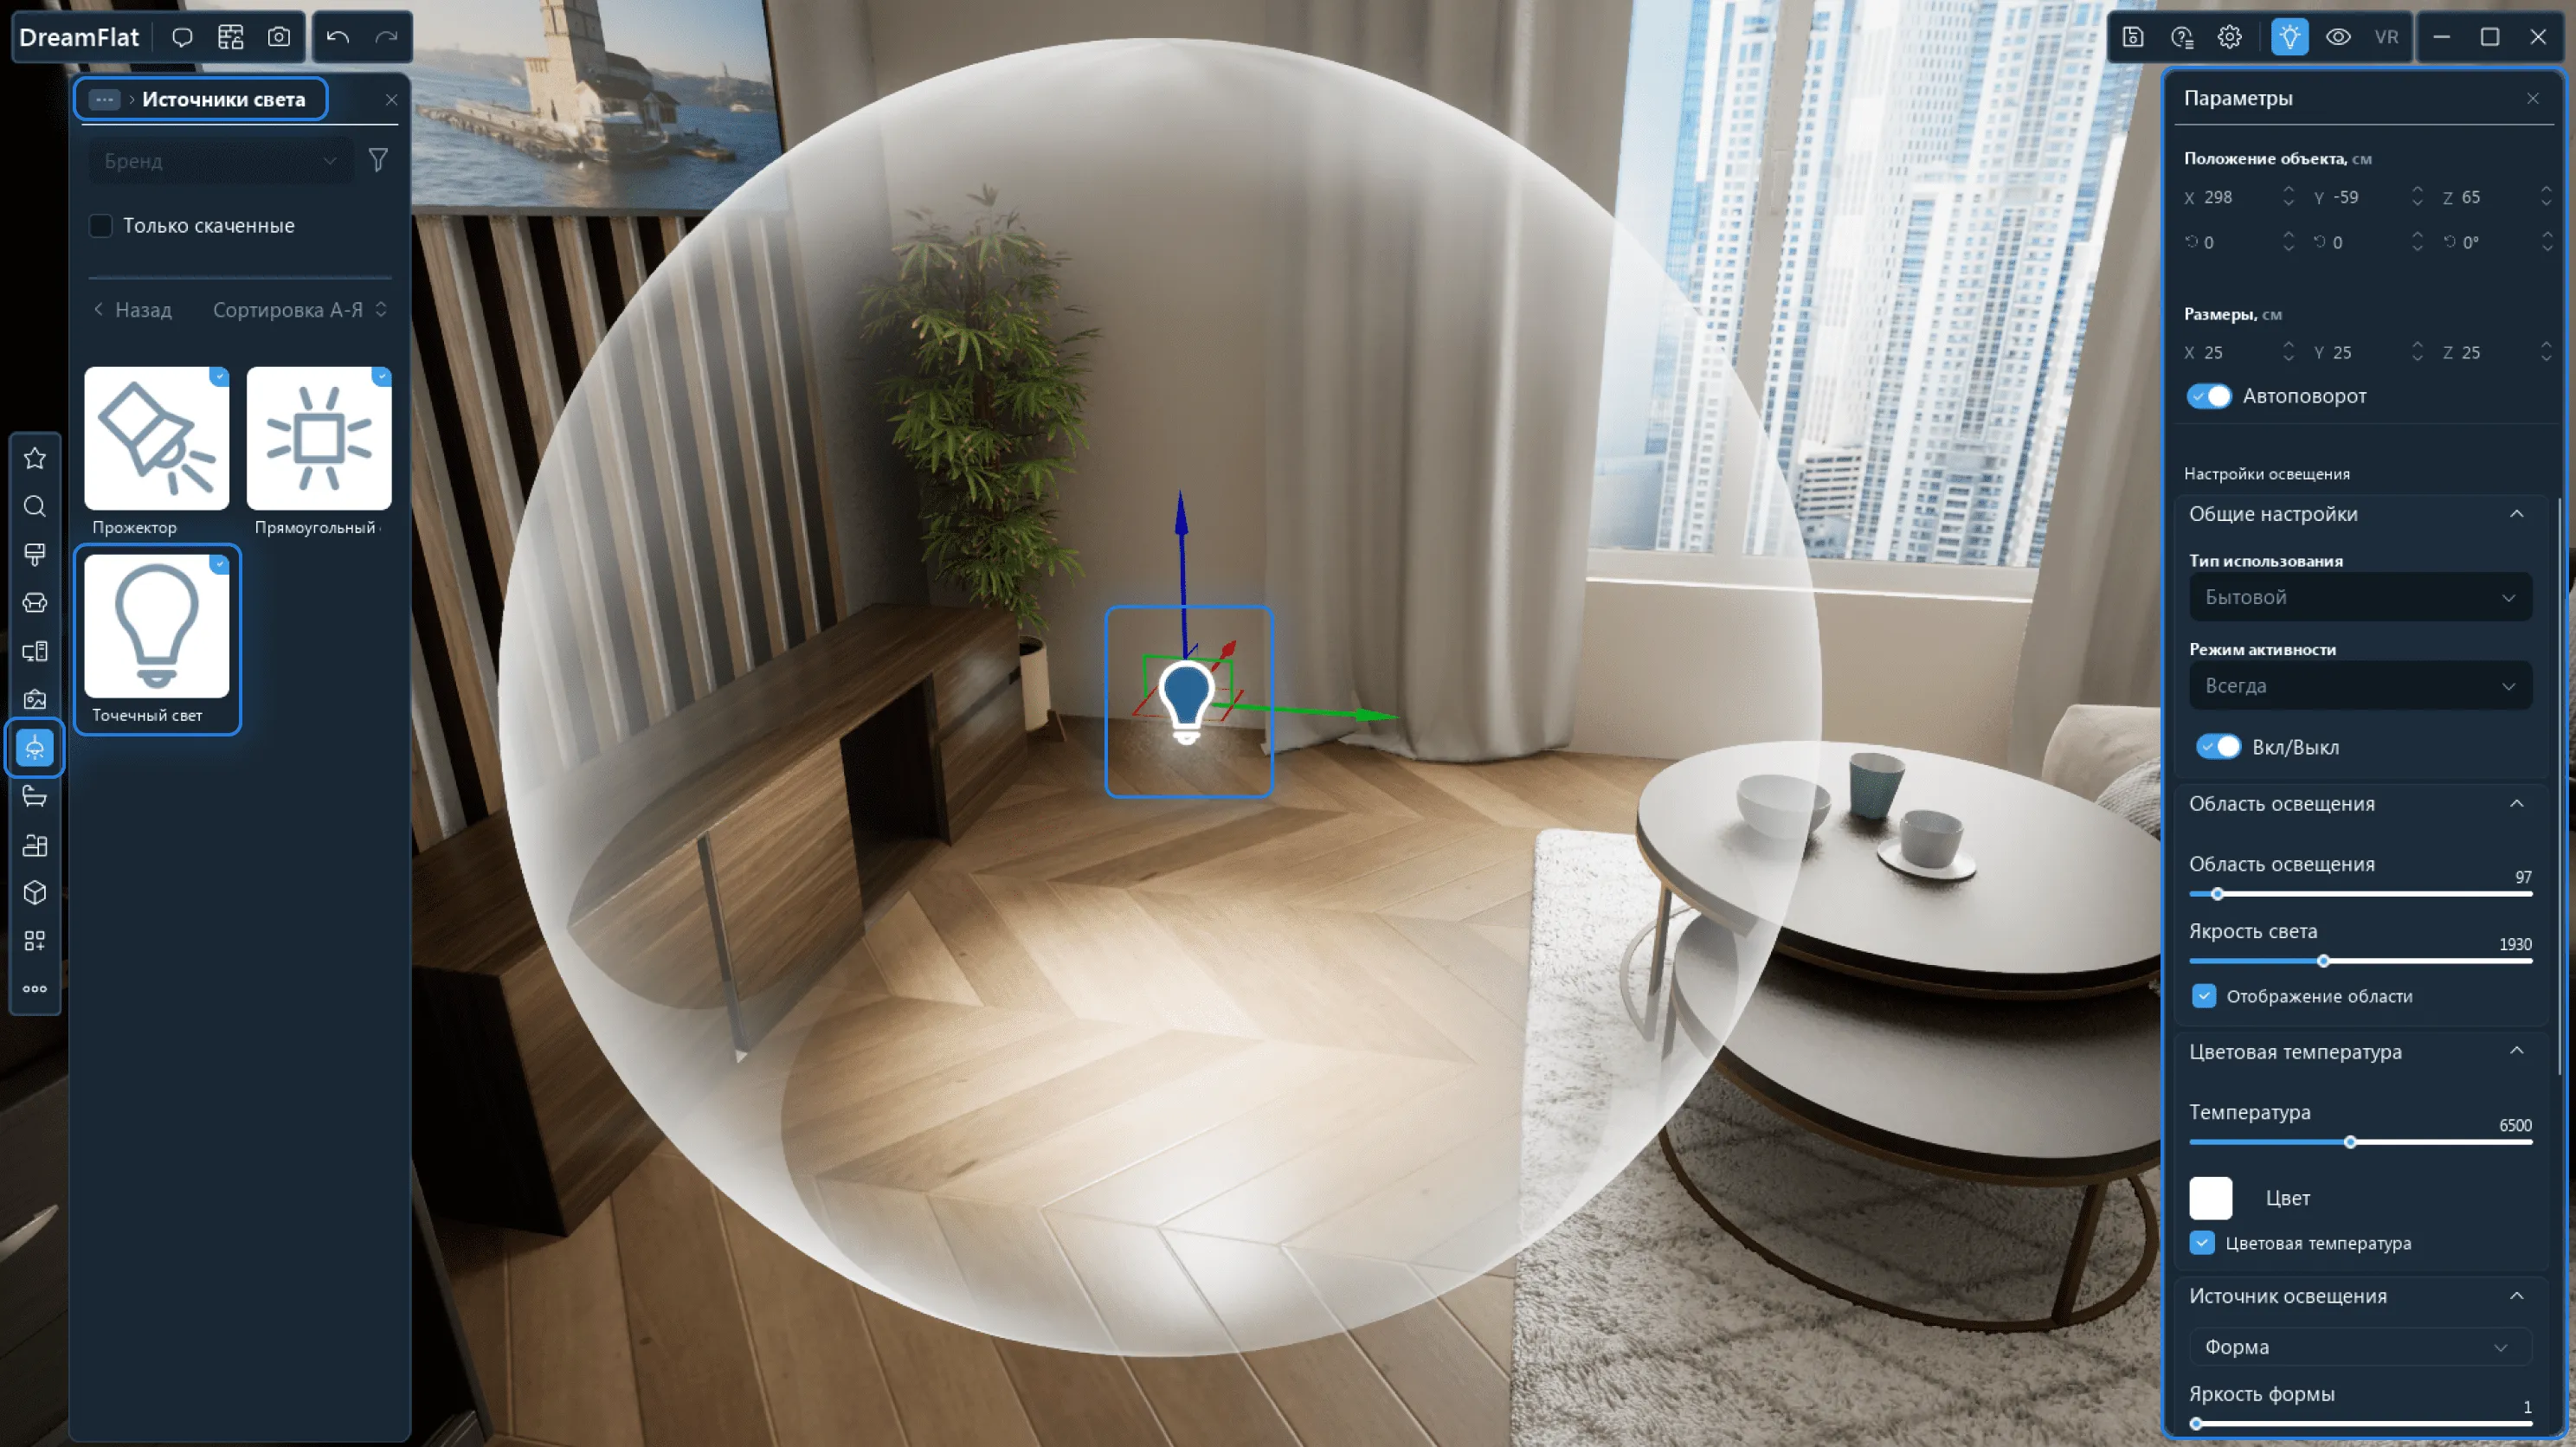
1.4. Spot Light
A spot light is a light that shines in all directions. You can adjust this source using the general options.
2. Fixtures, Lamps, Spot Light Systems
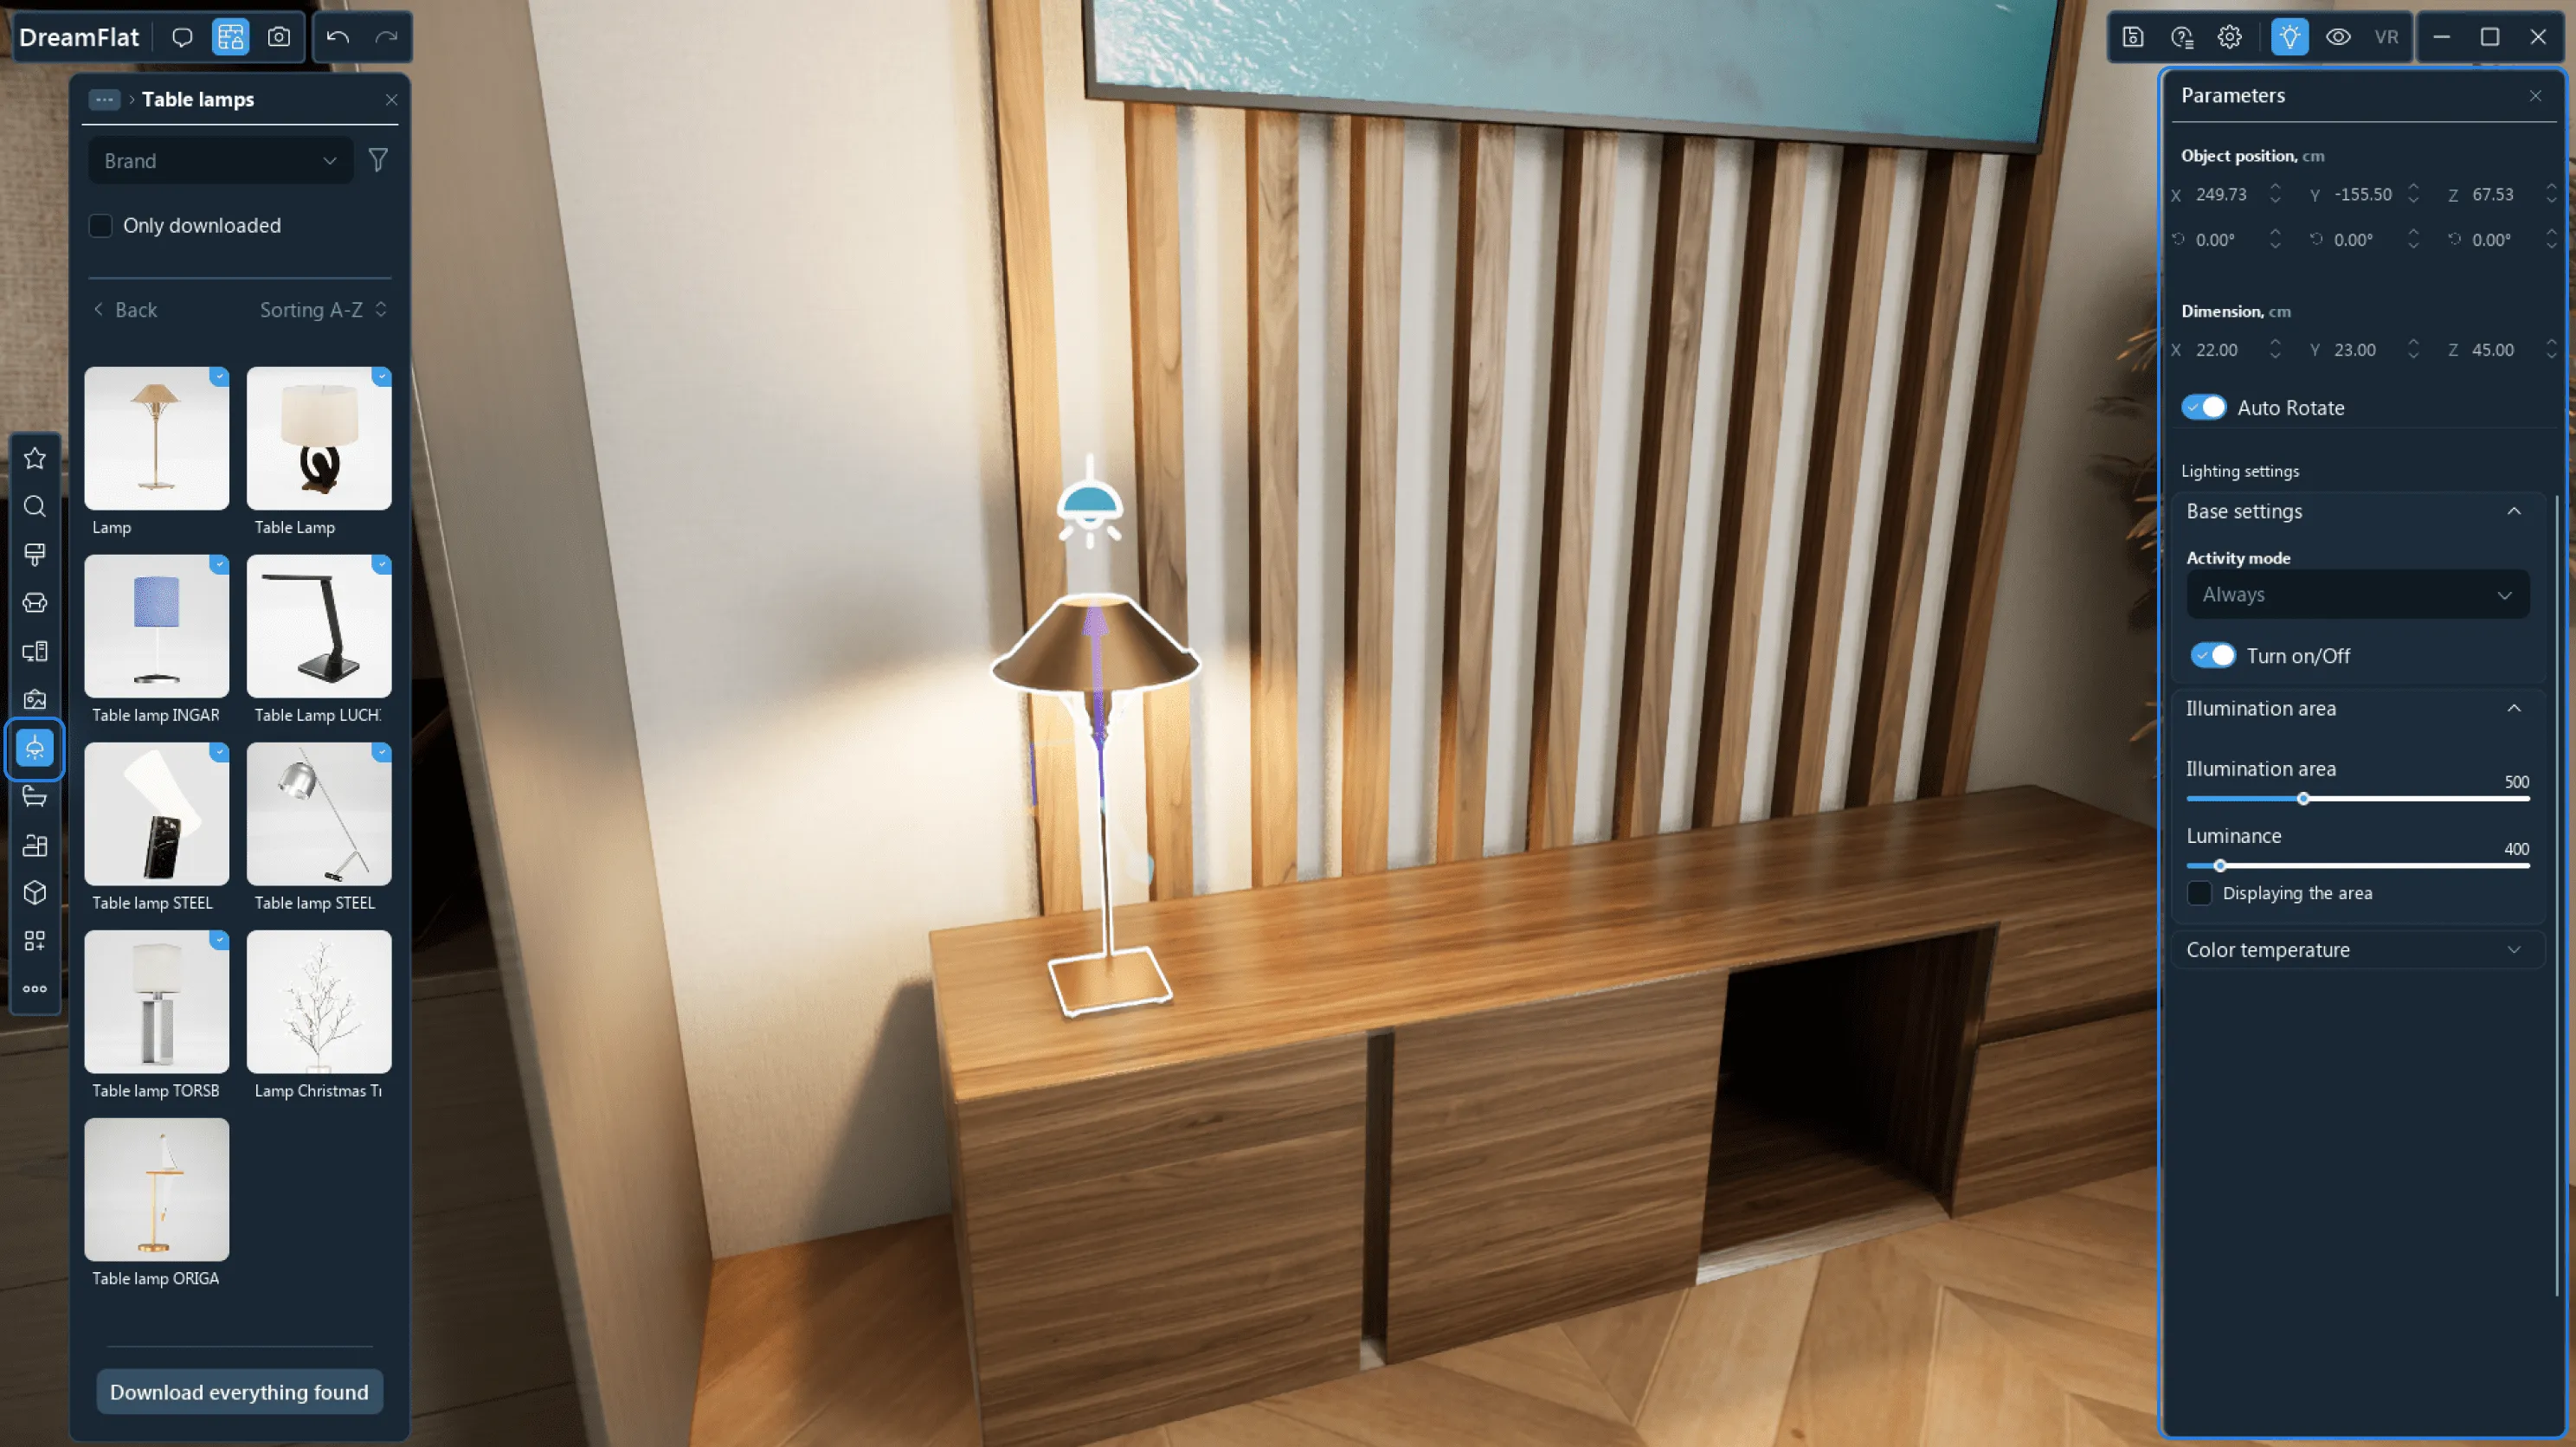
You can use floor and table lamps and fixtures as well as spot light systems in your project.
To add a lighting object to your scene, drag it from the Library to any area of the scene.
1. All the general options of scene models are available for lighting objects: they can be moved, rotated, copied and pasted, grouped, auto-rotated, and deleted from the scene.
2. General Lighting Settings. Here you can select Domestic/Other use and the Activity Mode.
● In Activity Mode you can choose when the light source will be on: during day, night, or always. For example, if you select night, then the light object will be turned off during the day, and when you switch the time of day to night, it will activate.
● To turn off the light object permanently without linking it to other settings, make the On/Off mode inactive.
3. Every light source has a lit area. To adjust this parameter, set the values in Lit Area and Light Intensity.
● You can choose to display the lit area in the scene. To do this, tick the Display Lit Area box. To hide the radius, uncheck the box.
4. Colour Temperature. By changing this parameter, you can adjust the temperature of the light or its colour.
● Move the slider to adjust the light temperature.
● To adjust the light colour, uncheck the Colour Temperature box → Click on the colour icon → On the colour wheel, select a colour and click Accept.
● To change the light temperature, uncheck the Colour Temperature box → Move the light temperature slider.
Kitchen
You can use pre-made kitchens or create your own using modules.
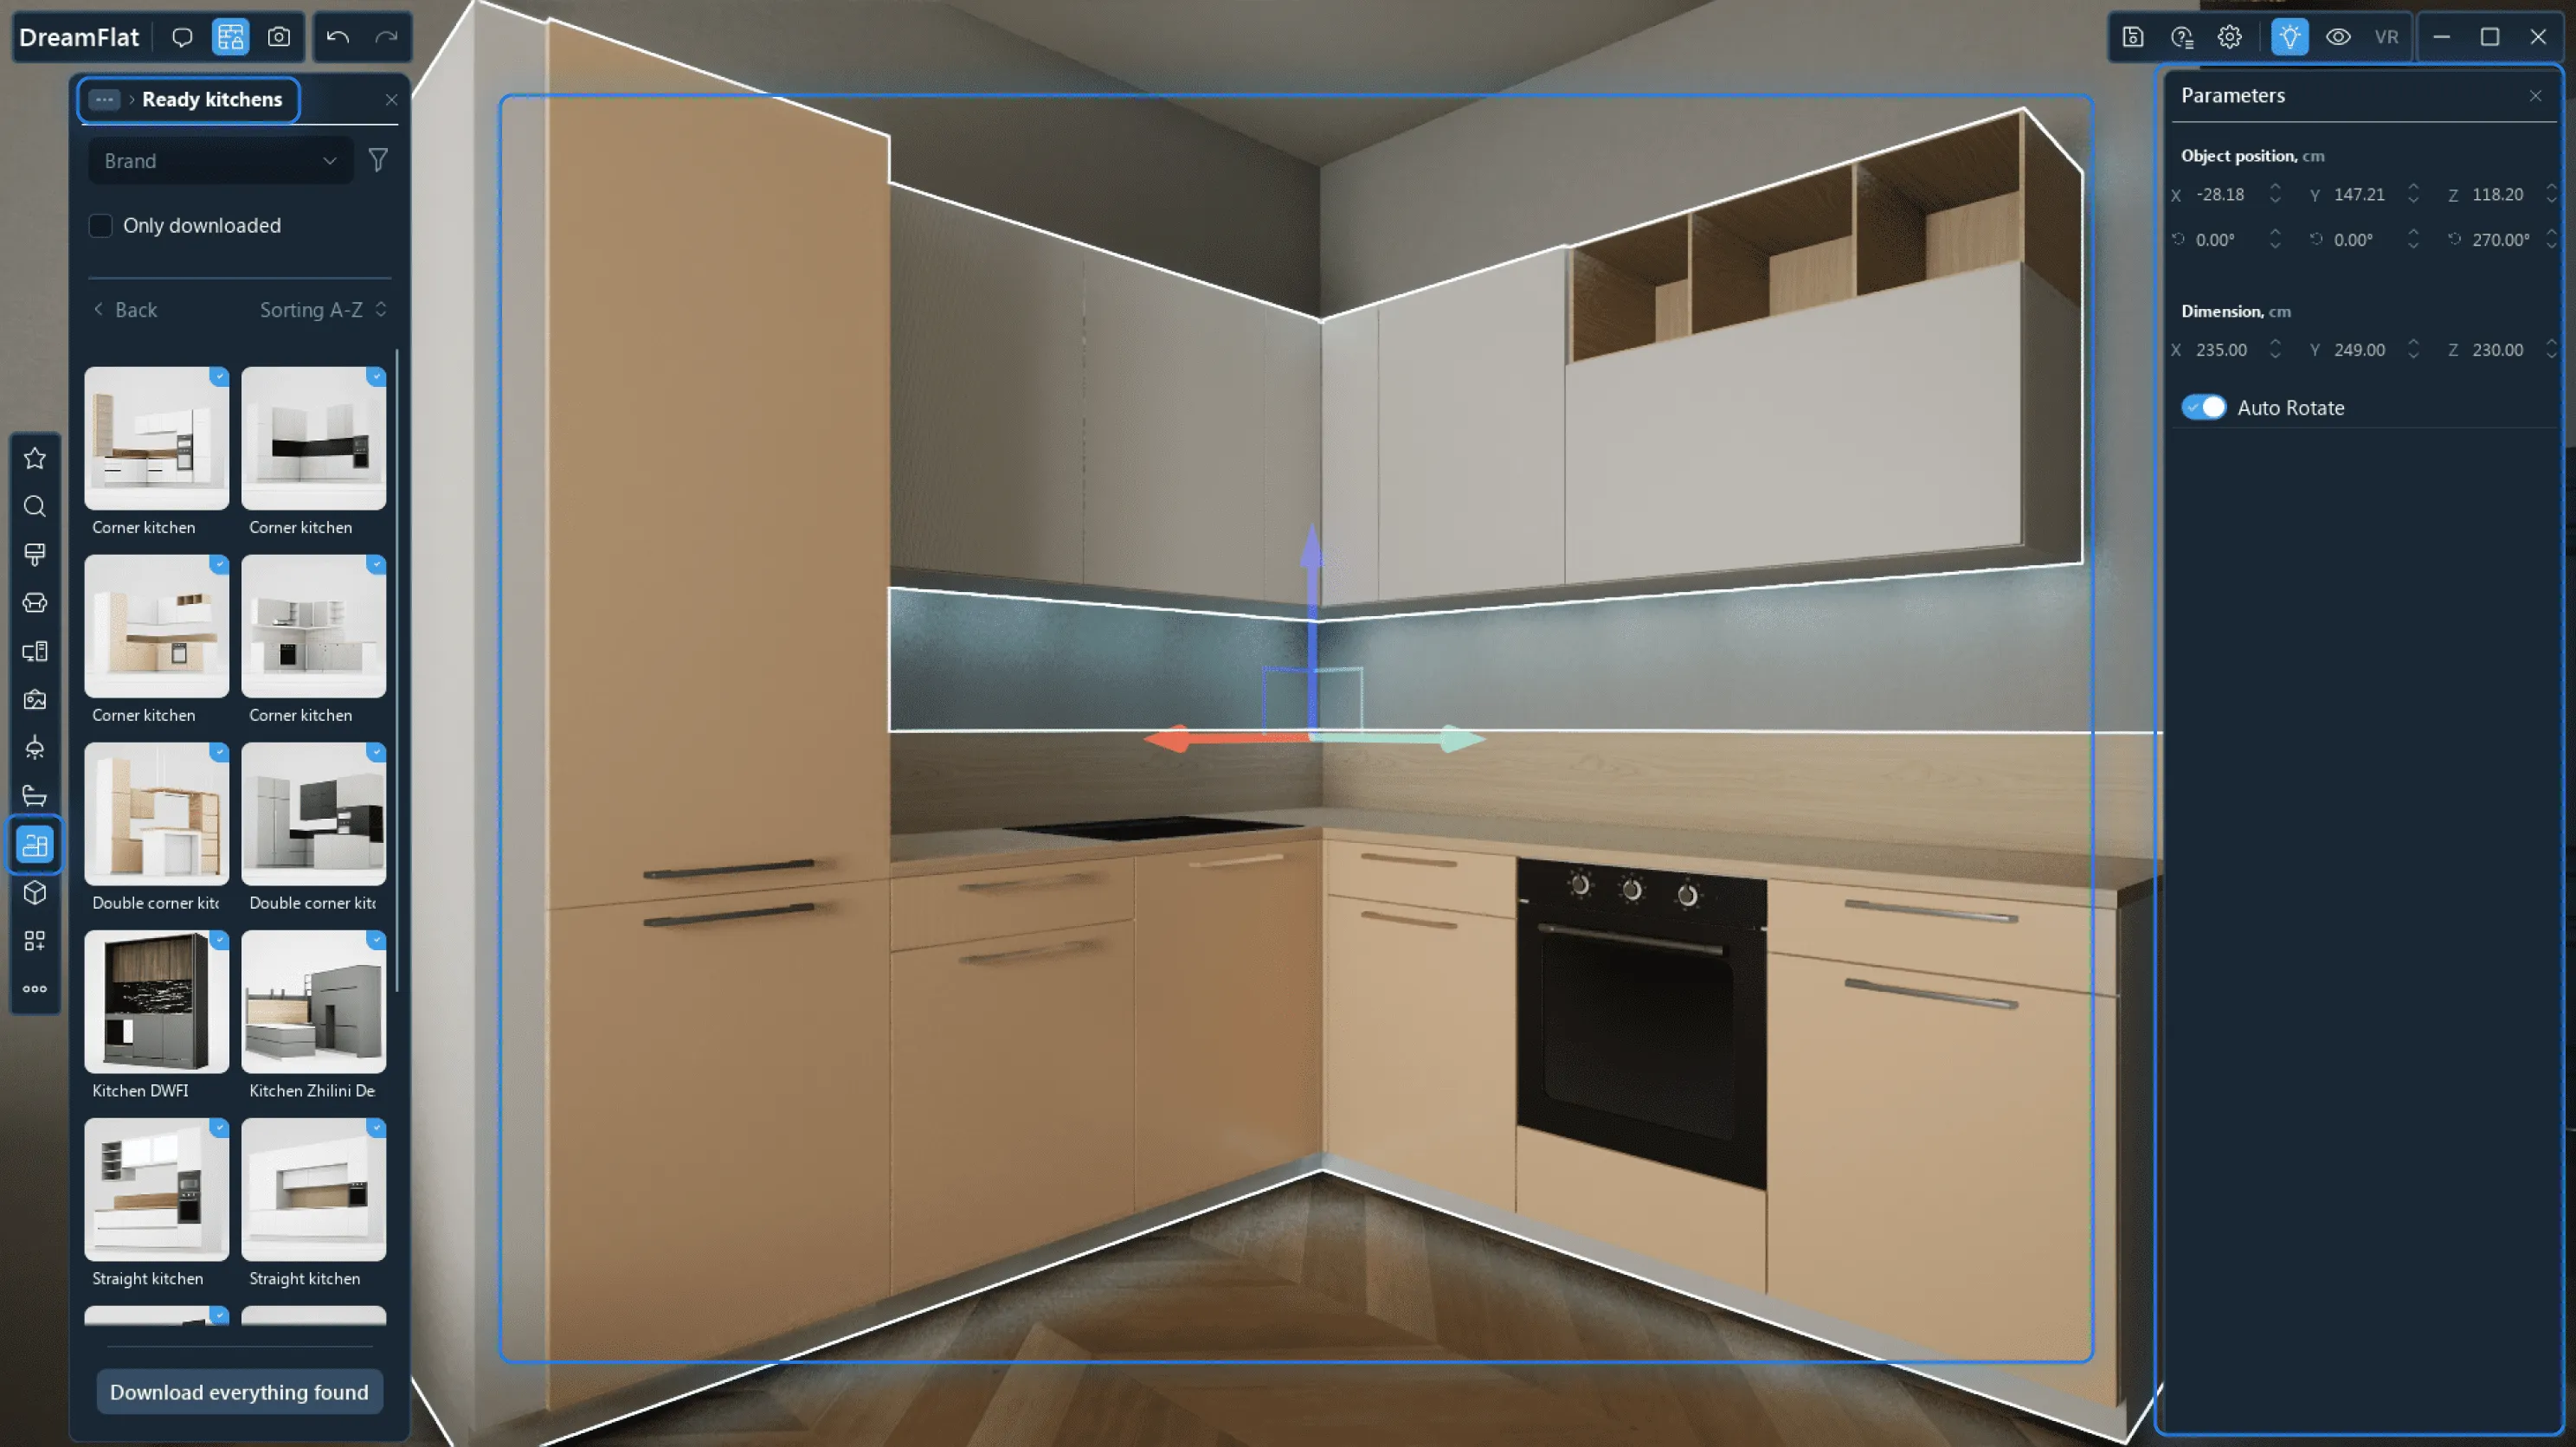
1. Pre-designed Kitchens
You can pick from the pre-designed kitchens available in the Library. All the general options of scene models are available for kitchens: they can be moved, rotated, copied and pasted, grouped, auto-rotated, and deleted from the scene. You can work on pre-made kitchens in the same way as on other models.
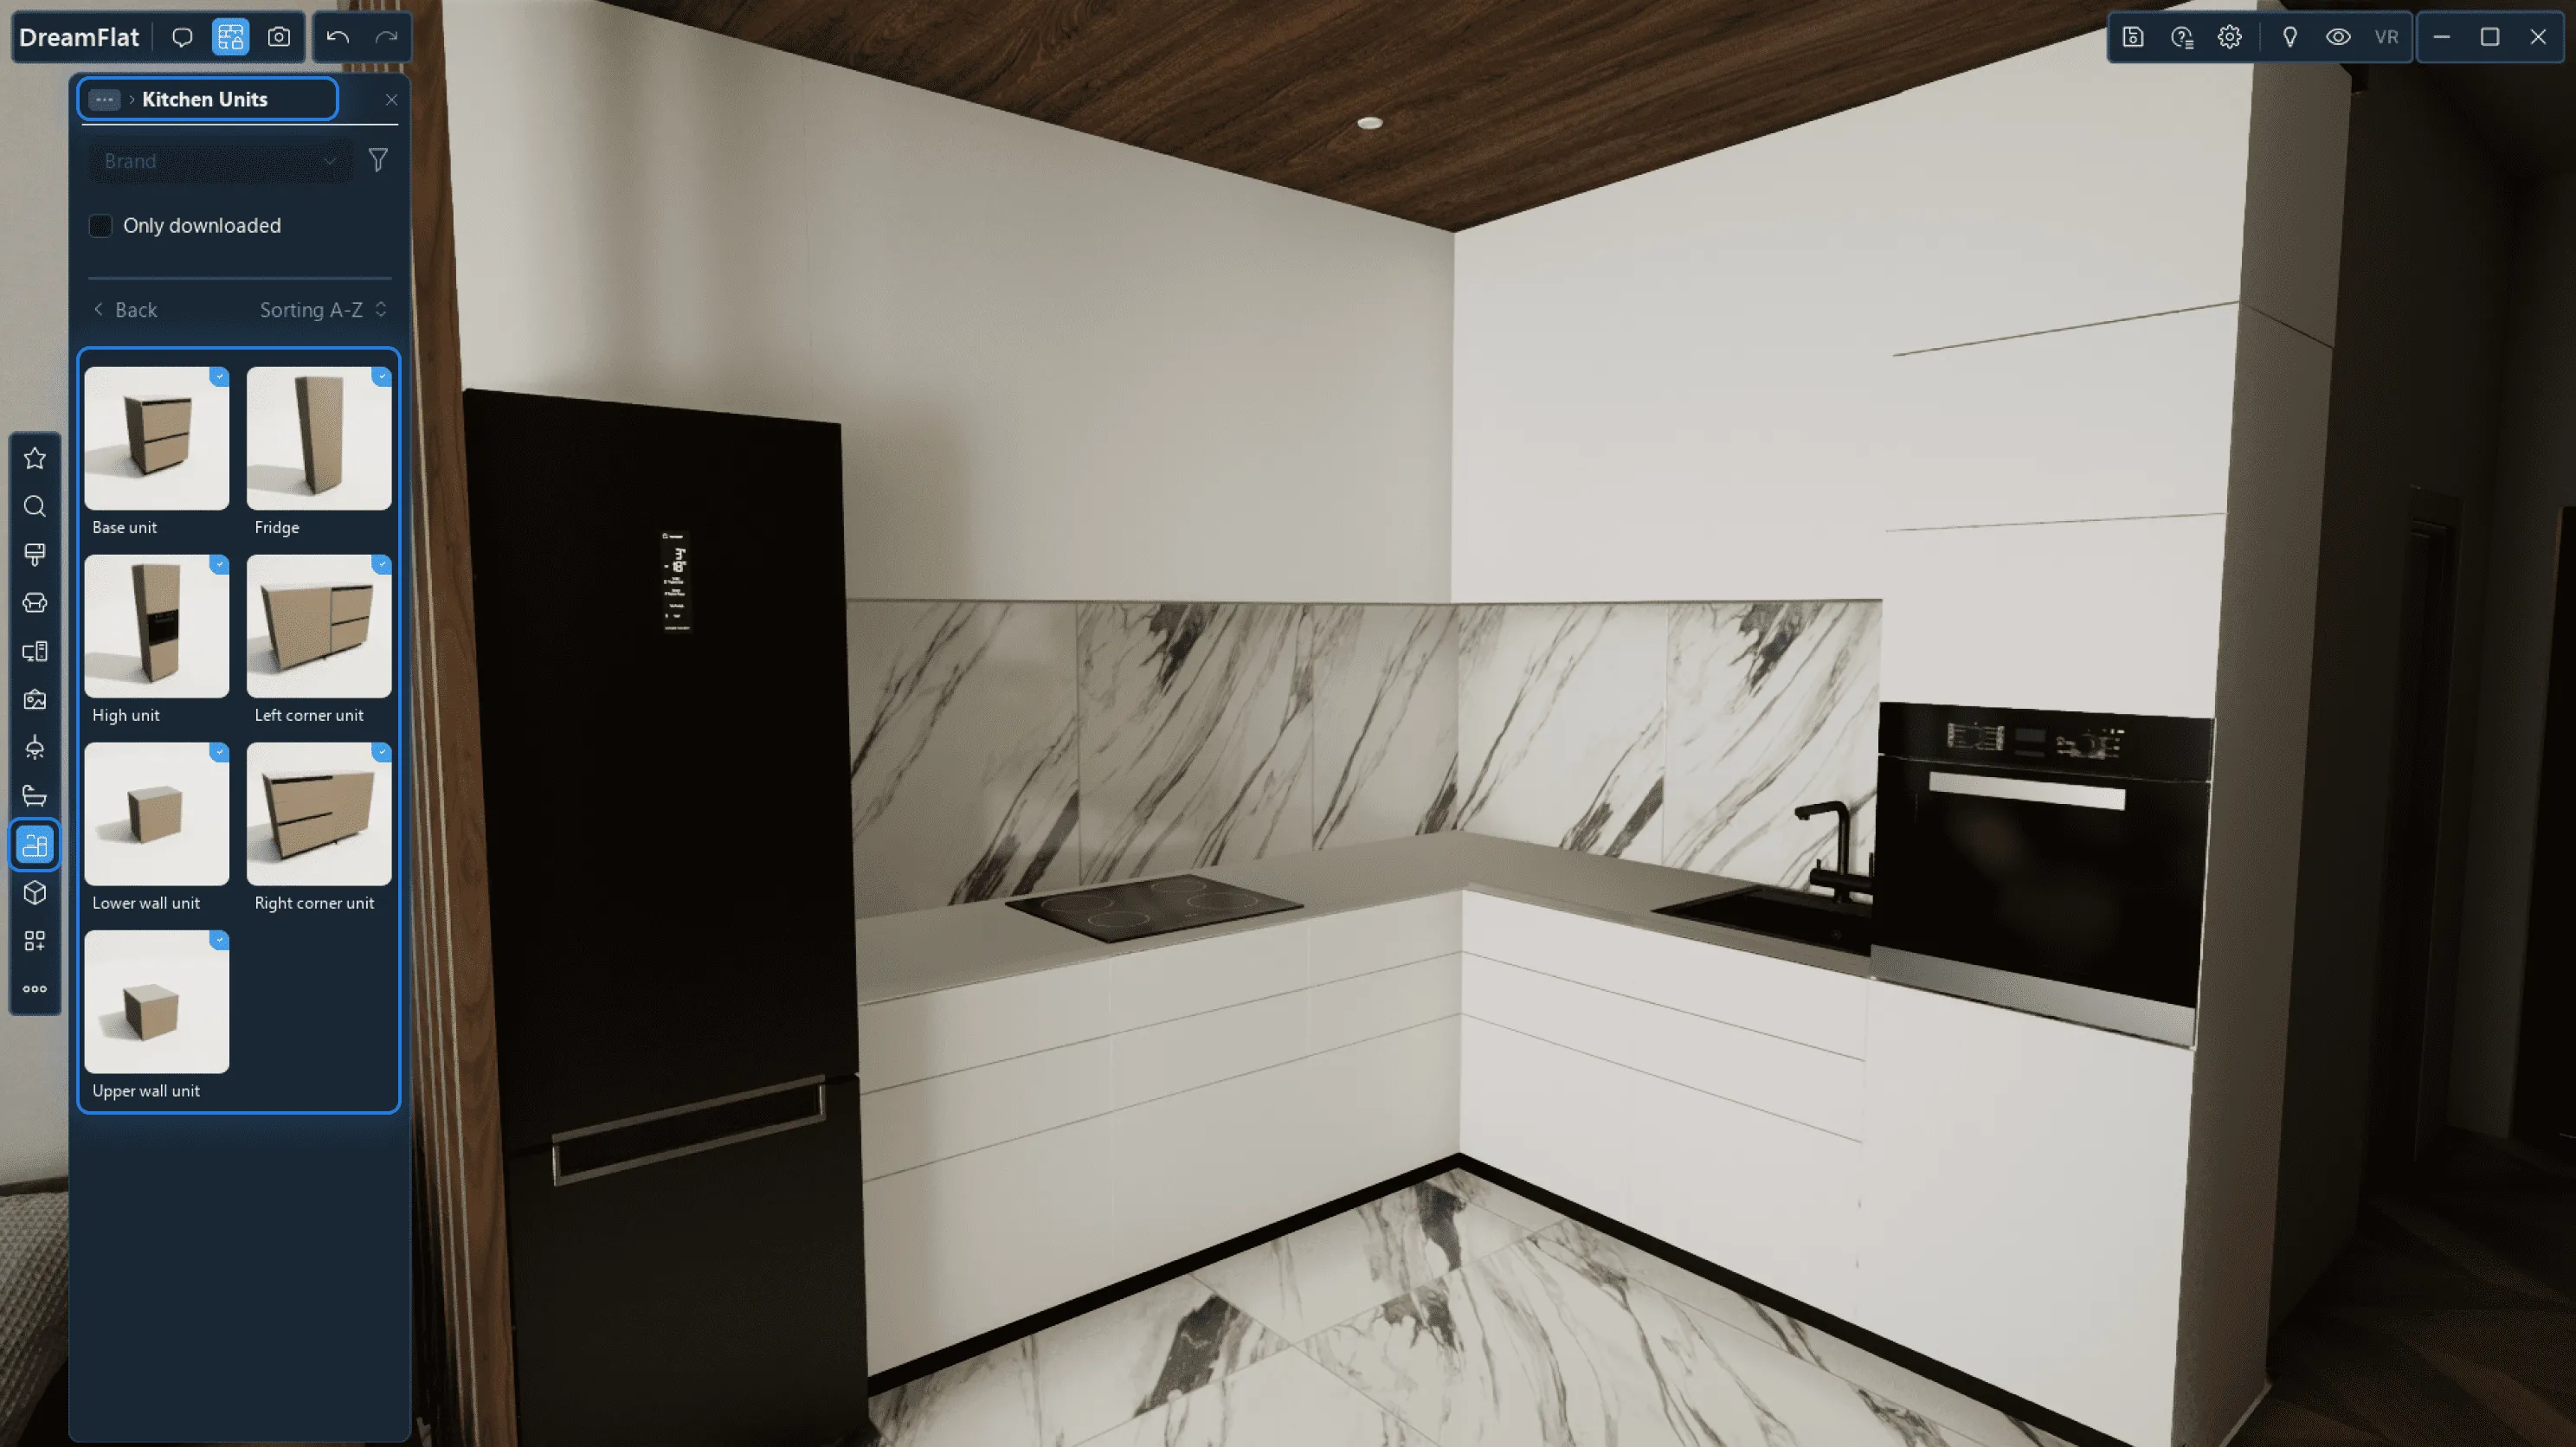
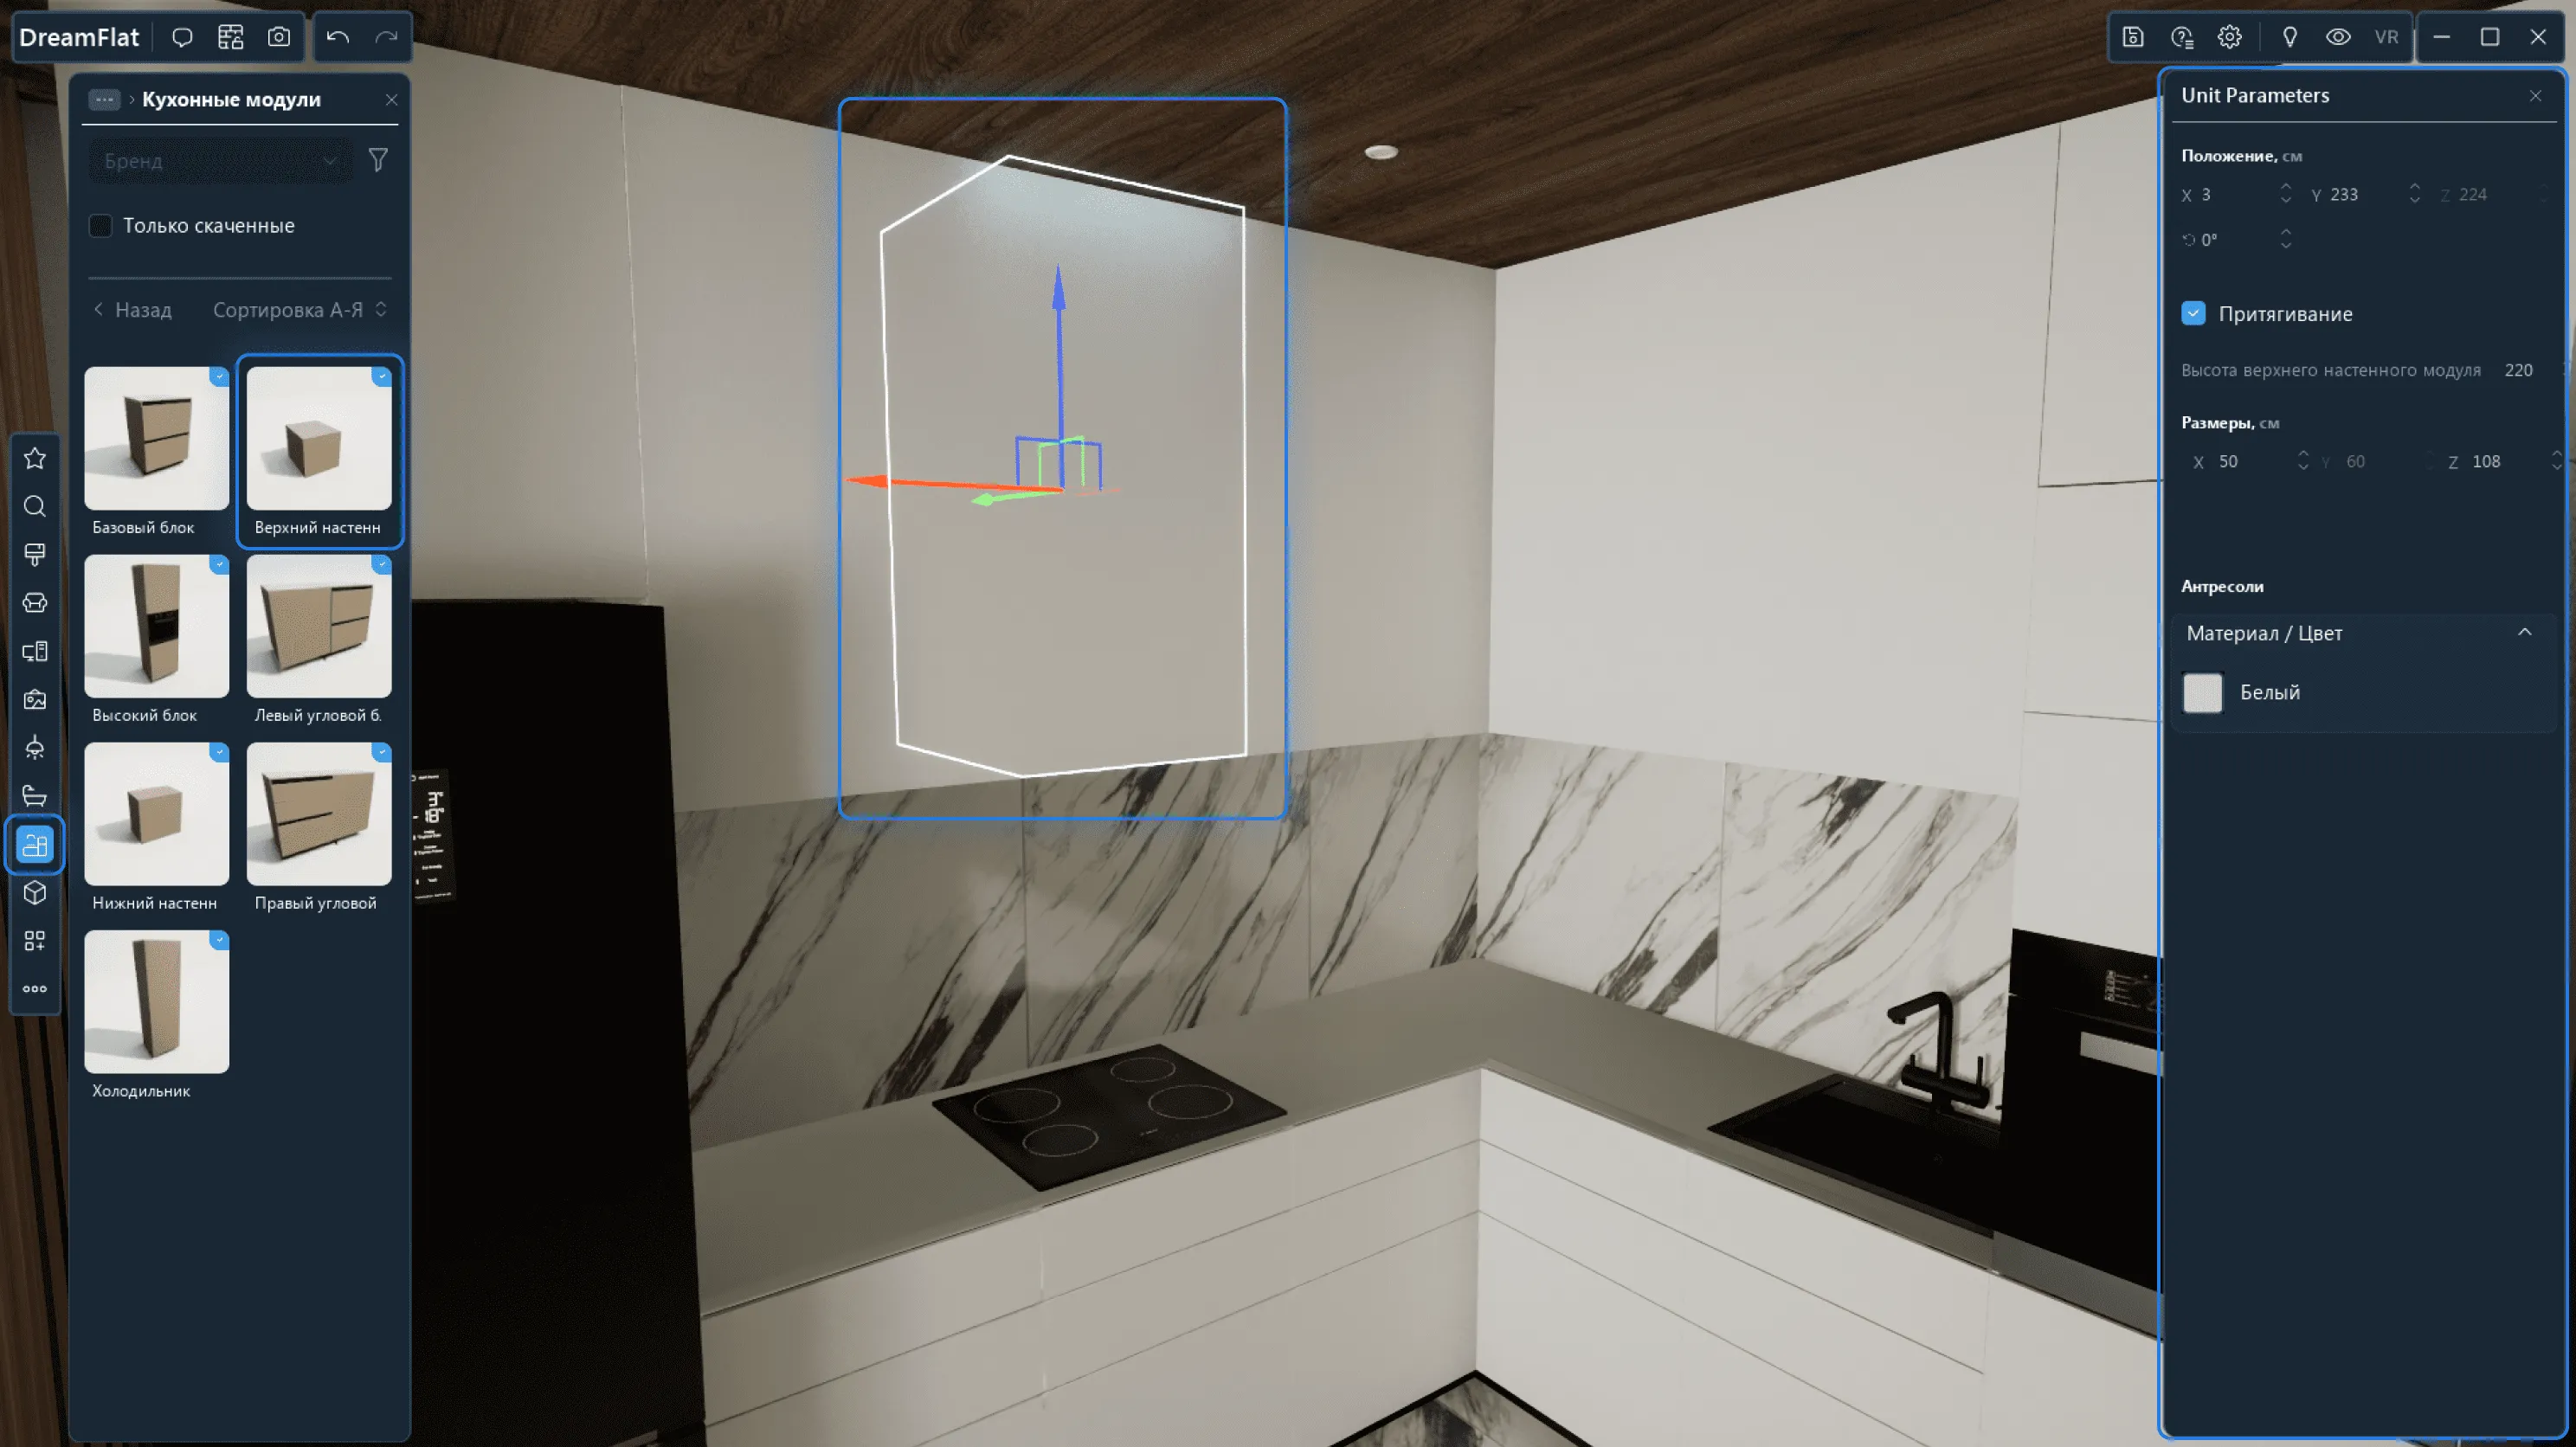
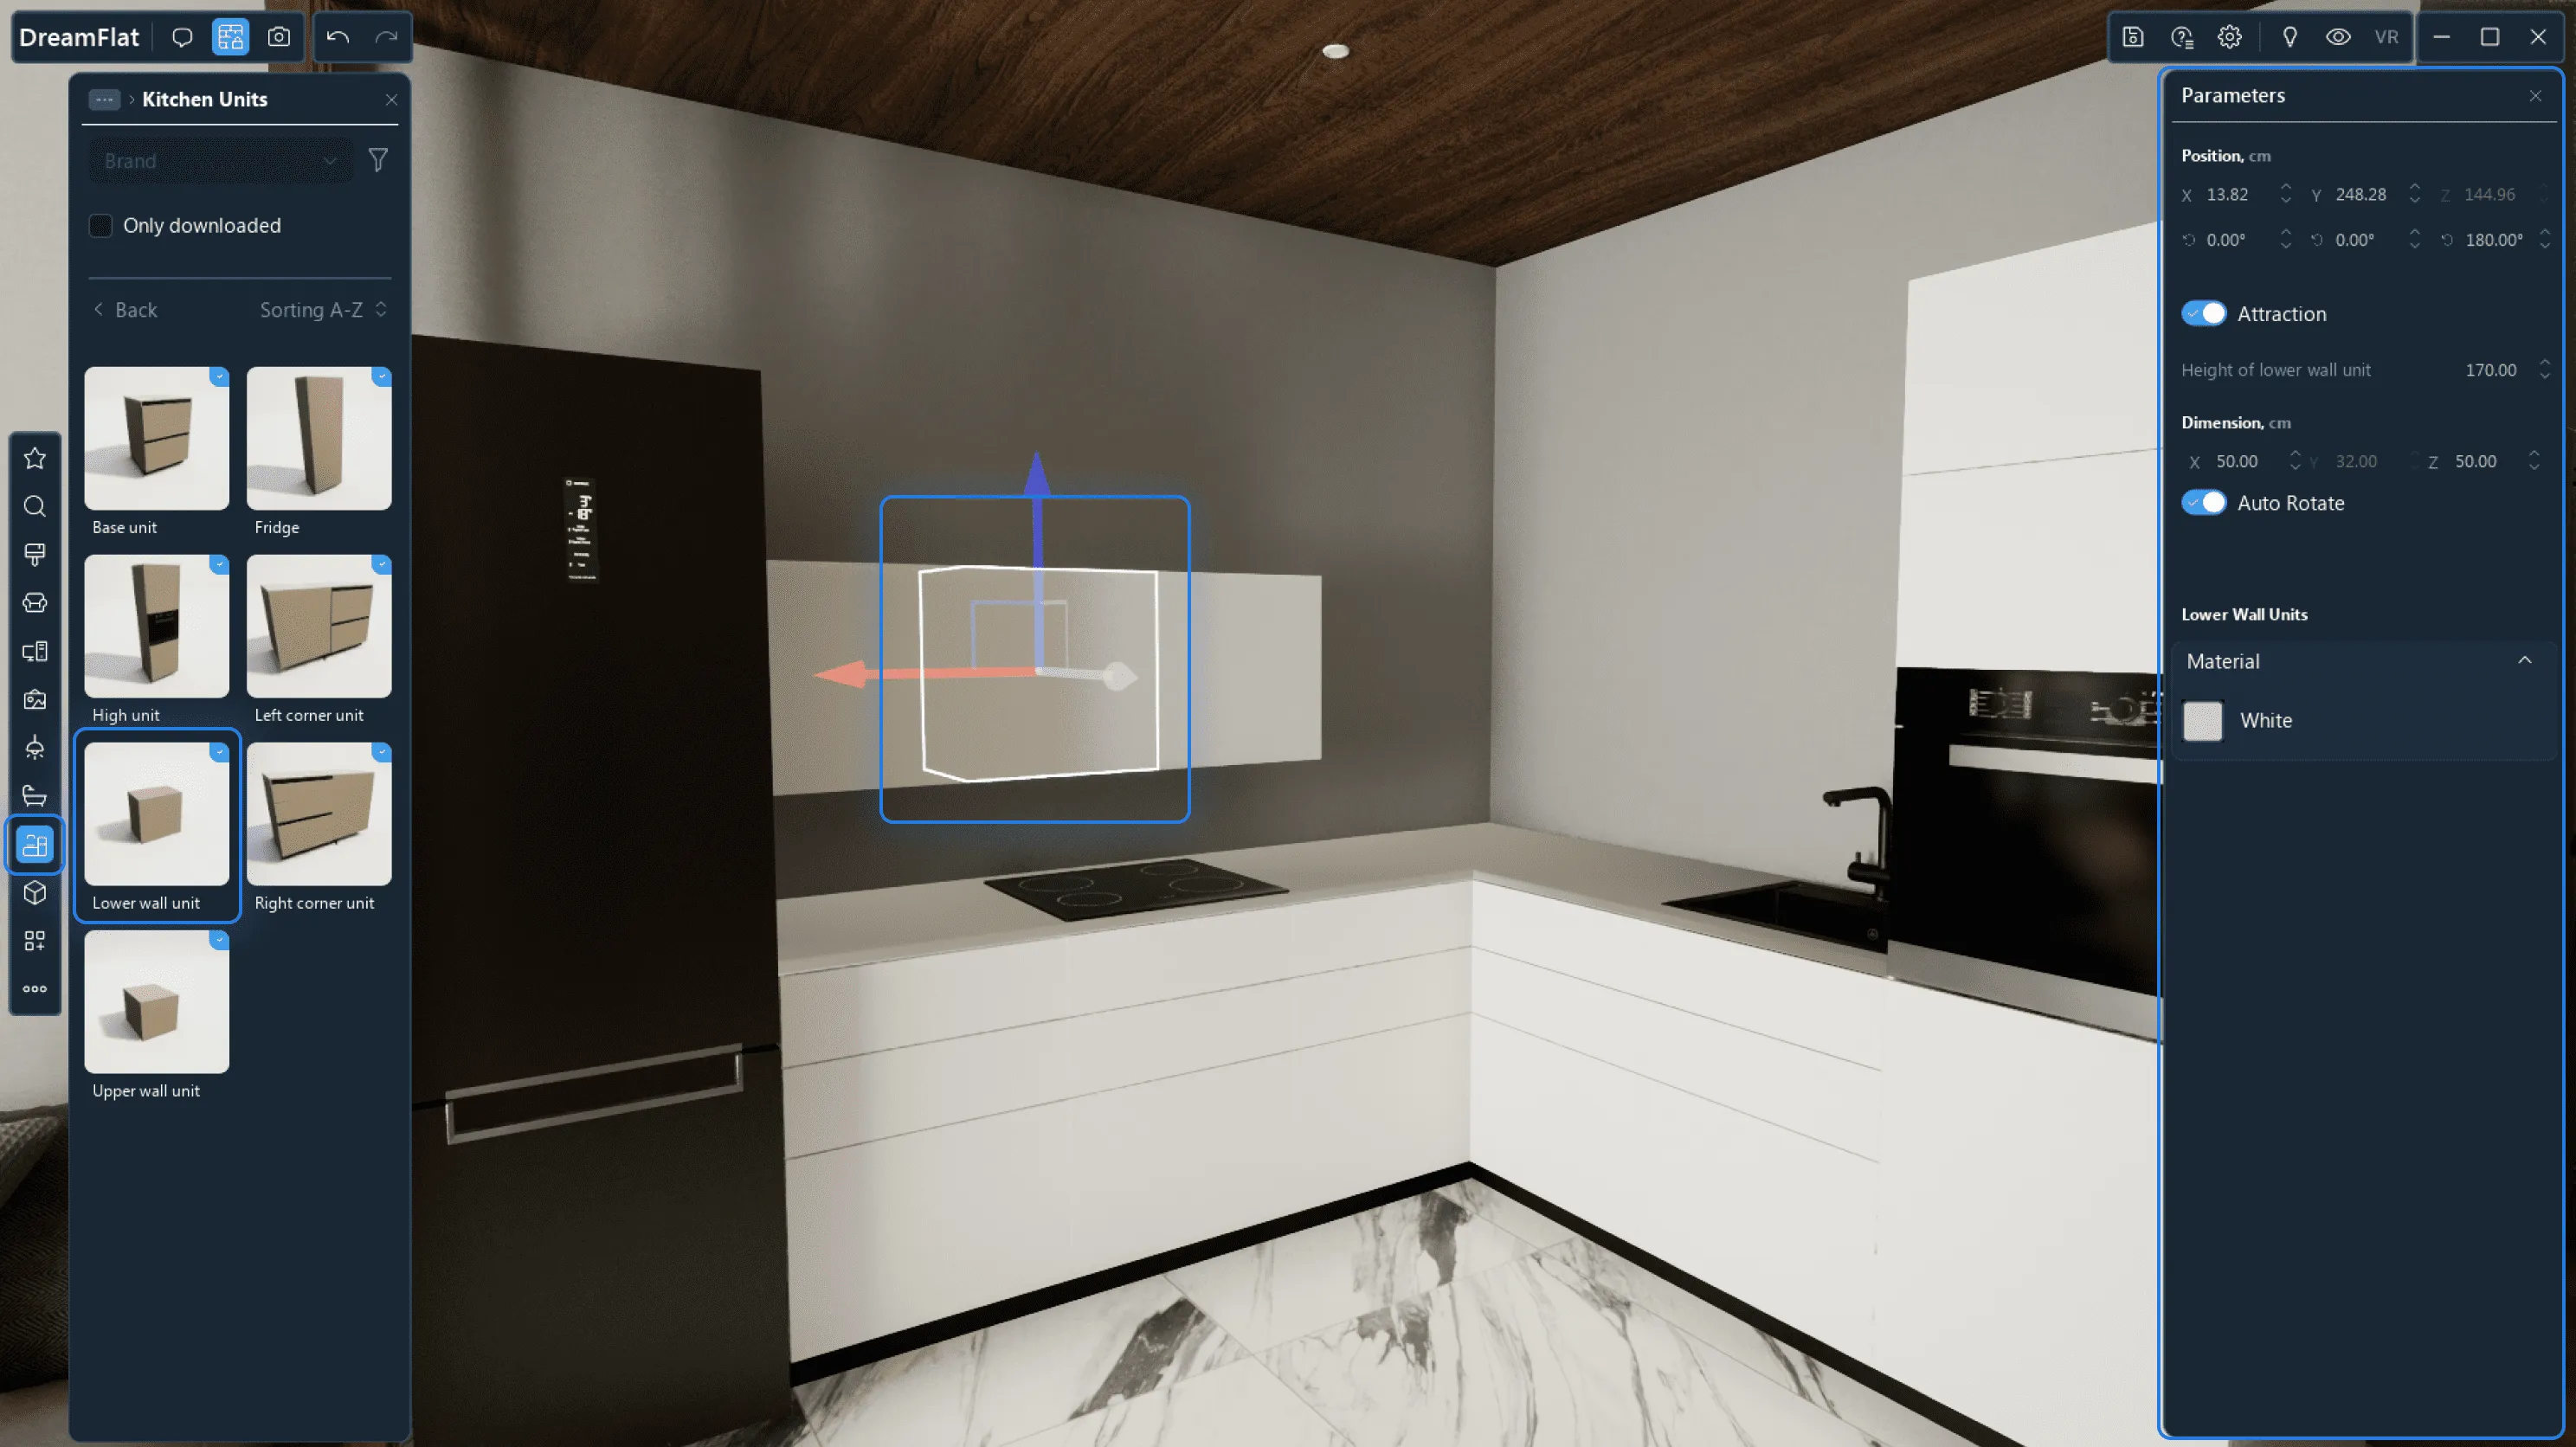
2. Modular Kitchens
You can create a kitchen using kitchen modules. First, go to Kitchens → Kitchen Modules → Select a module and drag it onto the scene.
The base unit, top wall unit, tall unit, left corner unit, bottom wall unit, right corner unit, and fridge are available.
After adding a module, a menu will appear on the right, where you can configure the object parameters. We will discuss these parameters below.
2.1. General Options for Kitchen Modules
1. The same general options as for scene models are also available for kitchen modules: they can be moved, rotated, copied and pasted, grouped, and deleted from the scene.
For ease the use, auto-rotation of kitchen modules is on by default.
2. The alignment will allow you to automatically place one module next to another. This function is on by default. To disable the alignment, uncheck the box.
3. Changing the object dimensions.
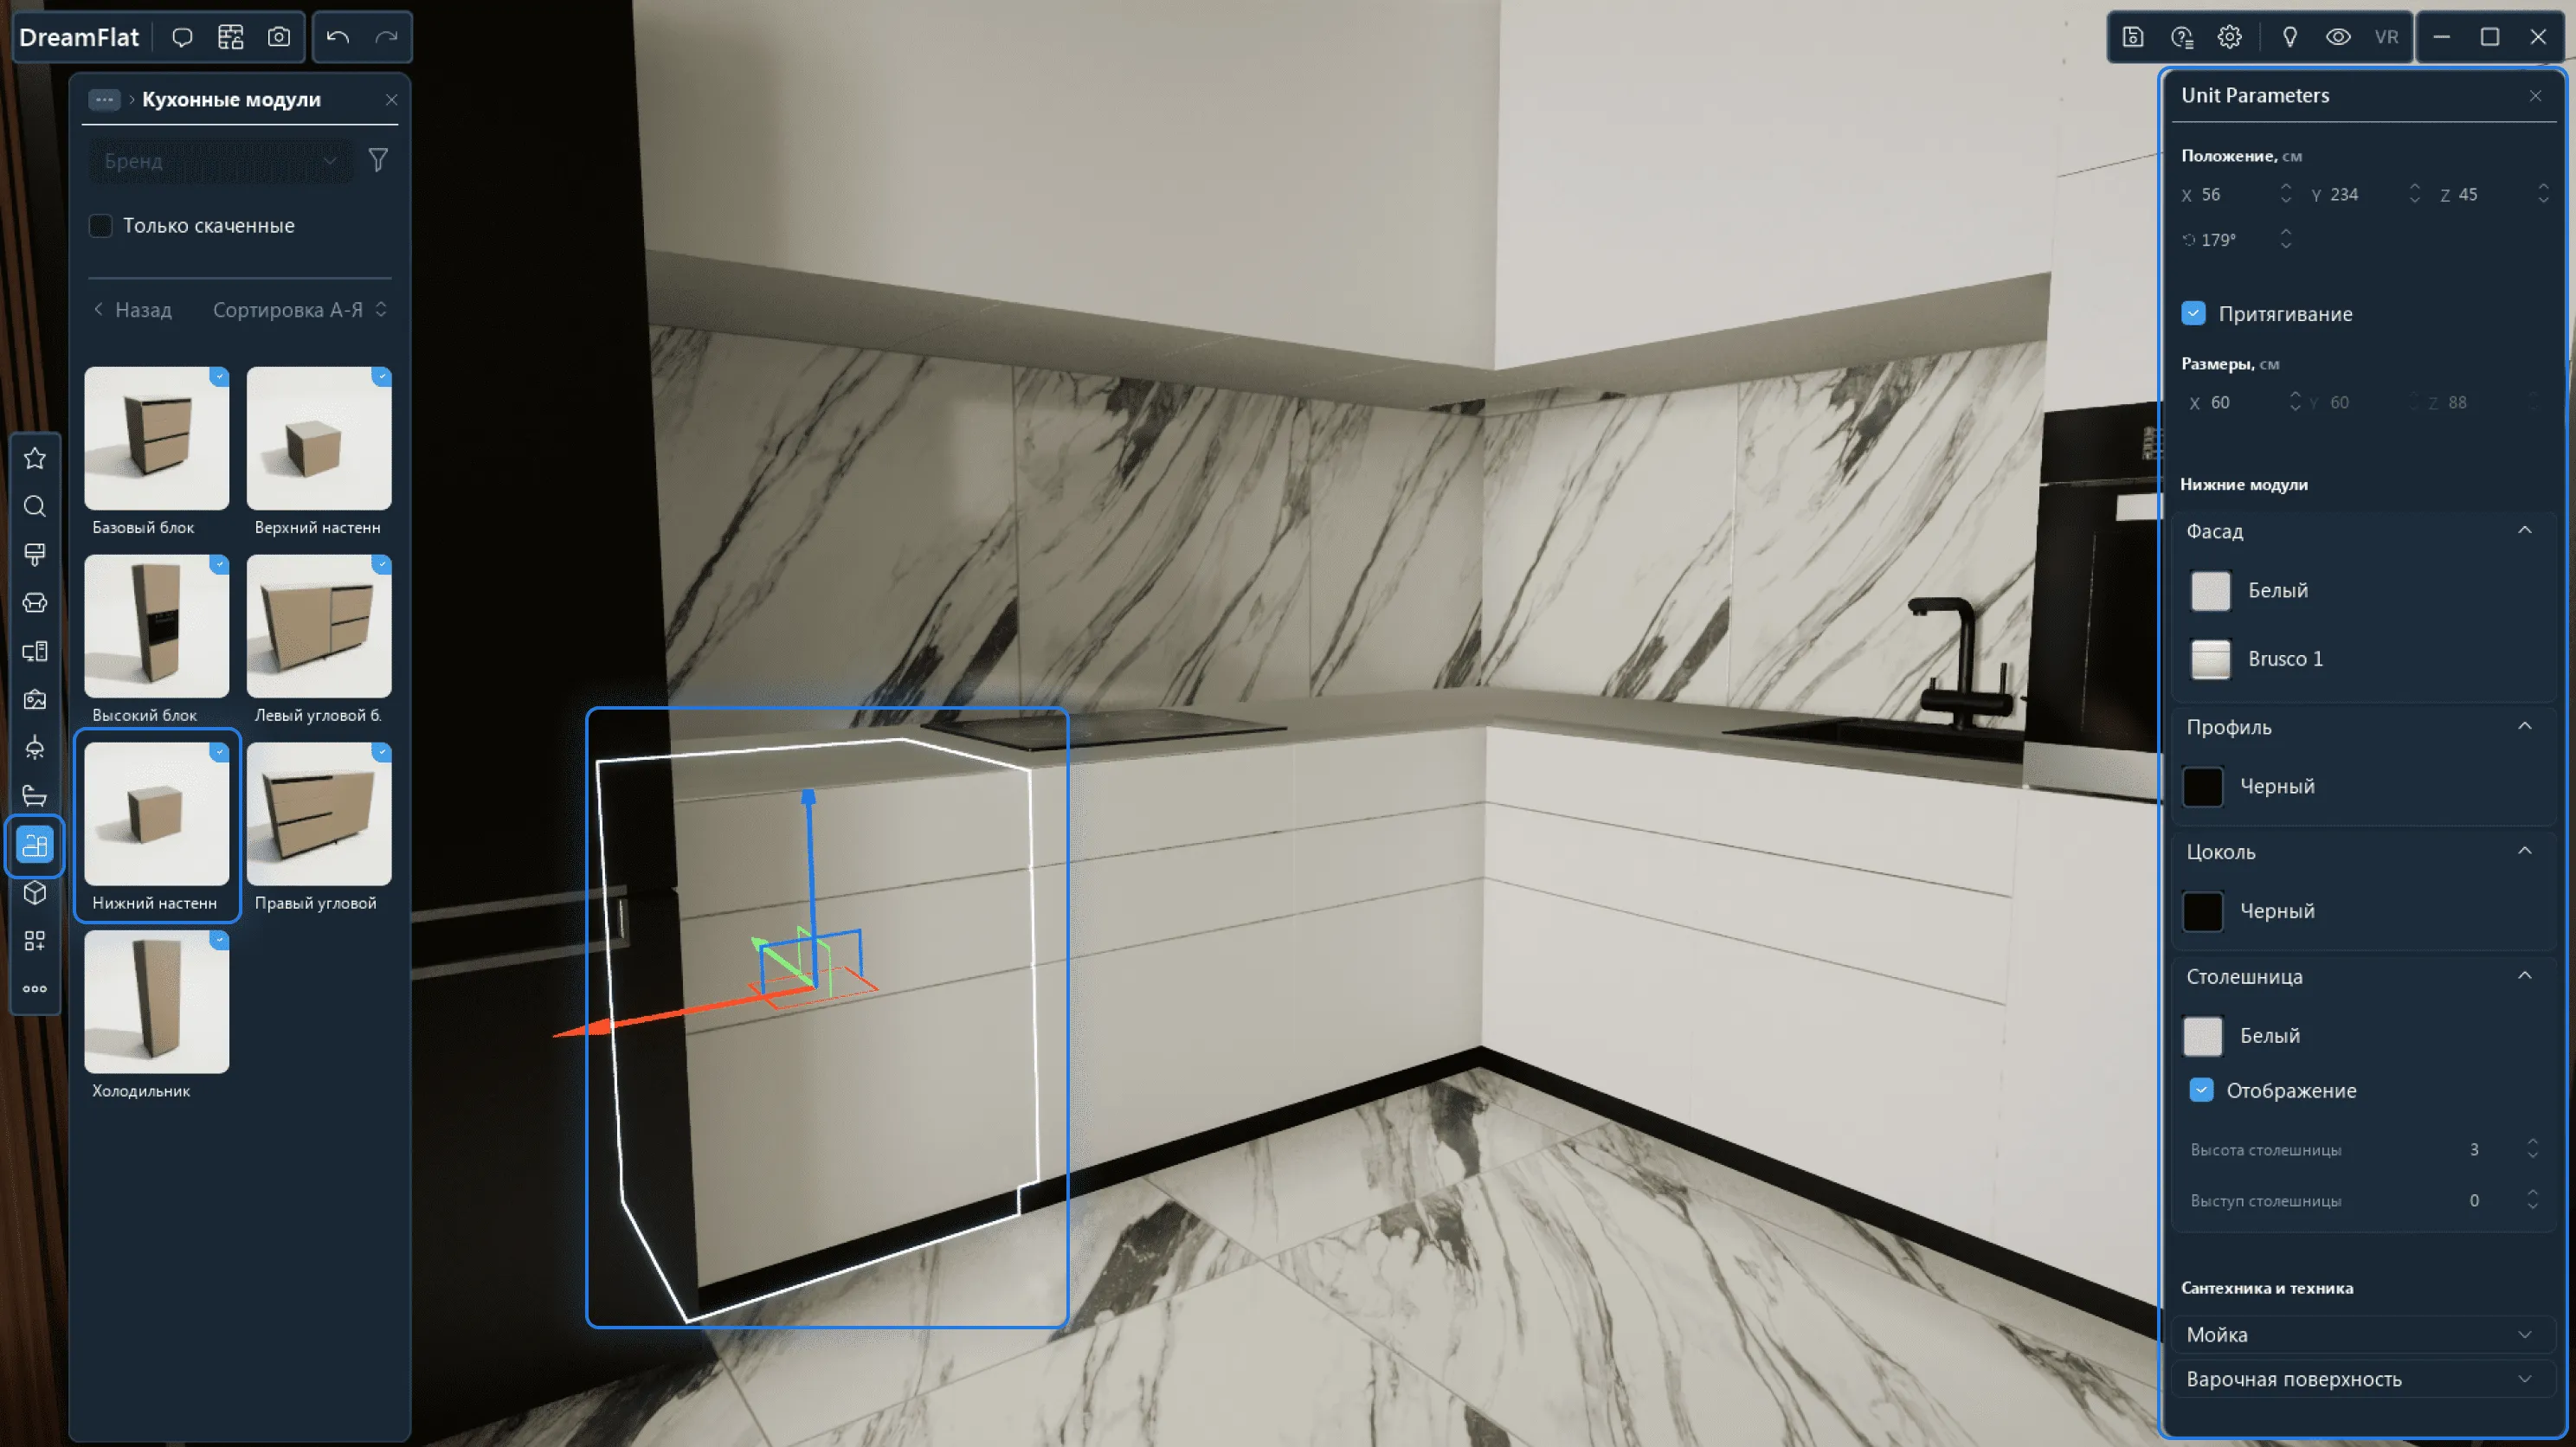
2.2. Bottom Modules.
1. You can adjust the colour and type of the front surface. To do this, click on the Colour/Type icon and assign colour/type.
The color will be applied to all the bottom modules.
The front surface type will only apply to the selected module. To apply one type to more than one module, click on the module → Hold down Ctrland select the other modules → Select the module type from the options.
2. Profile. You can customize the profile material. To do this, click on the Material icon and assign the material.
The selected colour will be applied to all the bottom modules.
3. Plinth. You can customize the plinth material. To do this, click on the Material icon and assign the material.
The selected colour will be applied to all the bottom modules.
4. Countertop. Here you can select the countertop material, hide/show the countertop, adjust the height and overhang of the countertop.
To select the material, click on the Material icon and assign the material.
Check/uncheck the Display box to hide/show the countertop.
To adjust the height and overhang of the countertop, enter your values.
5. Sink. Here you can select your wash basin and mixer. You can also check/uncheck the Displaybox to hide/show the sink.
6. You can select a cooking surface and hide/show it.
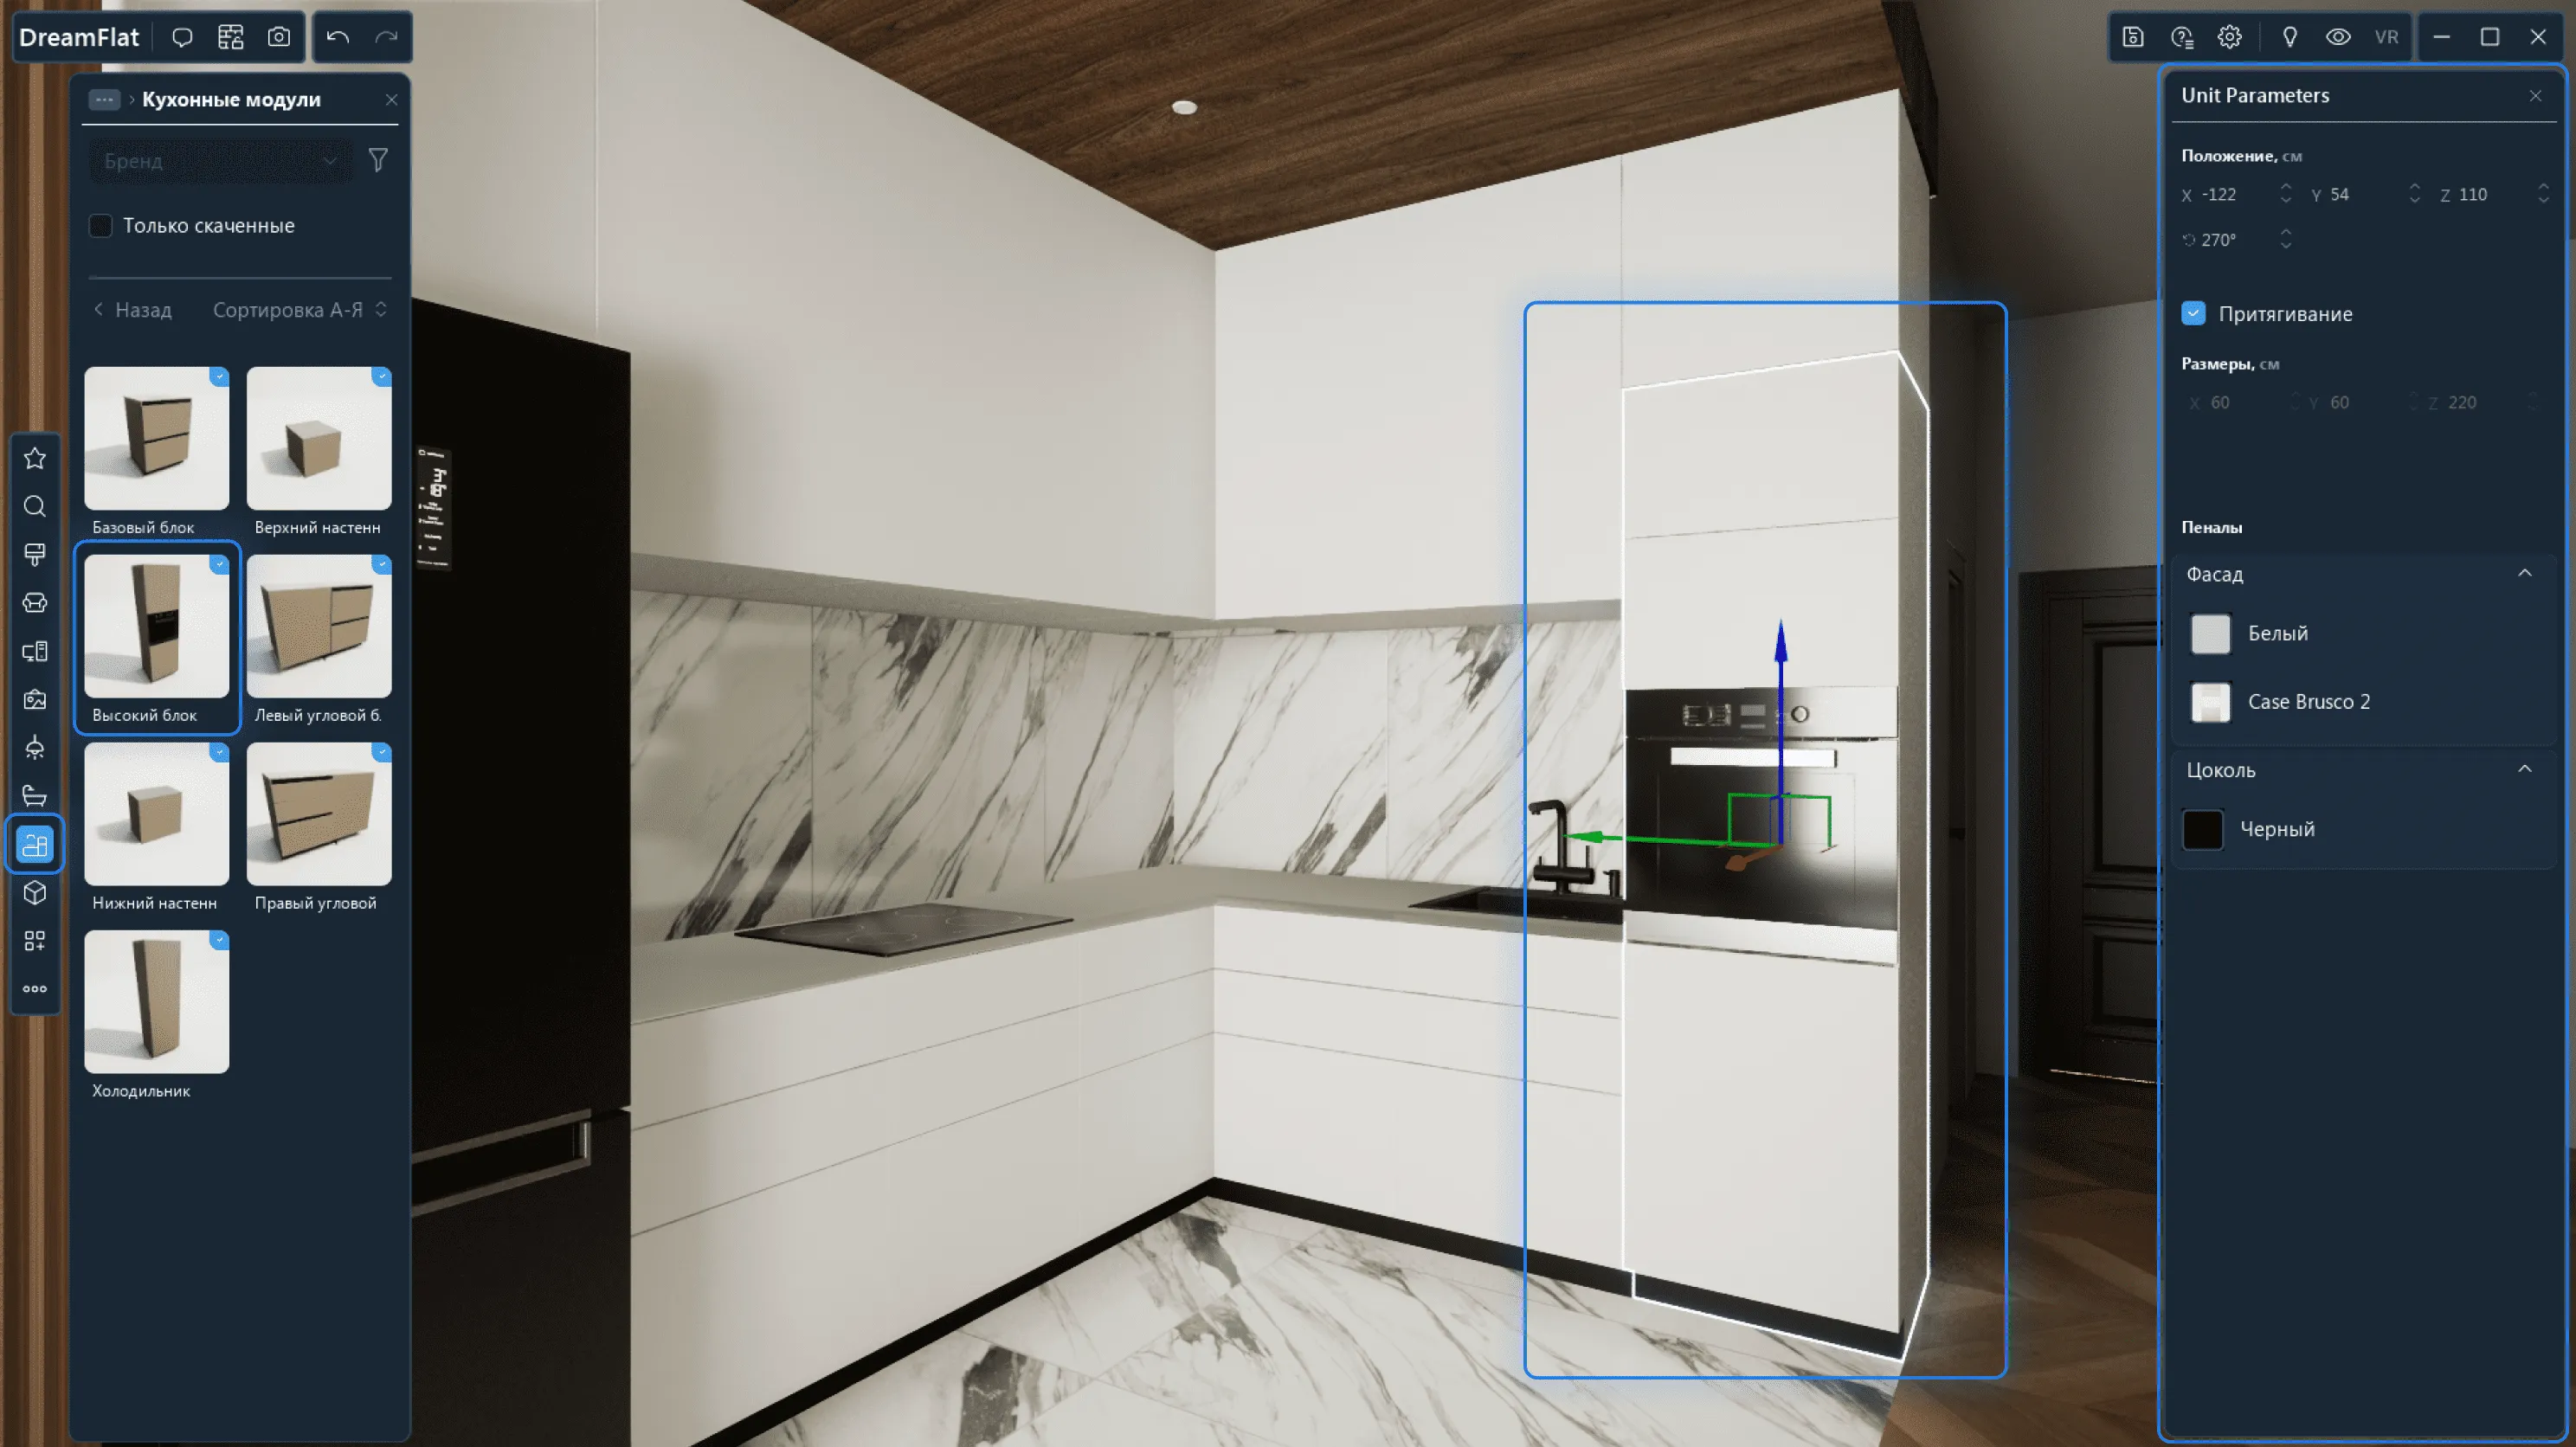
2.3. Tall Unit
1. You can adjust the colour and type of the front surface. To do this, click on the Colour/Type icon and assign colour/type.
2. Plinth. You can customize the plinth material. To do this, click on the Material icon and assign the material.
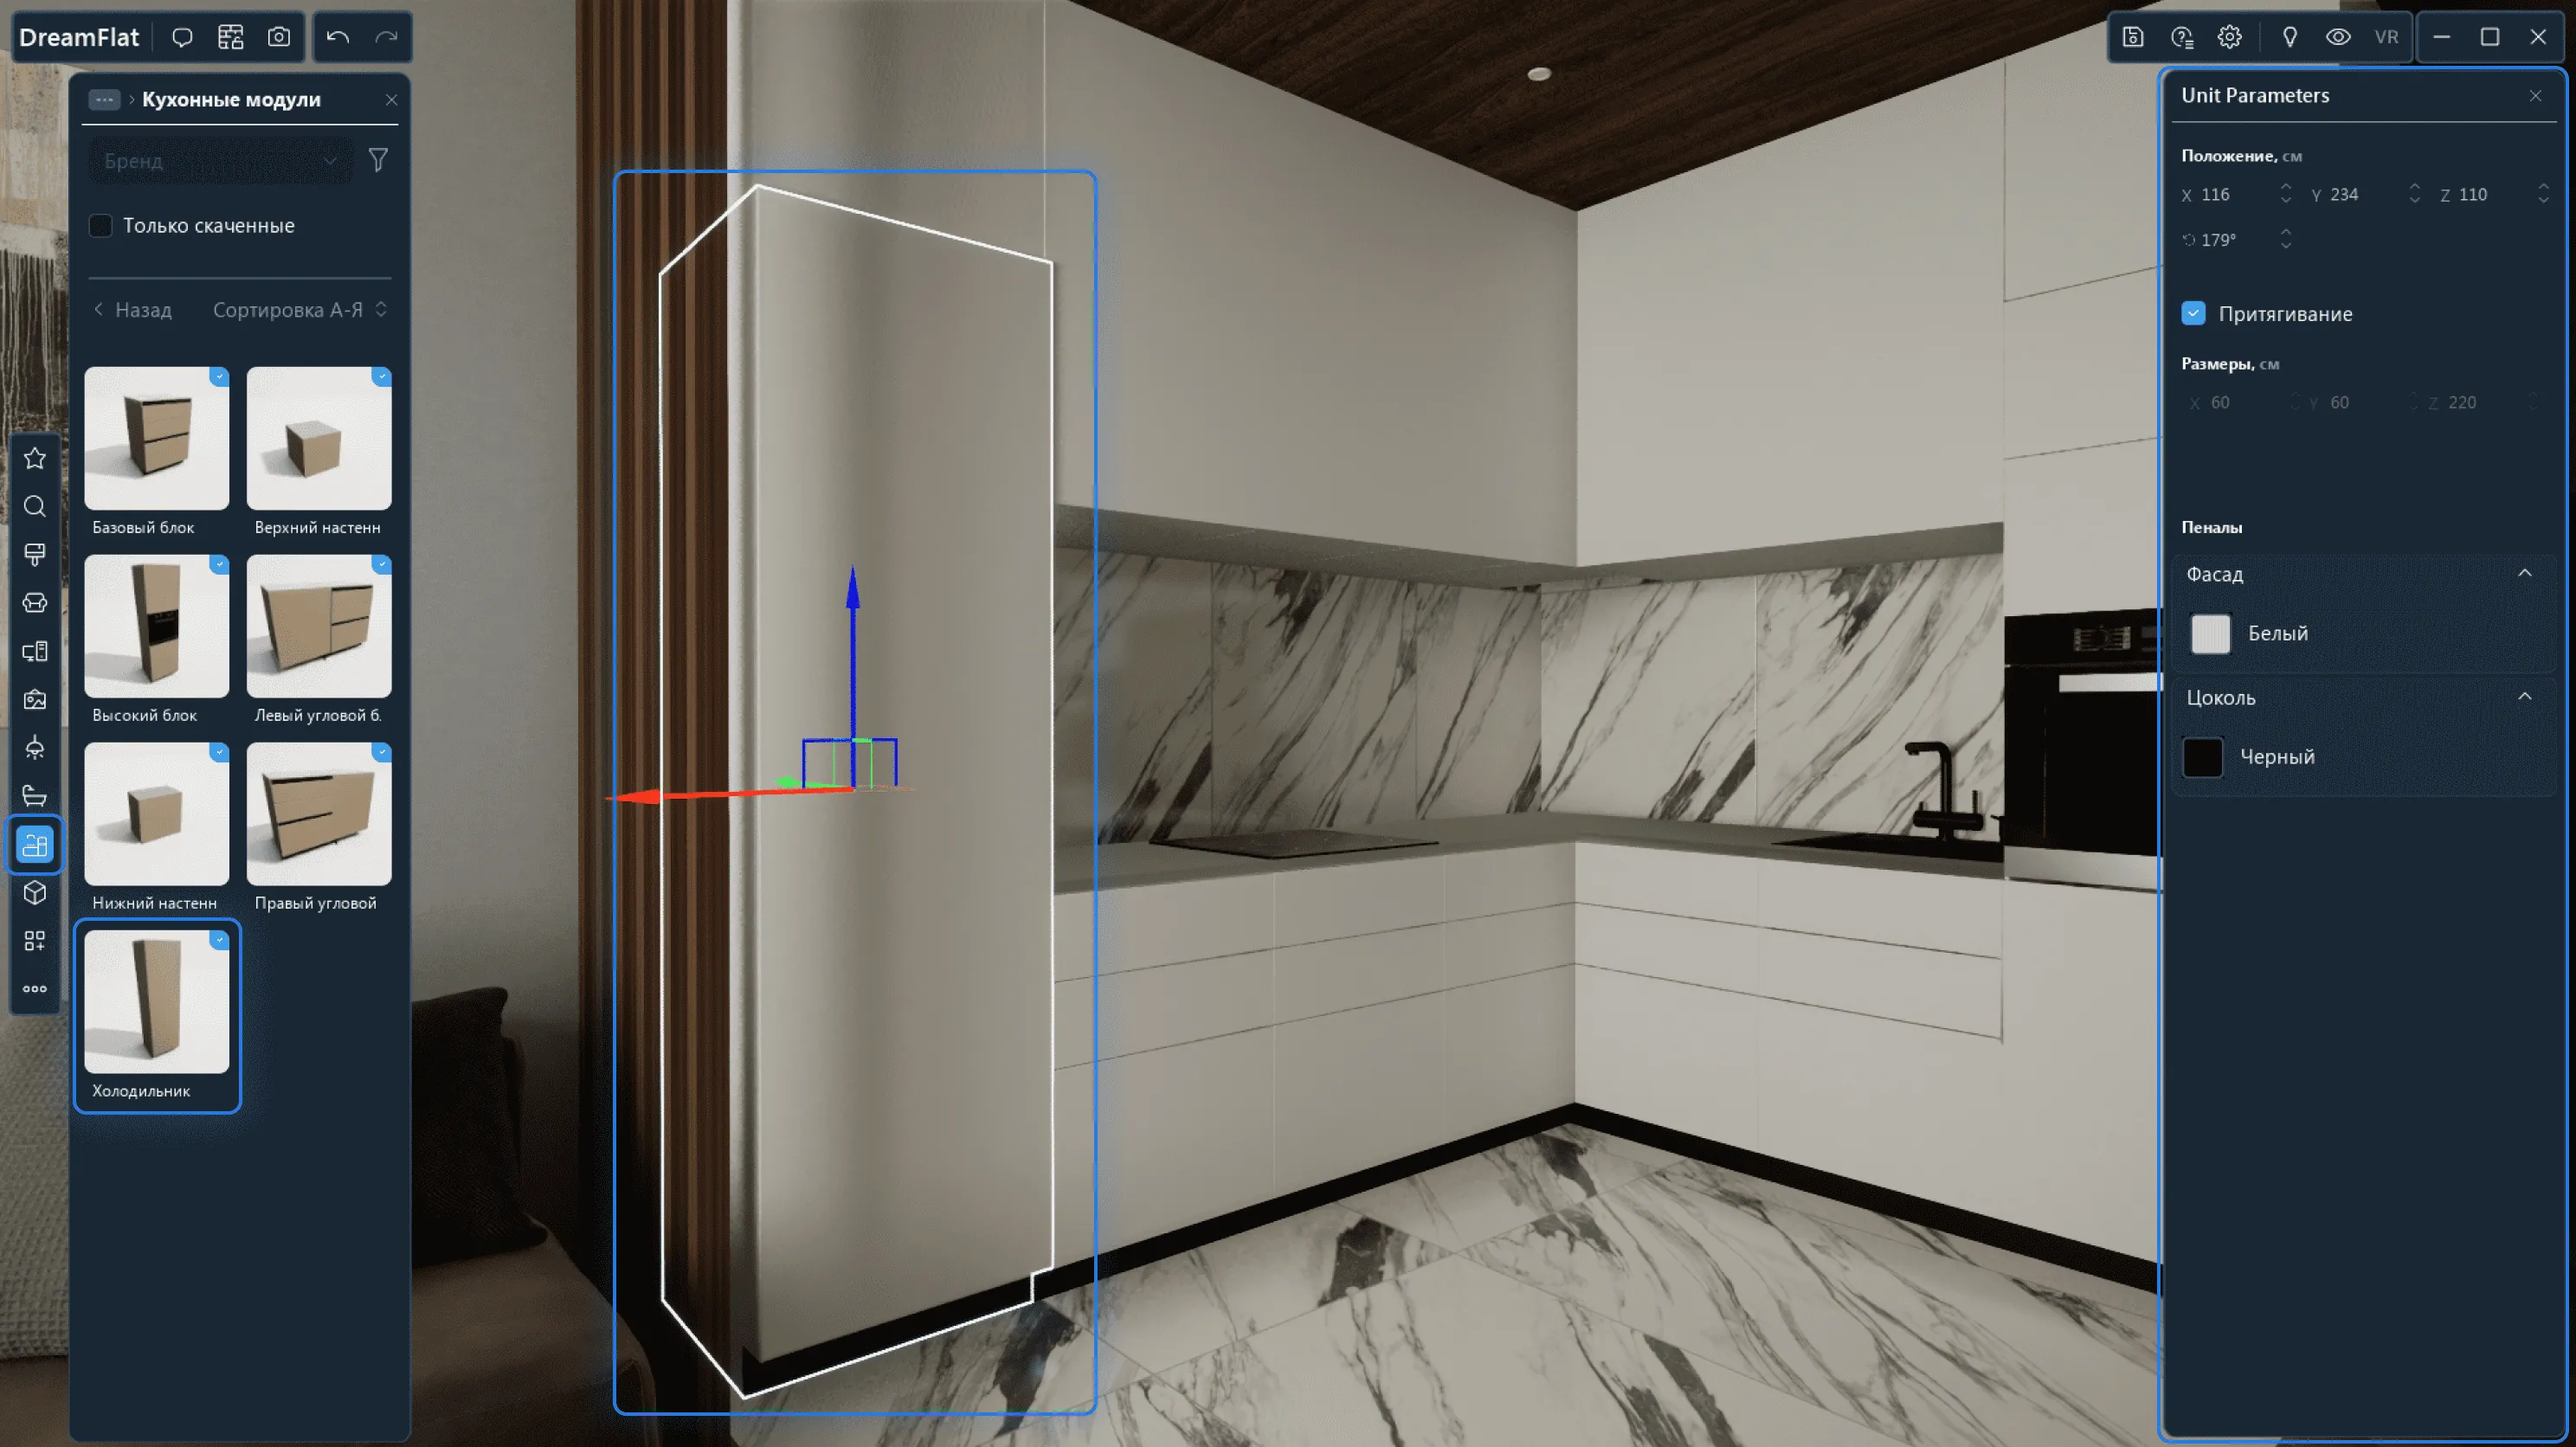
2.4. Fridge
1. You can adjust the colour and type of the front surface. To do this, click on the Colour/Type icon and assign colour/type.
2. Plinth. You can customize the plinth material. To do this, click on the Material icon and assign the material.
2.5. Upper Wall Modules
1. You can change the height of the upper wall modules within the scene using the relevant option.
2. You can also select the material/colour of the upper wall modules. These settings will apply to all linked modules.
2.6. Lower Wall Modules
1. You can change the height of the lower wall modules within the scene using the relevant option.
2. You can also select the material/colour of the lower wall modules. These settings will apply to all linked modules.
Primitives
Premium subscribers have access to primitives.
Primitives are sets of geometric shapes. You can use them to assemble interior elements: plinths, window sills, zoned rooms, and even furniture.
To use a primitive, first go to this section and drag the primitive onto the scene. The geometric primitive have the below options:
1. All the general options of scene models are available for the primitives: they can be moved, rotated, copied and pasted, grouped, auto-rotated, and deleted from the scene.
2. Changing the dimensions.
3. You can assign the material to a primitive. To do this, drag the material from the Library onto the primitive. All the options of scene material are available for the primitive materials: positioning and Pave function.
4. You can select the type of primitive. If you are going to make a primitive a part of a ceiling, activate Ceiling parameter to hide the primitive when switching to the layout top view.
There are also human figures available in the primitives section. You can drag them onto the scene to check the scale of the interior.
See the video tutorial below on using primitives.
Custom Objects
You can use pre-made kitchens or create your own using modules.
Designer+ subscribers have the option of uploading their own models and materials. This feature is useful for creating individual unique projects and expanding your own library.
You can also upload models with customizable elements. With this option, you can change sofa color or the legs material in few seconds.
Custom Model: Adding to the Scene and Modifying
1. Adding a model to a folder/without a folder
First, go to Custom Objects → Click Add Object below → in the pop-up window, select Model → Click Select →
For the Import Model dialog box, use the manual/parameters for adding model, set the name, select the model from your disk, set model sizes in centimeters, set an icon to display in the Object Browser, set the dimensions → Adjust the customizable elements of the model. Here you can select any color, terrain, gloss, metal, shadows, opacity, and glow for each element. → Click Add.
The uploaded model will appear in the Custom Objects.
Watch the video below on how to add your own model.
2. Modifying a Custom Model Added to the Scene
All the general options of scene objects are available for custom models: they can be moved, rotated, copied and pasted, grouped, auto-rotated, and deleted from the scene.
Additional functions available for models:
1. Auto Rotate This is a model function available from its Options menu that allows you to automatically place the model along the wall. Auto Rotate is enabled by default. To place the model at an angle to the wall, turn off Auto Rotatein the Options.
You can only change the dimensions and customisable elements of the model after uploading and configuring a copy by adding the same object once again.
Custom Material: Adding to the Scene and Modifying
1. Adding Material
Your own materials can be added to the Library the same way as models.
First, go to Custom Objects → Click Add Object below → in the pop-up window, select Material → Click Select →
For the Import Material dialog box, use the manual/parameters for adding material, set the name, select the material from your disk, adjust an icon to display in the Object Browser → Customize the material options. Here you can select any colour, surface relief, gloss, metal, shadows, opacity, and glow for the material. → Click Add.
The uploaded material will appear in the Custom Objects.
Watch the video below on how to add your own material.
2. Modifying a Custom Material Added to the Scene
All the general options of scene materials are available for custom materials: material positioning and Tile function.
Doors and Windows
Doors
You can also add doors directly from the DreamFlat catalog. To do this, you need to select the appropriate category in the library and drag the element you need onto the stage.
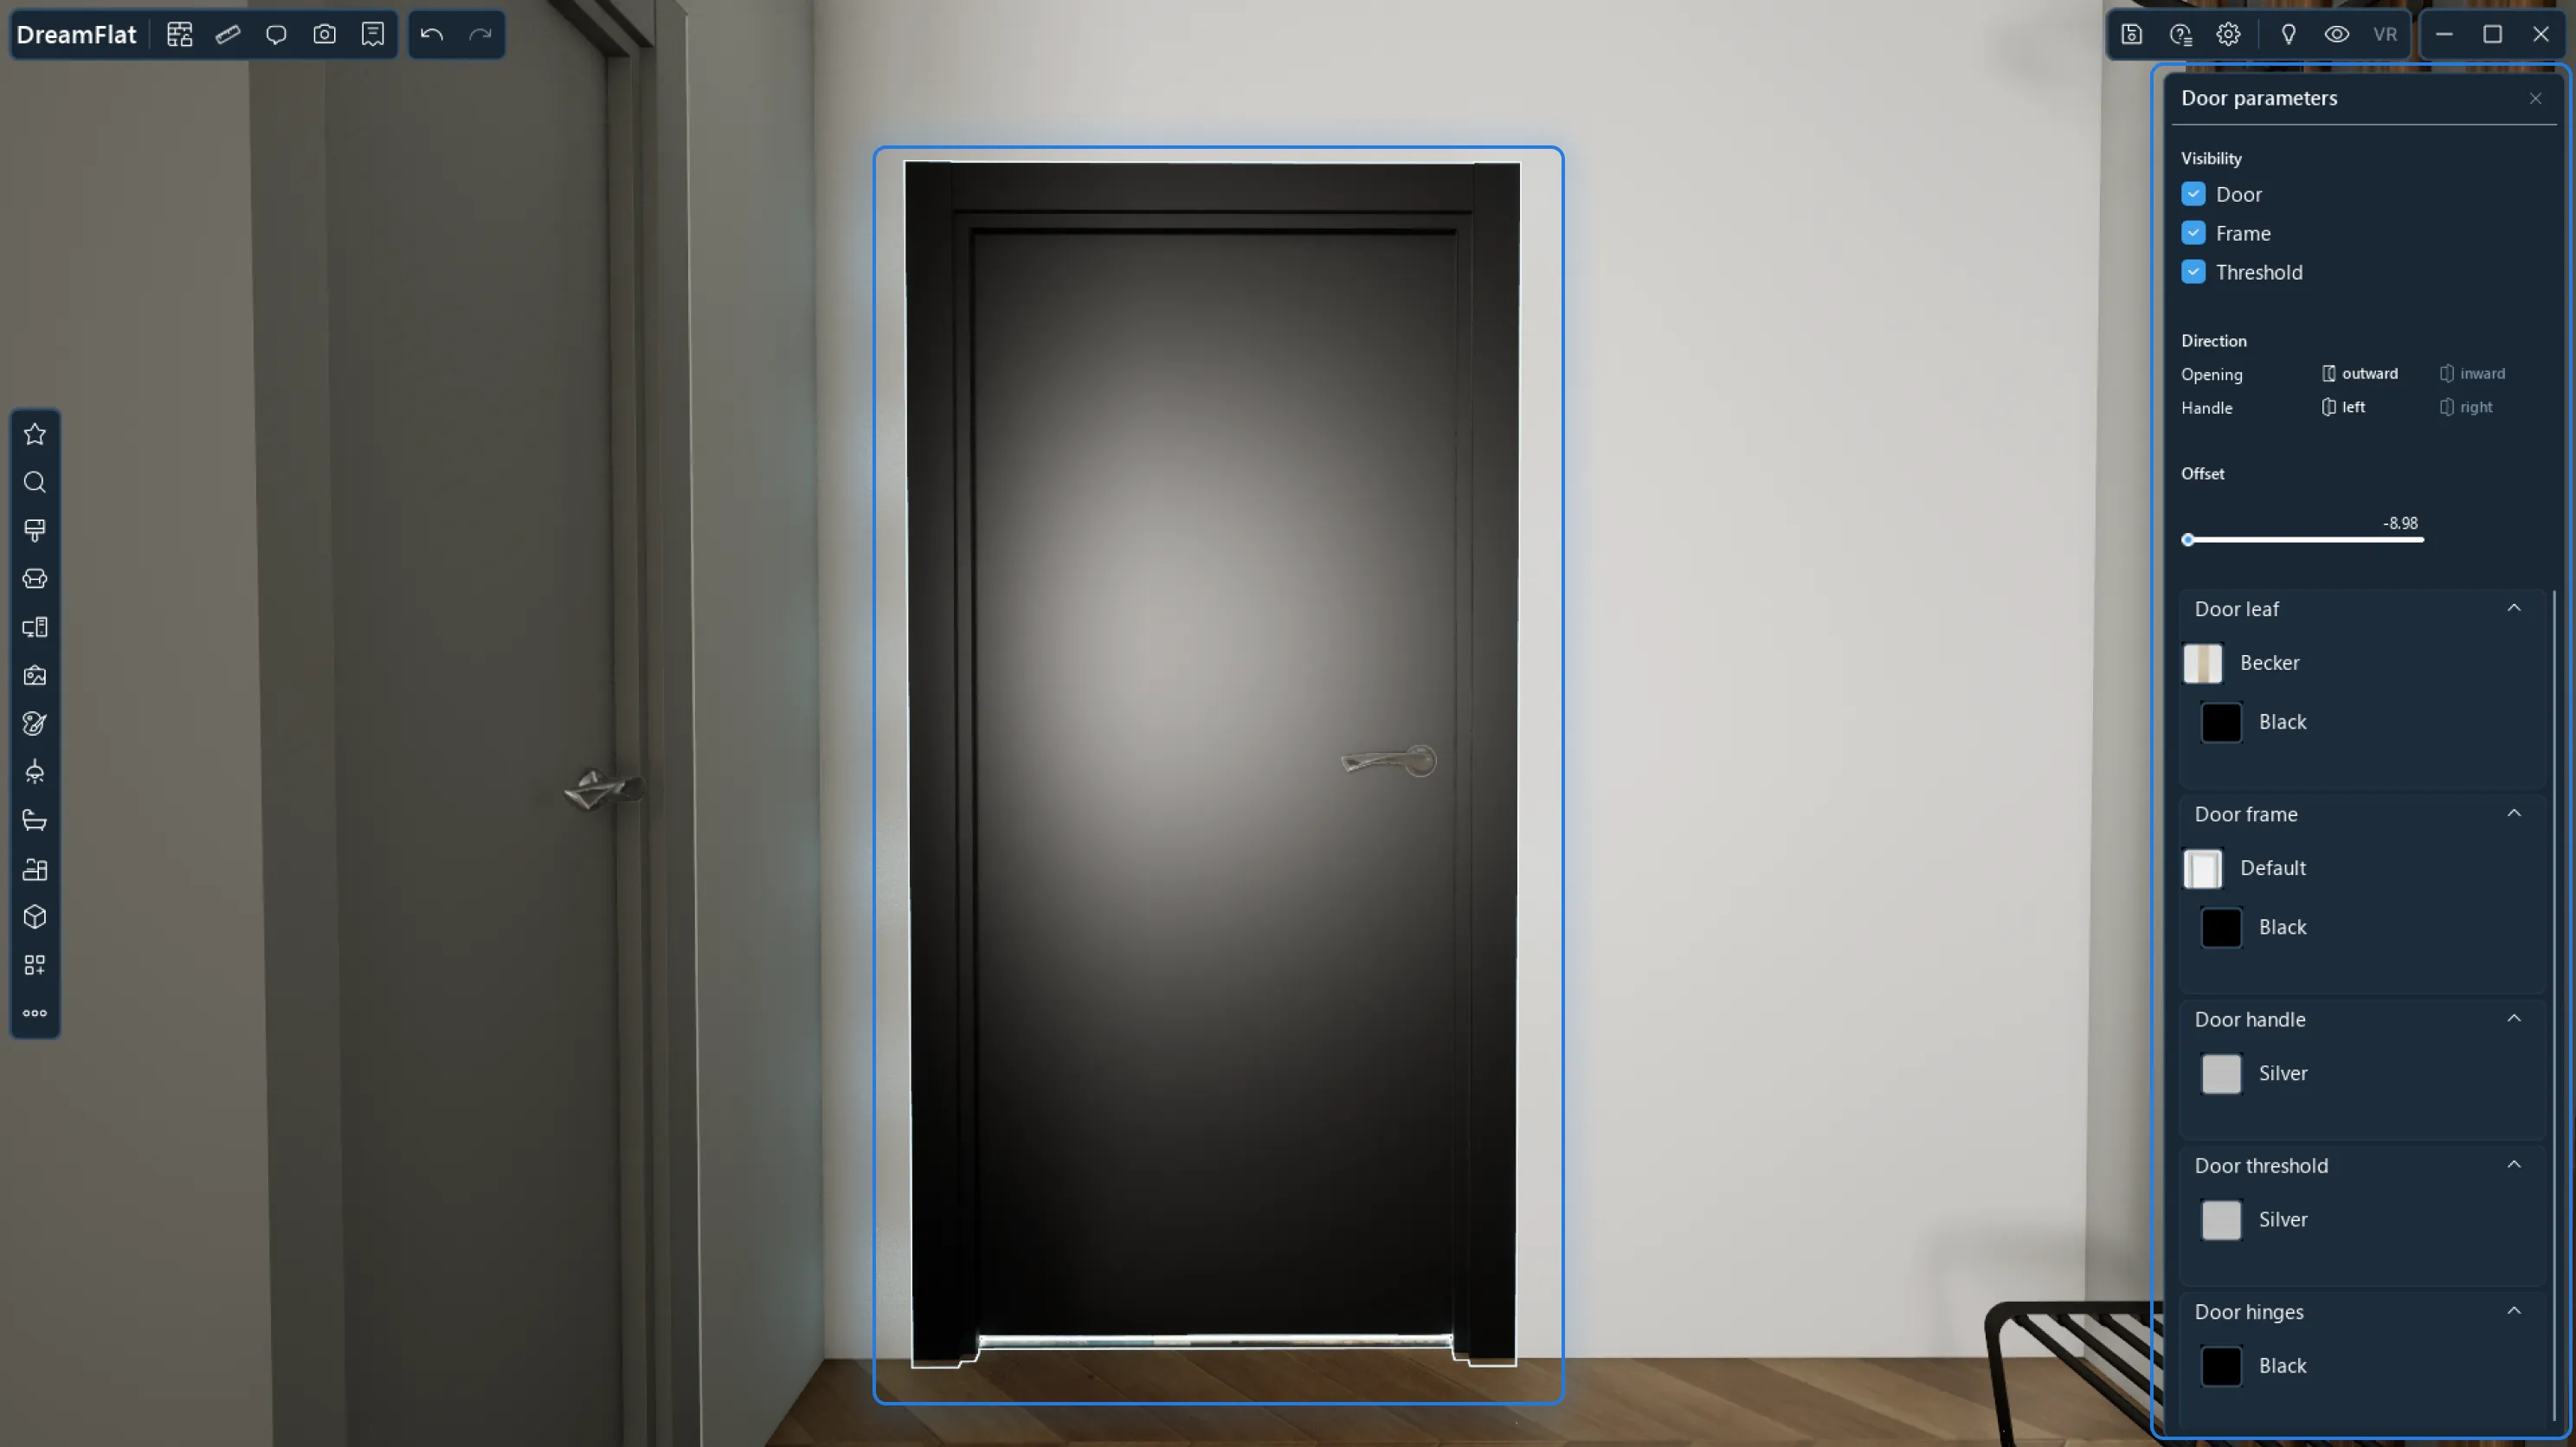
To modify a door, first, click on the door.
You can set the following parameters for doors.
1) Display doors, frames and doorsteps. Use this option if you want to delete a door, leaving an opening connecting the rooms;
2) Direction of Door Opening and Handle Position: push/pull, left side/right side;
3) Offset;
4) Color and material settings of the door panel, frame, handle, doorstep and hinges.
You can also edit multiple doors at the same time. To do this, hold down the Ctrl key, select all the necessary doors and edit them on the right in the Parameters.
Windows
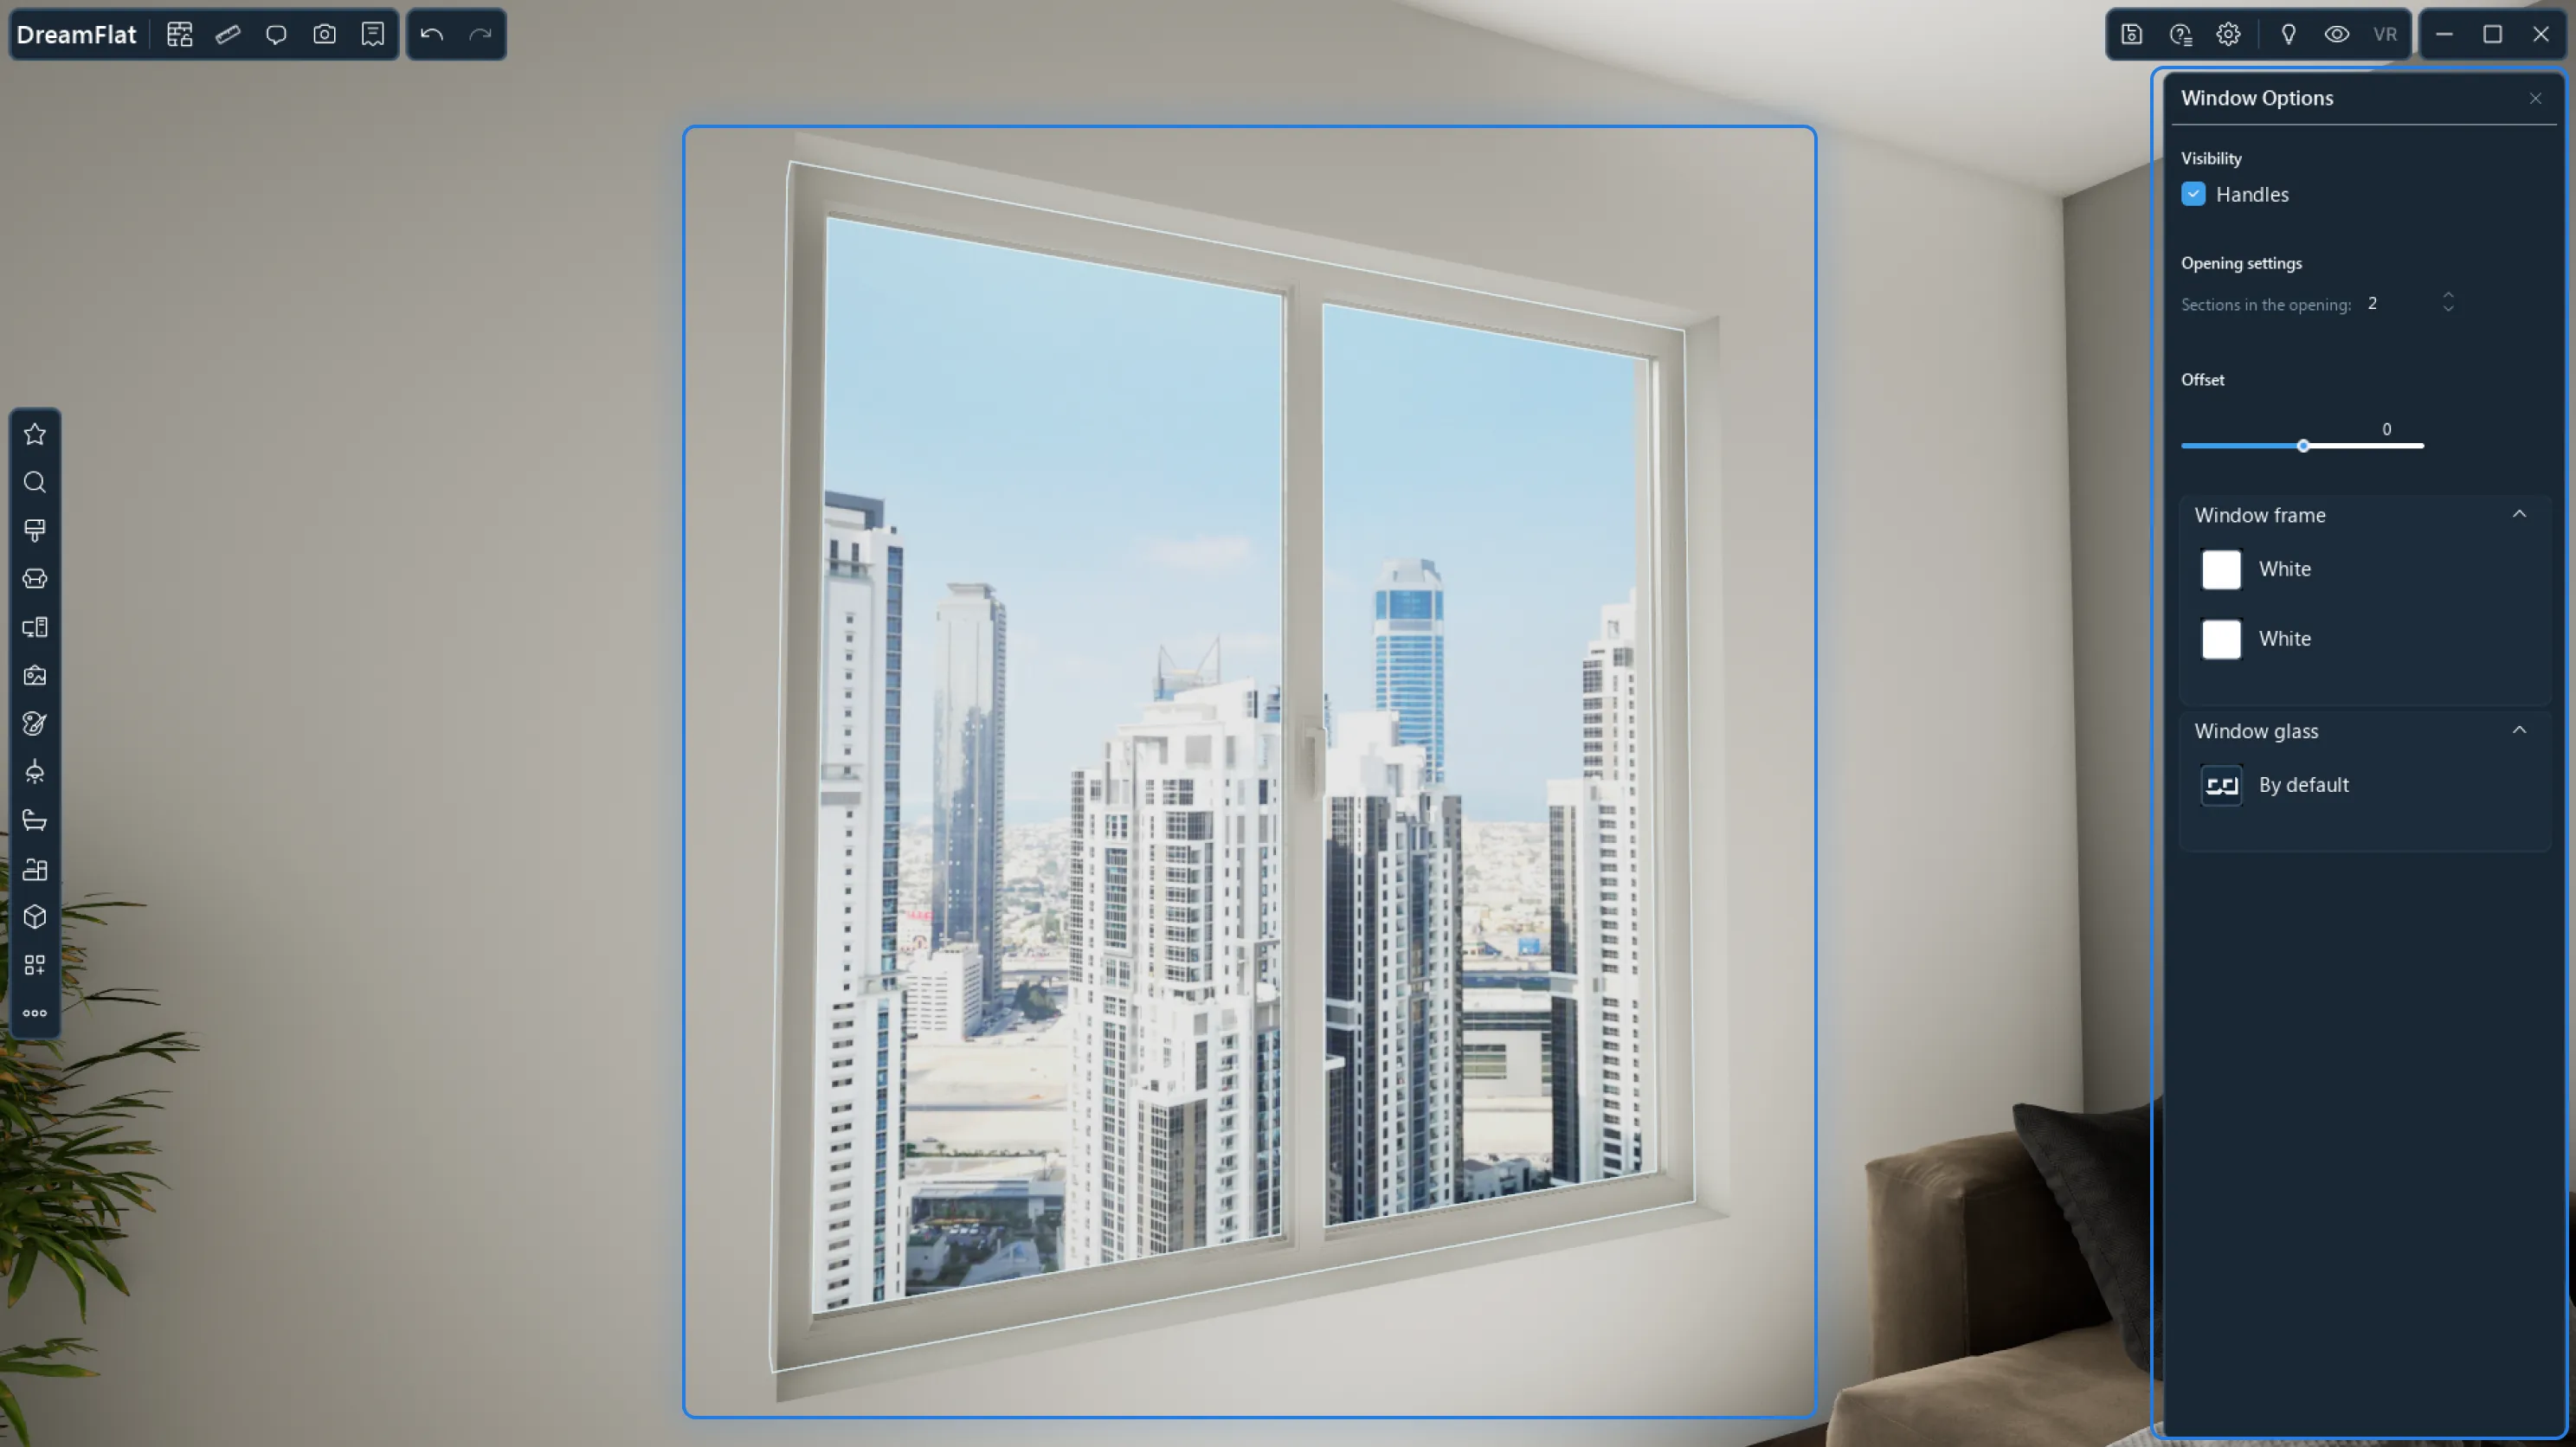
To modify a window, first, click on the window.
You can set the following parameters for windows.
1) Displayed Handles;
2) Number of Opening Sections;
3) Offset;
4) Window frame and glass settings.
You can also edit multiple windows at the same time. To do this, hold down the Ctrl key, highlight all the necessary windows and edit them on the right in the Parameters.
Right Object Browser
Working with objects
Working with objects
To work with objects, you can use settings from the following groups:
“Object parameters” includes all standard settings that relate to working with it and moving it.
“Customization”. If necessary, open object customization settings, such as the color of object materials. To do this, click on the corresponding icon on the right side of the screen - and on the same button if you want to hide these parameters.
Skirting boards
There are two ways to add a plinth to your design:
Double-click the left mouse button on the wall. “Wall Customization” will open on the right side of the screen, where you can select the element you need, as well as adjust the distance from the floor, color and material.
You can also add a plinth from the object browser. In this case, in a similar way, in addition to the standard furniture parameters, you will also have the opportunity to configure customization parameters.
Loading datasmith scenes
Import entire scenes into DreamFlat in .udatasmith format from popular programs such as Autodesk 3DS Max, SketchUp Pro, Autodesk Revit, Autodesk Navisworks, Rhino, Graphisoft ArchiCAD and SolidWorks. The download process is very simple:
1) Download the plugin from the official Unreal Engine website for your program.
2) The plugin itself will determine the version of your program and the installation path.
3) After installation, select the .udatasmith format from the export menu.
4) Open DreamFlat, while in the "My Projects" tab, click "Open Datasmith" and provide the file path to start downloading.
Saving and reopening a project
Saving the design.
To save your interior design, select Save Project from the menu → Name your project → Click Save.
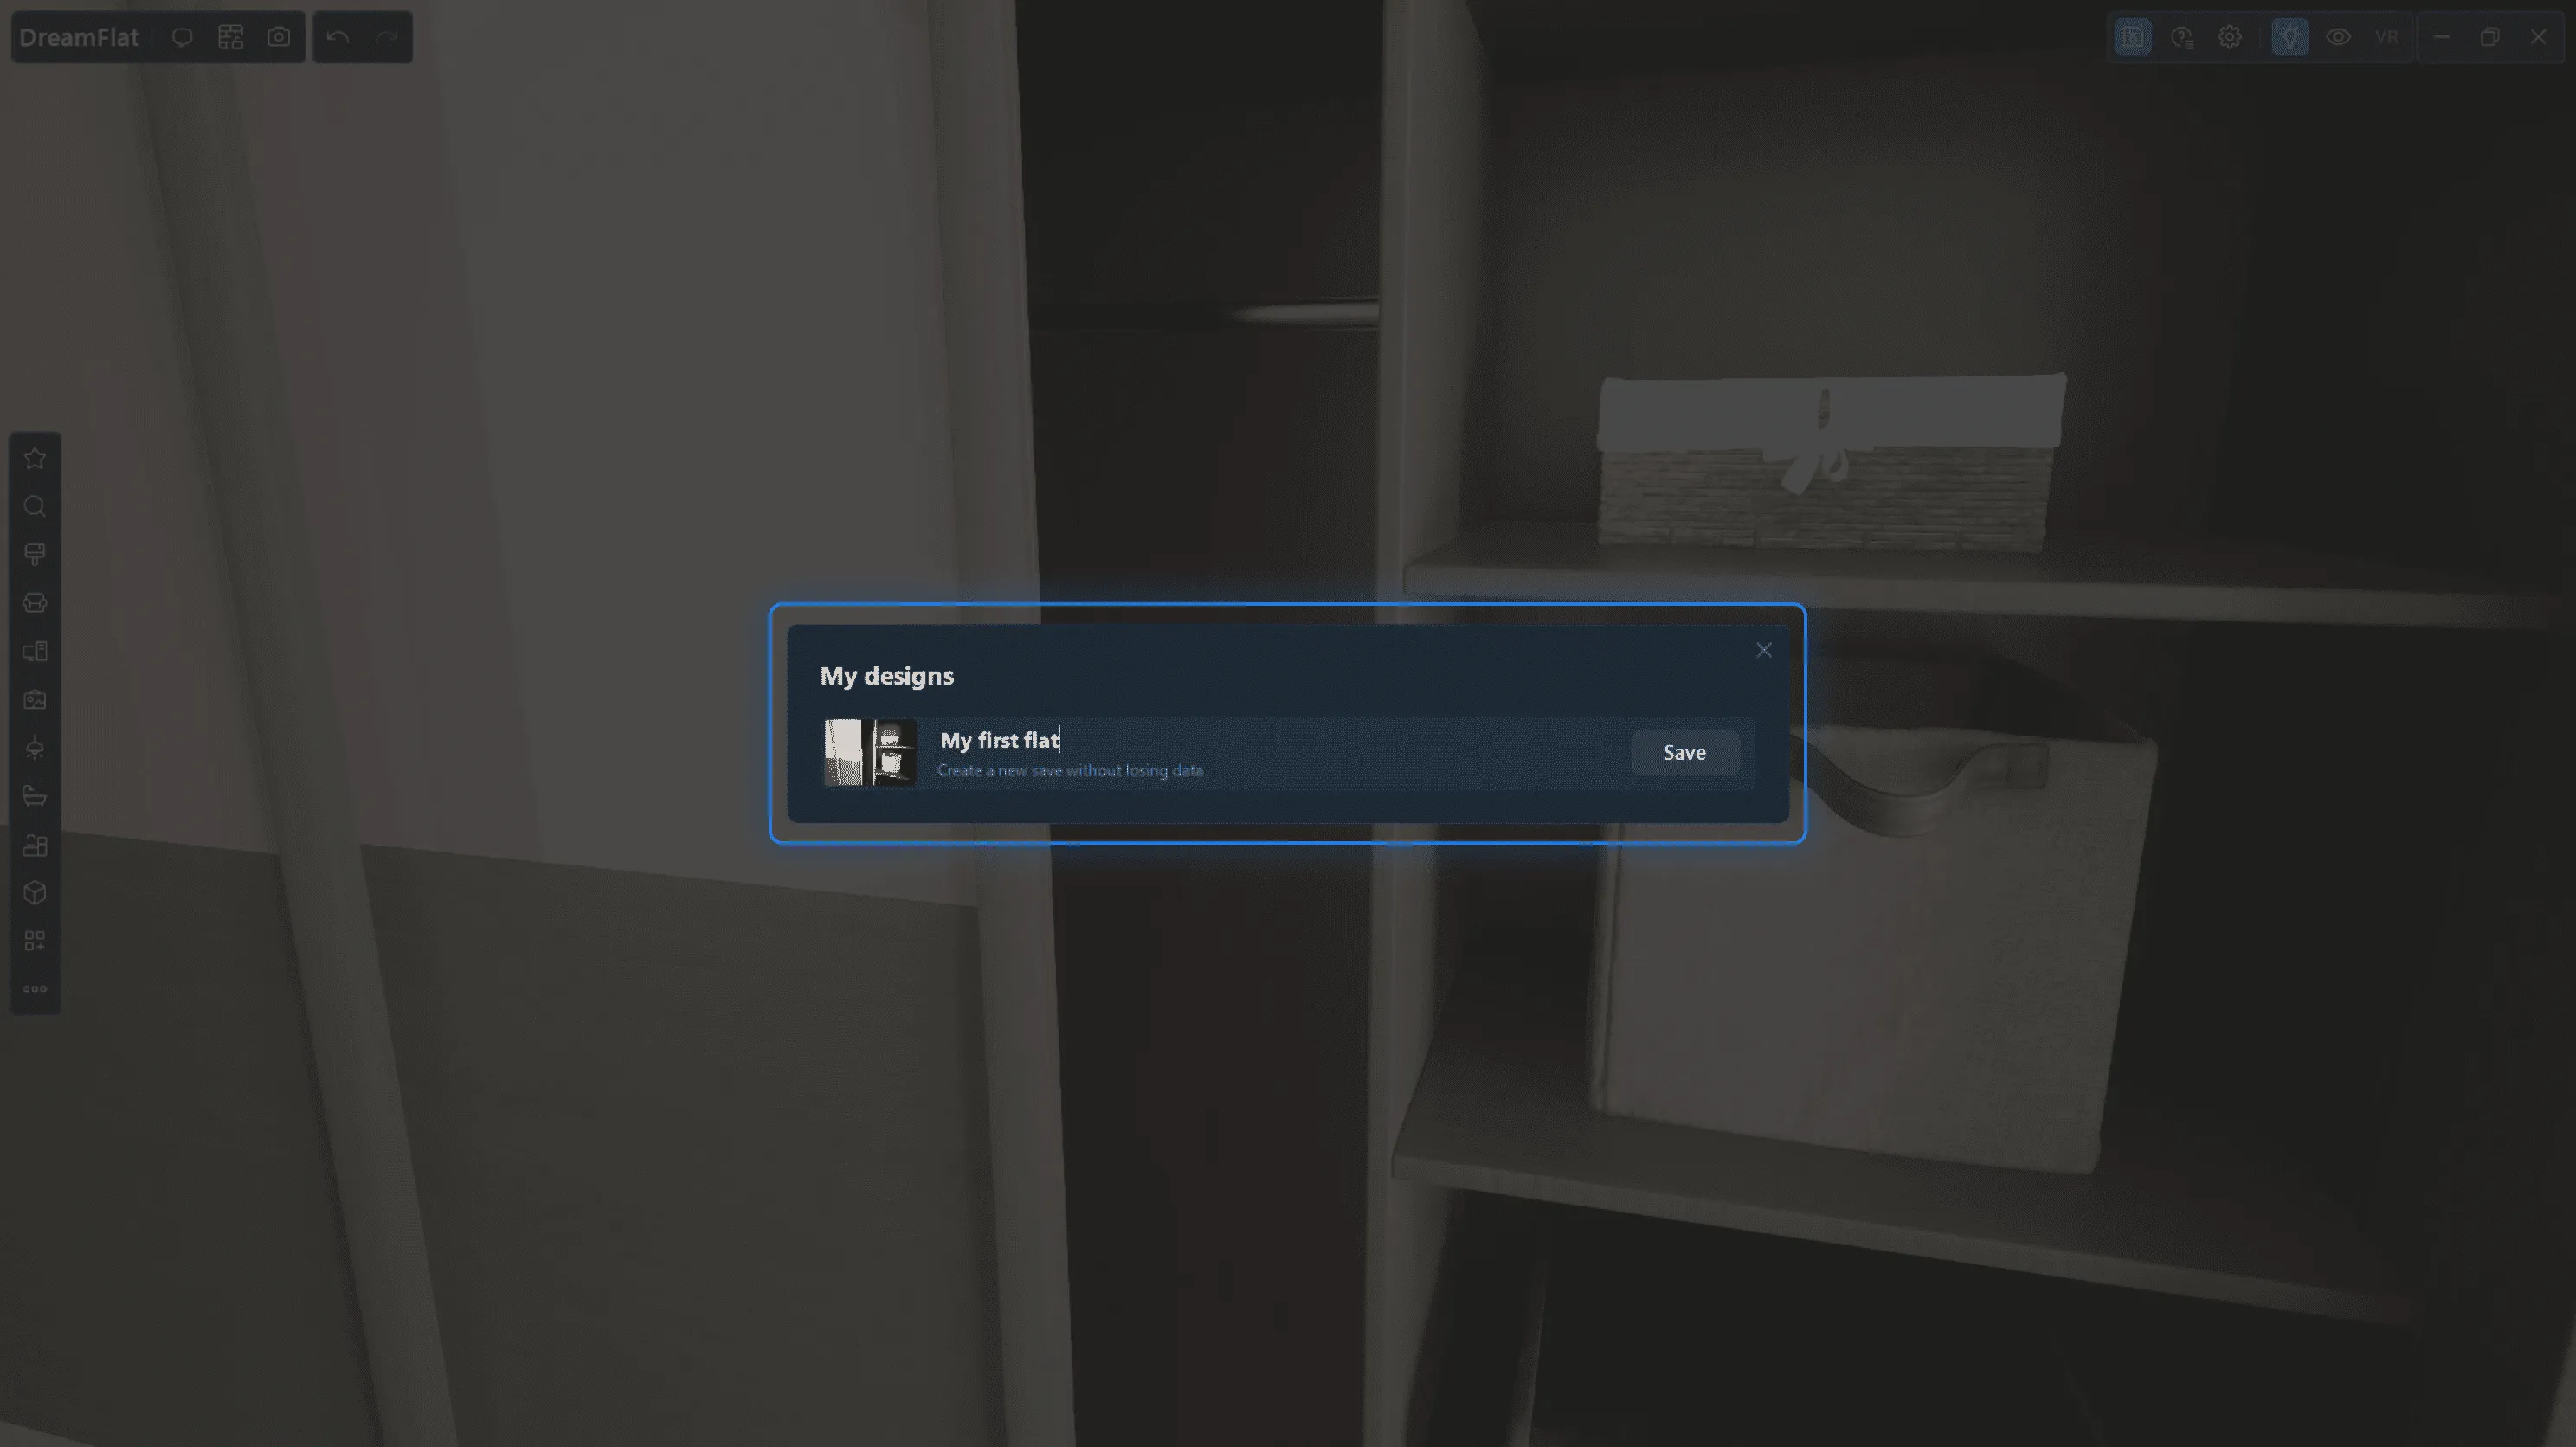
If you have a stable Internet connection, the design will be saved automatically in My Projects → *Your Project Name* → Design Options → Autosave.
If you have edited a design that you created earlier, there are two options for saving it:
1. To save the current design and replace the previous version, select the design you want to replace in the My Projects modal dialog box and click Save. Then your previous design will be deleted.
2. To save the current design as a new project (the previous design version will remain unchanged and will be available in My Projects → *Your Project Name* → Design Versions), in the My Projects modal dialog box click on Save as New Project and name the project.
Replacing the Design Version in a Scene
You can quickly switch between created designs right in the interior design mode. To do this, click on the "Save Project" icon in the menu → Select the version of the design you want to upload to the stage → Click "Upload".
If you want to save the current version of the design in My Projects, but replace the current scene with a previously saved version, you must first save the current design using the guidance provided above, otherwise it will be lost.
Re-Opening a Design
To continue working on a saved design, find the desired design in My Projects → Click Design Versions → Click Open Design

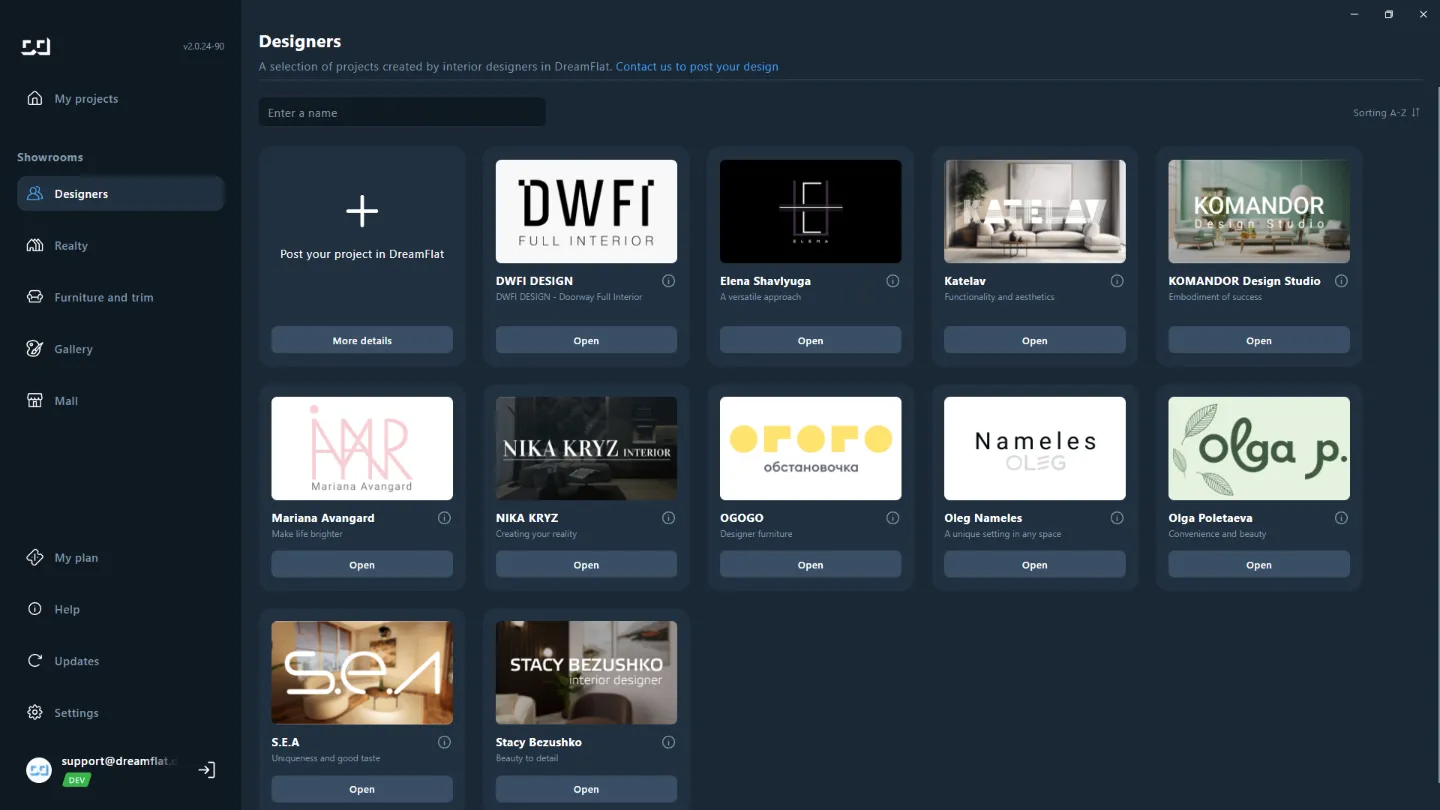
Publication of works in the public domain
In DreamFlat, all users can publish their works in the public domain. You can not only view the designs of other users, but also send a request to host your own project, which can be seen by everyone who works in the program. To do this, in the “Designers” section, click on “+” (“Publish your project in DreamFlat”)